Chapter 1 - Getting Started
From PhotoGrav 3.0
 |
|
|
1.0 Using this Document
This document has two objectives: (1) To acquaint you with PhotoGrav so you can
be productively using the program as rapidly as possible and (2) To serve as a
complete reference source for all of PhotoGrav's components and operational
characteristics.
To satisfy the first objective, chapters 1 and 2 have been written to present
essential information and concepts in as concise a manner as possible. Chapter 1
provides the information necessary to install PhotoGrav and to begin using it
almost immediately. A series of logically-connected scenarios, with screen
shots, provides immediate hands-on experience and should give you a good idea of
PhotoGrav's basic operational characteristics. Chapter 2 presents an overview of
the flow of events within PhotoGrav, discusses some basic PhotoGrav concepts and
rationale, and presents a summary of important information that you should know
about the program.
The remainder of the chapters, especially chapters 3 and 4, provides a detailed
reference source for all of PhotoGrav's features. Chapters 3 and 4 present
detailed descriptions of PhotoGrav's Primary and Support windows, respectively.
Chapter 5 describes how to use the program's Help capability and Chapter 6
explains what to do if you have any difficulties in using PhotoGrav. The
Appendices present supplemental information in specialized areas.
At a minimum, after installing the program, you should read Sec. 1.4 and step
through the scenario presented in that section. You should also definitely read
Sec. 2.3, Important PhotoGrav Information. Preferably, to really understand and
fully use PhotoGrav's extensive capabilities, you should read Chapters 1 and 2
in their entirety.
1.1 System Requirements
To use PhotoGrav, you need the following hardware and software:
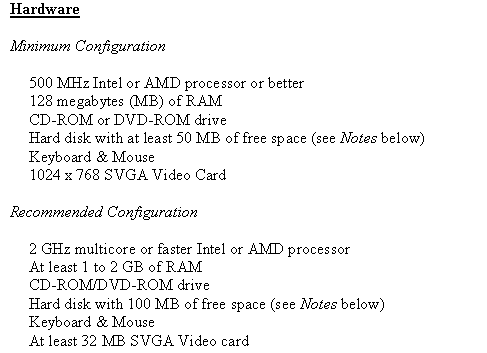
Notes on Hardware Requirements:
PhotoGrav itself requires less than 30 MB of hard disk space for program and
data files. However, several temporary disk files are created during PhotoGrav
execution on the disk where you installed PhotoGrav. These files are used as
temporary storage for some of the images which are generated during execution.
The sizes of these temporary files are proportional to the size of the digitized
photo which is to be engraved and thus the required hard disk space is a “soft”
number which depends on your operational scenario. All PhotoGrav temporary files
are deleted when PhotoGrav terminates execution.
1.2 Preliminaries
PhotoGrav requires that your computer monitor be set up to display a pixel depth
of at least 32 bits per pixel. It is also desirable that the display resolution
(desktop area) be set to at least 1024 x 768, but it is recommended to be set at
a larger size.
1.3 Installation / Setup
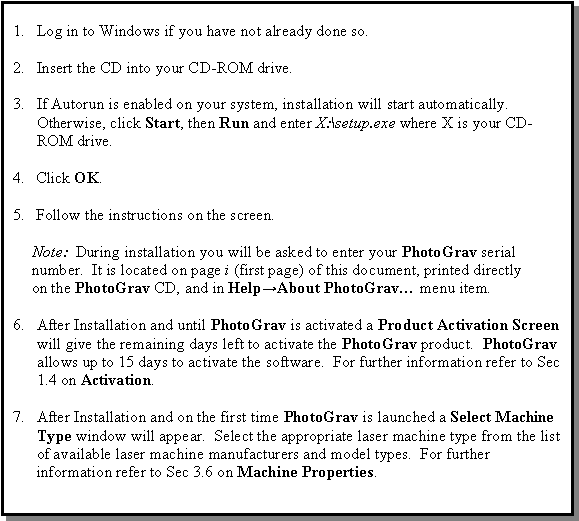
The installation process will create an icon for PhotoGrav and place that on
your desktop as a shortcut and will also create a new Program Group under
"PhotoGrav". In all cases, the installation process will also create an Uninstall
icon that allows you to easily remove PhotoGrav from your system. You may
also use the “Add/Remove Programs” capability in the Control
Panel to uninstall the program.
1.4 PhotoGrav Activation System and Licensing
When PhotoGrav is launched it checks to see if the software has been activated
and authenticated for full use. PhotoGrav will permit full usage with an
activation reminder up to 15 days from initial installation in order to give
adequate time for the user to activate the software. No registration is required
to activate the software and no personal information is transmitted across the
internet.
PhotoGrav Licensing and Activation System permits activations on two separate
computer machines and reactivation as many times as needed. This policy allows
PhotoGrav to be installed on any combination of two computers such as
office/laptop, home/office, machine/office, etc.
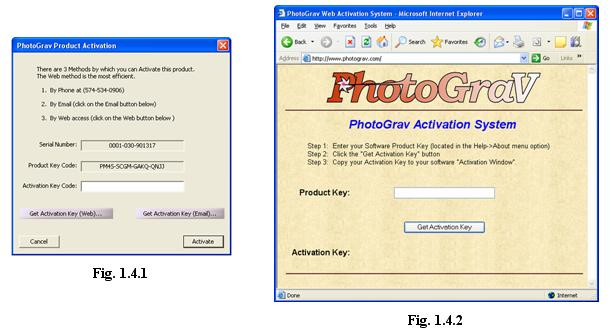
There are four different methods of activation provided to conveniently assist
in activating the PhotoGrav software product. These four methods of activation
are via the Web, Email, Postal Mail, and Phone (see Fig. 1.4.1). The quickest
method to activate the PhotoGrav software, assuming efficient internet
capabilities, is to use the online PhotoGrav Activation System (see Fig. 1.4.2).
To activate the software and display the activation screen in Fig 1.4.1, open
PhotoGrav and click Help→Activate PhotoGrav on the main menu bar. If an active
internet connection is available then it is suggested to click the Get
Activation Key (Web)… button for the quickest way to activate the software. If
you prefer to use email then simply click on the Get Activation Key (Email)…
button and on most computers your default email client will pop up and be filled
in with the appropriate information. If the computer system is configured in
such a way that the relevant information is already filled in then just click
the Send button to send an activation request email and allow 24 hours for the
Activation Key to be emailed back to the sending email address. The third method
is to call ImageLaz Sales Dept and we will be happy to provide an Activation
Key. The fourth and most inefficient method of activation is to send an
activation request via postal mail to ImageLaz with the appropriate information
and wait for the Activation Key to be sent back.
1.5 Quick Start Scenarios
This section provides a “Quick Start” to using PhotoGrav by presenting a simple,
but typical, engraving scenario. It introduces PhotoGrav’s major features and
controls and how they are used within the context of an actual engraving
scenario. To successfully use this section you should have a basic understanding
of Windows features and techniques. If you’re anxious to try PhotoGrav and you
don’t like to read, then this section is for you. However, even if you consider
yourself a PhotoGrav expert after completing this section, it is highly
recommended that you step through the additional scenarios in Section 1.6 and
then read Chapter 2 for a more complete understanding of how PhotoGrav works.
There are several definitions that one should have firmly in mind before
tackling the Quick Start scenario. These definitions are listed below:
|
|
Original Image (Gray or Color) |
The image, in jpg, tif, png or bmp format, that is the input image to PhotoGrav. This image is the digitized photograph (either in color or grayscale) that you want to engrave. |
| Engraved Image(Binary) | This is the processed image that PhotoGrav produces that should be sent to your laser engraver. This image is a binary image (black & white) and can be saved in either tif, png, or bmp format. | |
| Simulation Image | This is a simulation, produced by PhotoGrav, of what the engraved image will look like when engraved on the selected engraving material. This image is a 24-bit, true color image and can be saved in either jpg, tif, png or bmp format. This image is useful for customer proofs and for reference BUT is NOT the image to be sent to the laser engraver. |
Scenario 1: Engrave a man’s photograph on cherry wood.
It is assumed that the man’s photograph has been previously digitized and stored
as either a color or grayshaded image (in one of the supported image formats) on
disk. This scenario will use the image “Image250.bmp” which has been furnished
with PhotoGrav. This image should reside in the directory C:\[PhotoGrav
Installation Directory]\SAMPLES.
Note: The image “Image250.bmp” has a dpi of 250. In general, the ratio of
engraver dpi to image dpi should be an integer factor. So if your engraver has
dpi’s like 150, 300, 600, . . , then in the following scenario you should use
the image “Image300.dpi” which has a dpi of 300.
|
1.6 Additional Tutorial Scenarios
This section presents five additional scenarios which further illustrate
PhotoGrav’s features. Each scenario is a logical follow-on to Scenario 1
presented in the preceding section.
Scenario 2: Compare the original, grayscale, engraved, & simulated
images.
This scenario will demonstrate how easy it is to evaluate the engraved (binary)
image by comparing it and the simulated engraving to the original (input) or
grayscale image. The scenario will also demonstrate some of PhotoGrav’s
supporting features. PhotoGrav has a “Split Screen”
feature which can be used to more efficiently compare the various images (i.e.
grayscale vs. simulated).
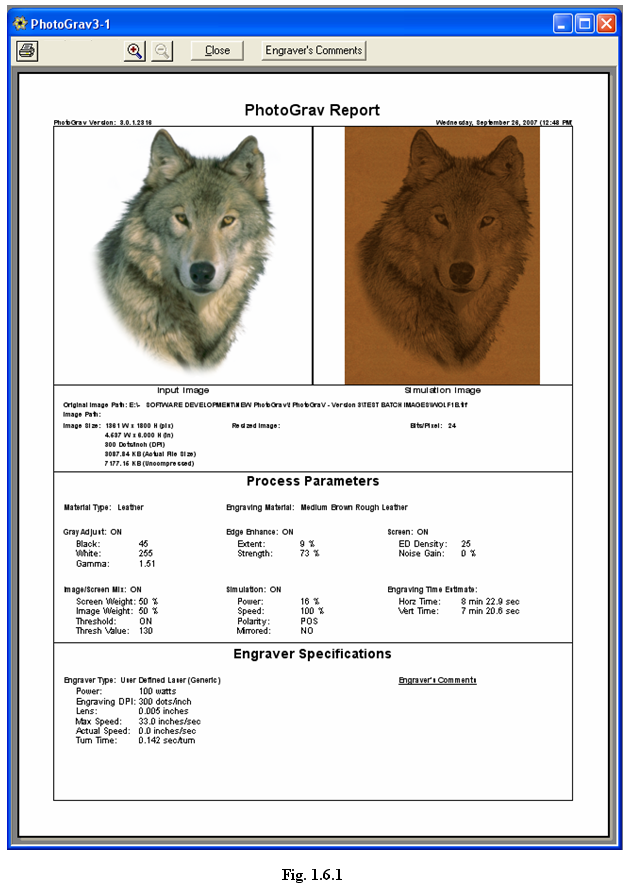
Scenario 3: Generating a PhotoGrav Session Information Report
This scenario will demonstrate how to generate a PhotoGrav Session Information
Report that completely describes the current engraving session. The scenario
will also demonstrate several other PhotoGrav features.
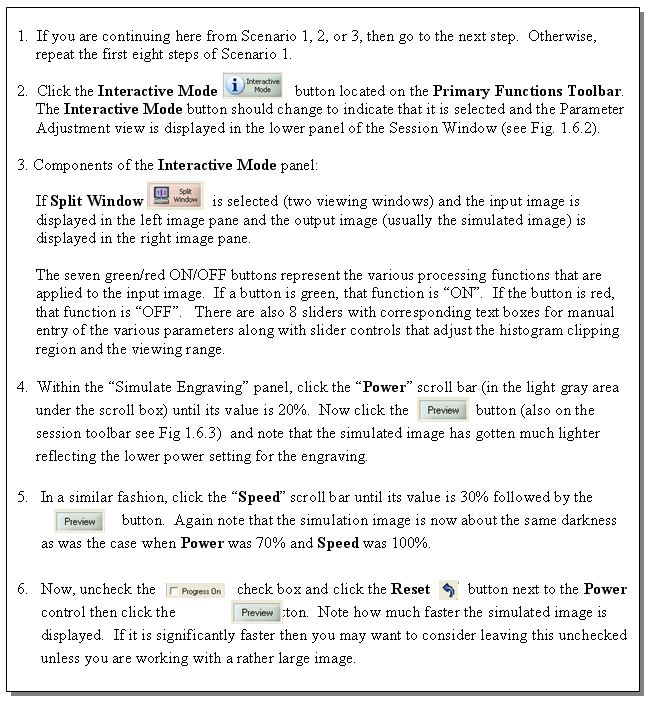
Scenario 4: Adjusting Parameters in the “Interactive Mode”
Panel.
This scenario will demonstrate how to adjust the parameters used in creating the
engraved and simulation images. The Interactive Mode panel is extremely
powerful, but also a little complicated so this scenario will just demonstrate
some, not all, of the features available when Interactive Mode is selected. This
scenario will also demonstrate how to export the Parameters.