Select the Installation Type (optional)
From AutoCAD Land Desktop
As part of making your deployment choices, you select the type of installation that users receive when they install the program, choose which optional tools or features are included, and specify where the product is installed on each workstation.
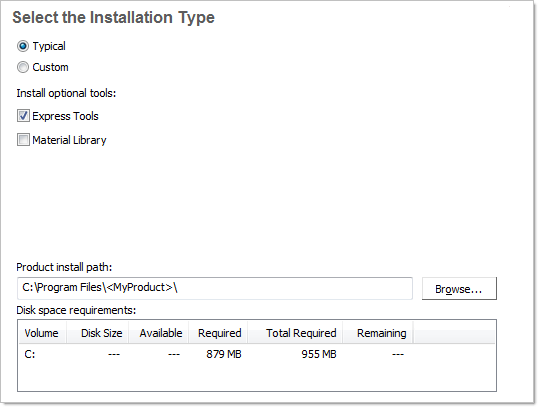
- Typical. Installs the most common application features. This option is recommended for most users.
- Custom. Installs only the application features that you select.
You can also choose to include Express Tools and the Material Library with this deployment.
- Express
Tools. Express Tools are available in their original
form, in English only, and are not supported. No updates have been
made to the tools. Double-byte characters are not supported.NoteSome Express Tools have been integrated into AutoCAD Land Desktop 2009. For a full list of tools that have been integrated, see the FAQ section in the Express Tools Help. You can also get help on each integrated command in the product Help system.
- Material Library. The Material Library contains more than 300 materials that you can apply to your models. The library is organized as a series of tool palettes.
You choose the location where program files are installed on the client workstation in the Product Install Path. To help decide where the product is installed, a chart of drives and disk space is provided.
To deploy a typical installation, choose optional tools and specify a product location
- During
the deployment, on the Select the Installation Type page, select Typical
as the type of installation that you want.
- Clear the check box for the Express Tools option if you do not want to include the tools in this deployment. Express Tools are installed by default.
- If you want to install the Material Library, select the check box for the Material Library option. The Material library option is cleared by default.
- Enter
the path on the client workstation where you want to install the program,
for example C:\Program Files\AutoCAD Land Desktop 2009, or
click the Browse button to specify the install location.
The Disk Space Requirements chart lets you review available drives and disk space.
- Click Next.
To deploy a custom installation, choose optional tools and specify a product location
- During
the deployment, on the Select the Installation Type page, select the
Custom option as the type of installation that you want.
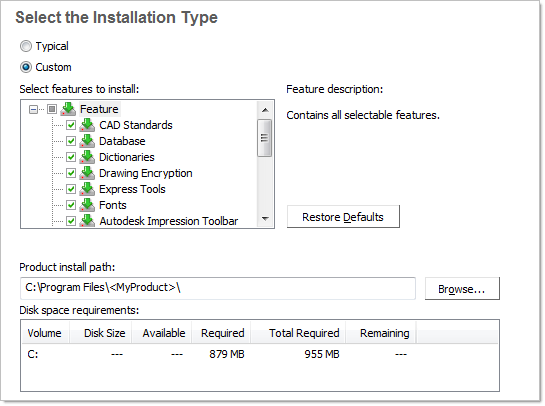
- From
the Select Features to Install list, select the features that you
want to install.
Your choices are as follows:
CAD Standards Contains tools for reviewing design files for compliance with your standards. Database Contains database access tools. Dictionaries Contains multi-language dictionaries. Drawing Encryption Allows you to use the Security Options dialog box to protect a drawing with a password. Express Tools Contains AutoCAD Land Desktop support tools and utilities (not supported by Autodesk). Fonts Contains AutoCAD fonts and True Type fonts. Material Library The Material library contains over 300 professionally built materials to apply to your model. New Features Workshop Contains animated demos, exercises, and sample files to help users learn the new features. Migrate Custom Settings Migrates custom settings and files from a previous version of your product to this version. Reference Manager Allows users to view and edit the paths of externally referenced files associated with a drawing. Samples Contains various feature sample files. Tutorials Contains tutorials. NoteAutodesk Impression availability is limited. Please check your local Autodesk website to see if Impression is available in your country.If, after making feature changes, you decide you want the original selections, click the Restore Defaults button.
- Enter
the path on the client workstation where you want to install the program,
for example, C:\Program Files\AutoCAD Land Desktop 2009, or
click Browse to specify the install location.
The Disk Space Requirements chart lets you review available drives and disk space.
- Click Next.