6.2.1 Configure the LANSA for the Web Configuration file (l4w3serv.cfg)
The Servlet configuration file contains the connection information used by the Servlet to connect the Web Server to the Data/Application Server. The configuration file contains the connection information to connect the Web Server to the Data/Application Server. This file is created and maintained using the LANSA for the Web Administrator (Local Configuration) and must be named l4w3serv.cfg. (Note that the file name must all be in lower case).
The following example describes a simple setup and does not make use of options such as Authentication or HTTP Header variables.
Follow these steps to create a simple Servlet configuration file.
Define the Web Server:
1. Start the LANSA for the Web Administrator by opening the LANSA folder from the LANSA icon on your desktop, selecting the Setting and Administration folder and choosing the Web Administrator from the list.
2. From the menu select and choose to create a new Servlet configuration file
3. From the menu select and verify that the default settings displayed on the tab and the tab are valid for your installation.
Define the connection parameters to the Data/Application server:
1. Select the menu, choose the sub-menu to display the (local) dialog box.
2. In this dialog, press the button to display the dialog.
3. Select the tab and specify the parameters.
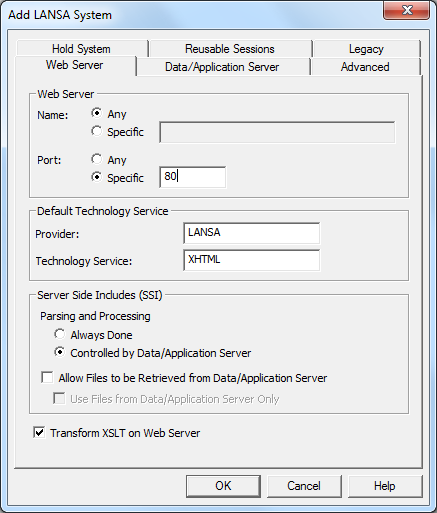
In this sample installation, Any is selected as the and the Port number is specified as '80' (the default port for HTTP).
If you enter a , be aware that due to restrictions on some DNS servers, it is necessary to enter it in lower case.
4. Select the tab and specify the parameters.
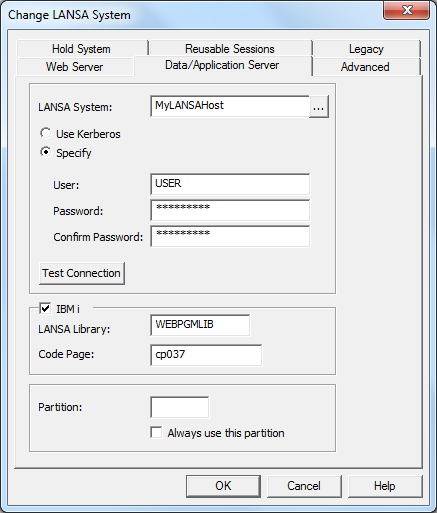
In this sample installation, 'MyLANSAHost' is entered as the This parameter must the same as the specified in the Communications Route Table (lroute.dat) file.
'cp037' is entered as the if the Data/Application Server is an IBM i Data/Application Server.
5. The default settings are used for the remaining tabs.
6. Save the Servlet configuration file with the name l4w3serv.cfg. Make sure that you save the file with the correct name and that the file name is in lowercase.