3 Create a LANSA Client Environment
From LANSA Client Administrator
3. Create a LANSA Client Environment
The LANSA Client environment is created by selecting the required options in the LANSA Client Administrator window.
Some options are language or host specific, and are selected from dialog boxes that are described separately. These are:
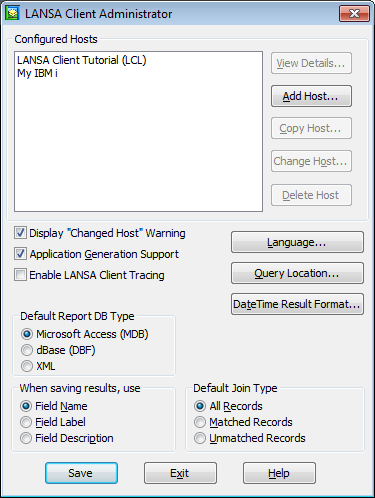
Configured Hosts
This box contains a list of the hosts configured for this environment. Initially it will be empty.
There must be at least one, but there can be any number of hosts defined for a single LANSA Client environment. When there are multiple hosts defined, the user chooses which host to connect to from a list displayed when LANSA Client starts.
To View the details of an existing host system:
- Select the host system from the list.
- Select the button. The dialog box is displayed with the host's details.
To Add a new host system:
- Select the button.
- The dialog box is displayed to allow you to enter details and choose options for the new host system.
To Copy an existing host system:
- Select the host system you want to duplicate from the Configured Hosts list
- Select the Copy Host button. The Host Configuration Details dialog box is displayed to let you change details as necessary.
To Change the details of an existing host system:
- Select the required host system from the list.
- Select the button. The dialog box is displayed so that you can change the details, if necessary.
To Delete a host system:
- Select the host system to be deleted from the list.
- Select the button.
Refer to 3.1 Specify the Host and Related Options for details of the dialog box.
Display "Changed Host" Warning
For a query that is run against a different host a "different host" warning message will be shown. The warning message has a "do not show this again" option, so that LANSA Client will not keep showing the message.
Application Generation Support
Use the option to turn on or off the application generation capabilities of LANSA Client.
Refer to Generating Applications in the if you would like to find out more about LANSA Client's application generation capabilities.
Enable LANSA Client Tracing
Turn this option on to enable LANSA Client tracing. The trace file is located in a folder called lansaclient under the TEMP folder, is named after the application running and has the extension .log.
Example: <drive>:\Users\<User Name>\Appdata\Local\Temp\lansaclient\lc32.log
Note that turning LANSA Client Tracing on will have an impact on performance. Only use this option when directed to do so by LANSA Support.
Language
Press this button to open the dialog box.
For details about the options related to languages, refer to 3.2 Choose the Language and Font.
Query Location
Press this button to open the LANSA Client dialog box.
For details about the settings related to default query location, refer to 3.3 Set Query File Location
DateTime Result Format
If you save your Results to an Excel or dBase file, and if your data contains a date or time, you can specify whether you want the dates or times saved as text/numeric or in a date or time format as described in 3.4 Default DateTime Result Format.
The options selected can be overridden using the command on the menu.
Default Report Database Type
Specify the default type of database to be created when outputting query results to reports.
Within LANSA Client the output database filename and type may be specified for each query, which will override this default value.
Saving results:
When the results of a query are saved, either the field's name, the field's description or the field's label will be included. These names are stored in the LANSA Repository on the host. As the label is limited to 15 characters, it is preferable to use it for report column headings rather than the description, which can be up to 40 characters long.
Once set, this option should not be changed because a report that has been created from a query using the field label will be unable to interpret the results if they are later presented with the field's description.
Note: Some of the file formats to which you can save a query's results may cause the field name to be truncated. For example, the DBF format will only allow 10 character field names (i.e. column headings) and they must only consist of alphanumeric characters. LANSA Client will ensure that the names of all the fields within a file are unique.
Default Join Type
Specify the Join Type to be used as the default for all new joins in your query.
The Join Types available are:
- All Records (Left Outer Join)
Records from the primary file will be shown even if there are no matching records in the secondary joined file. For example, list customers with and customers without orders.
- Matched Records (Inner Join)
Records from the primary file will only be shown if matching records in a secondary joined file are found. For example, list only customers with orders.
- Unmatched Records (Exception Join)
Records from the primary file will only be listed if there are no matching records in the secondary joined file. For example, list only customers who have not placed any orders.
Save the Environment
Press the button to save the changes you have made using the LANSA Client Administrator.
All the options you have selected for this LANSA Client environment are written to the LC32.LCX file which is saved in your LANSA Client folder.
Exit from the LANSA Client Administrator
Select the button. If you have modified the configuration and have not saved the changes, you will be prompted to do so.
Note: Close, then open LANSA Client to "pick up" the new defaults.
Further Information
3.1 Specify the Host and Related Options
3.2 Choose the Language and Font