Introducing Custom Events
Custom Events
We're all familiar with the basic events — click, mouseover, focus, blur, submit, etc. — that we can latch on to as a user interacts with the browser. Custom events open up a whole new world of event-driven programming. In this chapter, we'll use jQuery's custom events system to make a simple Twitter search application.
It can be difficult at first to understand why you'd want to use custom events, when the built-in events seem to suit your needs just fine. It turns out that custom events offer a whole new way of thinking about event-driven JavaScript. Instead of focusing on the element that triggers an action, custom events put the spotlight on the element being acted upon. This brings a bevy of benefits, including:
- Behaviors of the target element can easily be triggered by different elements using the same code.
- Behaviors can be triggered across multiple, similar, target elements at once.
- Behaviors are more clearly associated with the target element in code, making code easier to read and maintain.
Why should you care? An example is probably the best way to explain. Suppose you have a lightbulb in a room in a house. The lightbulb is currently turned on, and it's controlled by two three-way switches and a clapper:
|
1
2
3
4
5
6
|
|
Triggering the clapper or either of the switches will change the state of the lightbulb. The switches and the clapper don't care what state the lightbulb is in; they just want to change the state.
Without custom events, you might write some code like this:
|
1
2
3
4
5
6
7
8
9
10
11
12
13
14
15
|
|
With custom events, your code might look more like this:
|
1
2
3
4
5
6
7
8
9
10
11
12
13
14
15
16
17
18
19
20
21
|
|
This last bit of code is not that exciting, but something important has happened: we've moved the behavior of the lightbulb to the lightbulb, and away from the switches and the clapper.
Let's make our example a little more interesting. We'll add another room to our house, along with a master switch, as shown here:
|
1
2
3
4
5
6
7
8
9
10
11
12
13
|
|
If there are any lights on in the house, we want the master switch to turn all
the lights off; otherwise, we want it to turn all lights on. To accomplish
this, we'll add two more custom events to the lightbulbs: turnOn and
turnOff. We'll make use of them in the changeState custom event, and use
some logic to decide which one the master switch should trigger:
|
1
2
3
4
5
6
7
8
9
10
11
12
13
14
15
16
17
18
19
20
21
22
23
24
25
26
27
28
29
30
31
32
33
34
35
36
37
38
39
40
41
42
|
|
Note how the behavior of the master switch is attached to the master switch; the behavior of a lightbulb belongs to the lightbulbs.
If you're accustomed to object-oriented programming, you may find it useful to
think of custom events as methods of objects. Loosely speaking, the object to
which the method belongs is created via the jQuery selector. Binding the
changeState custom event to all $(".light") elements is akin to having a
class called Light with a method of changeState, and then instantiating new
Light objects for each element with a classname of light.
Recap: $.fn.on and $.fn.trigger
In the world of custom events, there are two important jQuery methods:
$.fn.on and $.fn.trigger. In the Events chapter, we saw how to use these
methods for working with user events; for this chapter, it's important to
remember two things:
-
$.fn.onmethod takes an event type and an event handling function as arguments. Optionally, it can also receive event-related data as its second argument, pushing the event handling function to the third argument. Any data that is passed will be available to the event handling function in thedataproperty of the event object. The event handling function always receives the event object as its first argument. -
$.fn.triggermethod takes an event type as its argument. Optionally, it can also take an array of values. These values will be passed to the event handling function as arguments after the event object.
Here is an example of the usage of $.fn.on and $.fn.trigger that uses
custom data in both cases:
|
1
2
3
4
5
6
7
8
9
|
|
A Sample Application
To demonstrate the power of custom events, we're going to create a simple tool for searching Twitter. The tool will offer several ways for a user to add search terms to the display: by entering a search term in a text box, by entering multiple search terms in the URL, and by querying Twitter for trending terms.
The results for each term will be shown in a results container; these containers will be able to be expanded, collapsed, refreshed, and removed, either individually or all at once.
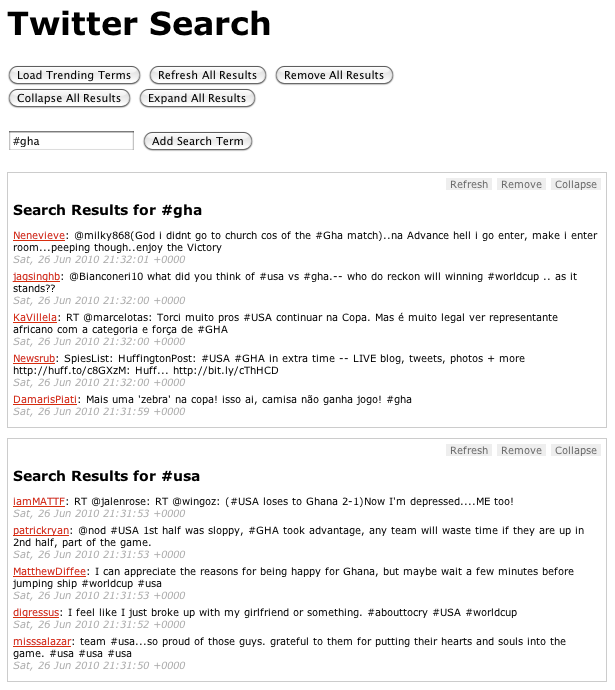
When we're done, it will look like this:
|
1
2
3
4
5
6
7
8
9
10
11
12
13
14
|
|
This gives us a container (#twitter) for our widget, a template for our results containers (hidden via CSS), and a simple form where users can input a search term. (For the sake of simplicity, we're going to assume that our application is JavaScript-only and that our users will always have CSS.)
There are two types of objects we'll want to act on: the results containers, and the Twitter container.
The results containers are the heart of the application. We'll create a plugin that will prepare each results container once it's added to the Twitter container. Among other things, it will bind the custom events for each container and add the action buttons at the top right of each container. Each results container will have the following custom events:
-
refresh- Mark the container as being in the "refreshing" state, and fire the request to fetch the data for the search term. -
populate- Receive the returned JSON data and use it to populate the container. -
remove- Remove the container from the page after the user verifies the request to do so. Verification can be bypassed by passing true as the second argument to the event handler. The remove event also removes the term associated with the results container from the global object containing the search terms. -
collapse- Add a class of collapsed to the container, which will hide the results via CSS. It will also turn the container's "Collapse" button into an "Expand" button. -
expand- Remove the collapsed class from the container. It will also turn the container's "Expand" button into a "Collapse" button.
The plugin is also responsible for adding the action buttons to the container. It binds a click event to each action's list item, and uses the list item's class to determine which custom event will be triggered on the corresponding results container.
|
1
2
3
4
5
6
7
8
9
10
11
12
13
14
15
16
17
18
19
20
21
22
23
24
25
26
27
28
29
30
31
32
33
34
35
36
37
38
39
40
41
42
43
44
45
46
47
48
49
50
51
52
53
54
55
56
57
58
59
60
61
62
63
64
65
66
67
68
69
70
71
72
73
74
75
76
77
78
79
80
81
82
83
84
85
86
87
88
89
90
91
92
93
94
95
96
97
98
99
100
101
102
103
104
|
|
The Twitter container itself will have just two custom events:
-
getResults- Receives a search term and checks to determine whether there's already a results container for the term; if not, adds a results container using the results template, set up the results container using the$.fn.twitterResultplugin discussed above, and then triggers therefreshevent on the results container in order to actually load the results. Finally, it will store the search term so the application knows not to re-fetch the term. -
getTrends- Queries Twitter for the top 10 trending terms, then iterates over them and triggers thegetResultsevent for each of them, thereby adding a results container for each term.
Here's how the Twitter container bindings look:
|
1
2
3
4
5
6
7
8
9
10
11
12
13
14
15
16
17
18
19
20
21
22
23
24
25
26
27
28
29
30
31
32
33
|
|
So far, we've written a lot of code that does approximately nothing, but that's OK. By specifying all the behaviors that we want our core objects to have, we've created a solid framework for rapidly building out the interface.
Let's start by hooking up our text input and the "Load Trending Terms" button.
For the text input, we'll capture the term that was entered in the input and
pass it as we trigger the Twitter container's getResults event. Clicking the
"Load Trending Terms" will trigger the Twitter container's getTrends event:
|
1
2
3
4
5
6
7
8
9
10
|
|
By adding a few buttons with the appropriate IDs, we can make it possible to remove, collapse, expand, and refresh all results containers at once, as shown below. For the remove button, note how we're passing a value of true to the event handler as its second argument, telling the event handler that we don't want to verify the removal of individual containers.
|
1
2
3
4
5
6
7
8
9
10
11
|
|
Conclusion
Custom events offer a new way of thinking about your code: they put the emphasis on the target of a behavior, not on the element that triggers it. If you take the time at the outset to spell out the pieces of your application, as well as the behaviors those pieces need to exhibit, custom events can provide a powerful way for you to "talk" to those pieces, either one at a time or en masse. Once the behaviors of a piece have been described, it becomes trivial to trigger those behaviors from anywhere, allowing for rapid creation of and experimentation with interface options. Finally, custom events can enhance code readability and maintainability, by making clear the relationship between an element and its behaviors.