Tag Operations - Untraceable
From Universal Reader Assistant
Untraceable
Navigation Path: Tag Operations > Untraceable
Introduction to Gen2V2
These instructions describe how to use a Micro module with firmware version 1.07.01 or greater with Universal Reader Assistant 2.6.18.18 or greater (distributed with API version 1.27.1) to demonstrate the EPCglobal Gen2V2 properties of NXP “UCODE DNA” tags.
These capabilities are:
- Enabling the "Untraceable" feature which permits obscuring all or part of the EPC; all, part, or none of the TID; and all or none of the User memory
- Inserting and activating key0 and key1 (both keys can be used for authentication of the tag, but only key1 can be used to read data securely)
- Ability to read data securely, either by obtaining the data over the air, or asking the tag to store the data in buffer memory, where it is obtained securely.
Note that as with all function tabs, you may either go to the tag and act on the first tag to respond, or you may select a tag in the Tag Results page, left-click on its EPC field, then use the right mouse button to select a tab category. The EPC of that tag will automatically be used to communicate with that tag selectively:
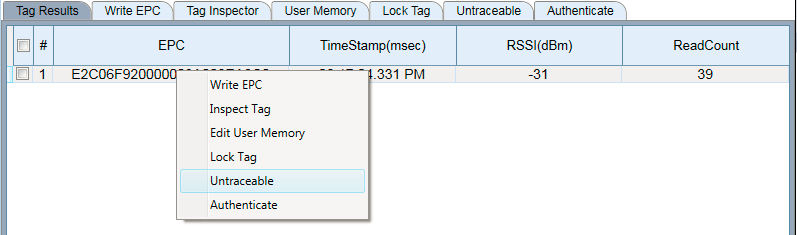
Figure 17: Tag Selection for Advanced Operations
Note : If you are going to vary the tag's reported EPC length using the Untraceable function, it is best to read the first tag to respond as the selective search for the tag does not automatically adjust to the changing EPC value.
Confirming Tag Type
After you get URA connected to the Micro, make sure that the tag is readable and it is an NXP AES (also called "DNA") tag:
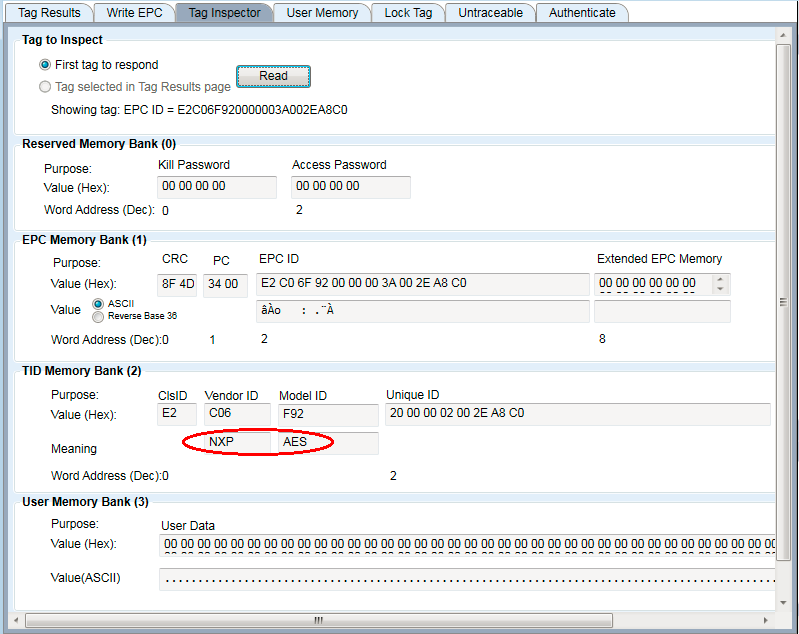
Figure 18: Confirming Tag Type
If you wish to assign an Access Password to the tag for additional security, do so through the Lock Tag tab.
Note : Although the current value of the Access Password is shown with spaces between the bytes, if you enter a desired value, you must remove these spaces.
Note : The NXP "UCODE DNA" tags currently require that the Access Password be nonzero in order for the Untraceable command to configure the tag properly. Once the Untraceable value is set, however, the value of the Access Password can be zero or non-zero when obtaining the EPC, TID or User memory values.
Untraceable Function
You use the Untraceable function by selecting the options and then pressing "Write to Tag" to send the desired configuration to the tag and activate it. Note that you need to use a non-zero Access Password to set the Untraceable properties. Thereafter, you may define the access password back to all zeroes when reading the allowed tag information, f you wish.
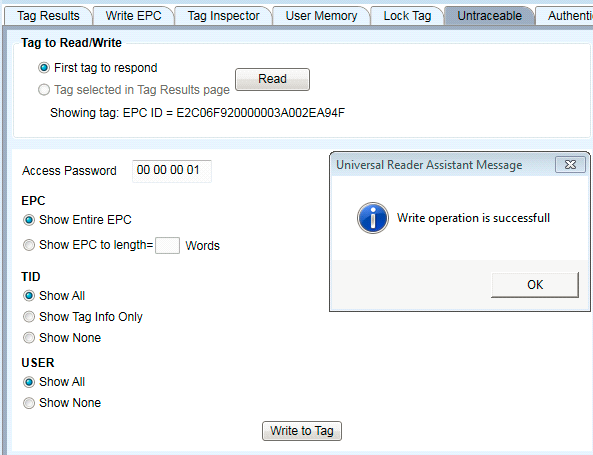
Figure 19: Changing Untraceable Settings
Note : When the tag is read, this display does NOT show the current state of the settings for the tag except for the Access password. This display always returns to its default choices and there is no way of knowing what the tag is configured to return for each data field.
Changing EPC Options
Select whether you want the tag to report its entire EPC, or a partial EPC. The partial EPC may be adjusted in units of Words (2 bytes). Note that you may not only shorten the EPC, but you may lengthen it as well, to the limits of the extra data in the EPC memory (see results of Tag Inspector).
As you make changes to the EPC length, and repeatedly read from the Tag Results page, you will see that the tag is identified as unique as each change is made. Here is an example of the tag reporting the entire EPC (6 Words), EPC shortened to 4 Words, and EPC lengthened to 8 Words.
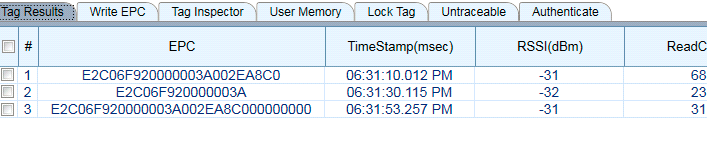
Figure 20: Results of Changing EPC Untraceable Options
Changing TID Options
The choices for TID is to show all (tag make and model plus serial number), Tag info only, or not to reveal any. To observe these changes, use the Embedded ReadData function with the setting shown here ("UniqueByData" will allow you to see all the changes and not have new reads overwrite the old ones in Tag Results. "Show failed Data Reads" will allow you to see the tag reads when the TID is not reported.
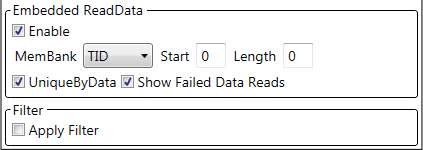
Figure 21: Displaying Results of TID Options
The results are shown here, for TID choices of "Show All", "Show Tag Info Only" and "Show None".
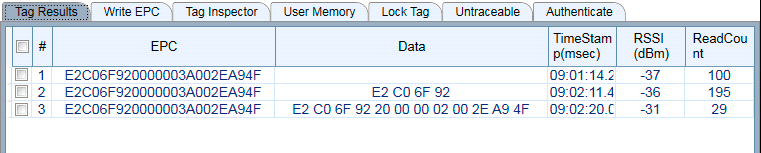
Figure 22: Results of Changing TID Untraceable Options
Note that in order to read the TID when "Show Tag Info Only" is active, you must specify that you want to read two words, as shown here:

Figure 23: Requesting 2 Words of TID Data
If you specify a length of "0", no TID data will be returned.
Changing User Data Options
The choices for User Data are "Show All" and "Show None".
The settings for Embedded ReadData may be changed to display User data as shown here:
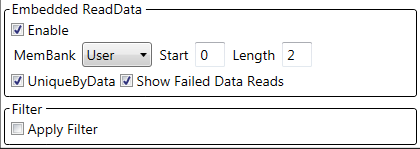
Figure 24: Displaying Results of User Data Options
Note that the NXP UCODE DNA tag does not support reading all User memory with a "0" length. You must specify the length of the data to read.
Again, select "Show Failed Data Reads" if you want the tag read results to show when no User data is returned.

Figure 25: Results of Changing User Untraceable Options