Tables with combined cells
From Offline MediaWiki Code Editor
|
Tables with Combined Cells
|
Previous Top Next |
 An assistant to build and insert wikicode for tables with merged cells.
|
|
This assistant for Tables with combined cells helps you to create tables with up to five rows
and five columns, where you can merge adjacent cells in whatever the way you need.
Due to the complexity of the sintax and the rarity of these tables, the assistant do not produce
tables with a higher number of rows or columns. But if you pay attention to the wikicode, you
might manually add more cells to a table generated with this assistant.
The default features of the tables you can produce with this assistant are the following:
· Table title in bold type
· The size of the cells is auto-adjusted to the content.
· Column headings and row headings centered and in bold type.
· Cells with thin borders
· Cell content centered vertically
· Cell backgrounds in a light gray shades
· Up to 5 columns
· Up to 5 rows
The centered position is particularly convenient for wide tables occupying most of the page
width. The alignment to one side is only convenient in the case of narrow (and long) tables, to
let the surrounding text to flow through the opposite side avoiding an excess of blank space in
the page.
Table title
Table title is centered by default, but you can optionally align the title to the left.
· No headings at all - Choose this option if you want to have all the cells with the same
format. Cell content is left aligned by default. Tables with no headings have a background
with only one shade of gray. This option is not available in the Assistant for regular tables.
· Column headings only - When you choose this option the first row is reserved for
column headings, where the text will be centered and in bold type, with a darker shade of
gray in
the background.
· Column and row headings - When you choose this option the first row is reserved for
column headings, while the first column is reserved for row headings. All headings have
centered text and bold type by default, and have a darker shade of gray in the background.
Table cells
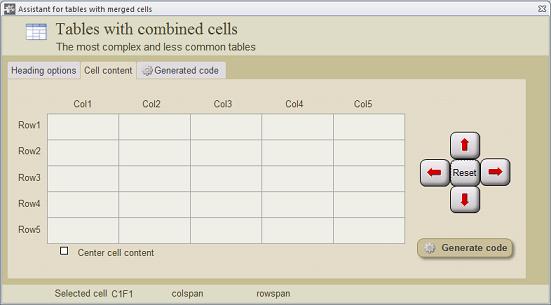 Cell content is aligned to the left by default. But If you want to show the text centered, you
should activate the option Center cell content. In the case you need to align to the right the cell
content, first choose Center cell content and after generating the code, change manually the
code value text-align:center to text-align:right
Cell content is centered vertically by default.
1. Enter table title and indicate if it should be aligned to the left.
2. Enter the text of the first cell (C1F1) which is in the left top corner of the table. When
necessary merge this cell with one of the contiguous cells using the panel of buttons at the
right side of the form.
3. Do the same operation with the next cell (from left to right). When you finish a row
continue with the next until the table is completed. Merge the cells the way you want, but
do not left empty cells. Left empty only those cells which will not belong to the table.
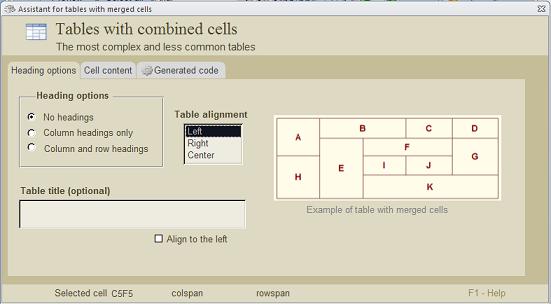
You may realize that there is a great number of possible cell combinations merging cells of a 5
x 5 table. The following is an example of one of the complex tables you can build with the help
of this assistant:
|
|
4. This example was based on a table of five columns and four rows, merging cells
to obtain a total of eleven cells with different sizes.
After entering all data, click on the command button <Generate code> to generate the code
that will appear in the wikicode window. Then click on the command button <Insert table> to
insert the table in the Edit window.
Contiguous cells are merged with the aid of the <Cell merger>. The <Cell merger> is a panel
of buttons cross-arranged at the right side of the panel of cells.
|
This will be the result:
A + B
were merged
If you click again it will produce the following result:
A+B+C were combined
|
Every click on the button with the right arrow will merge another cell to the combination.
|
|
To undo this action click on the button with the arrow up.
You can also make more complex combinations involving cells of different rows and columns.
This is an example of how to combine the four cells A, B, C and D: Place the cursor in the cell
A and make a click on the button with the right arrow and another click on the button with the
down arrow. Only two clicks are necessary to merge these four cells:
|
|
The command button <Start> in the center of the panel has the function to restart the
assistant. Clicking on that button you can undo all cell combinations and erase the content of
all cells.
The generated code will not be saved if you close the assistant before inserting the code in the
Edit window (the assistant for tables with regular cells behaves differently).
Error inserting a table
|