|
Tables with Regular Cells
|
Previous Top Next |
 |
|
A table is an arrangement of columns and rows that organizes and positions data. Tables can
be created on Wikipedia pages using special wikitext syntax, and many different styles and
tricks can be used to customize them. Consider using a multi- column list when appropriate.
To create tables using this assistant you do not need to know the sintax. Just enter the table
data and the assistant will generate the wikicode to produce tables with the typical appearance
of tables in Wikipedia. The default features of the tables you can produce with this assistant
are the following:
· Table size (% in relation to page width)
· Table title in bold type.
· The size of the cells is auto-adjusted to the content.
· Column headings and row headings centered and in bold type.
· Cells with thin borders and text aligned to the left
· Cells text vertically centered.
· Cell backgrounds in a light gray shades
· Up to 10 columns
· Up to 50 rows.
· Alignment of the title and cell content
· The proportional width of the columns.
If the proportional width of each column is not fixed, it is automatically adjusted to the content.
It is uncommon but not rare to see in Wikipedia regular tables with more than 10 columns and
50 rows, and the assistant is not able to build bigger tables. But if you pay a little attention to
the generated wikitext you can manually add the necessary code to increase the size of your
tables, if necessary.
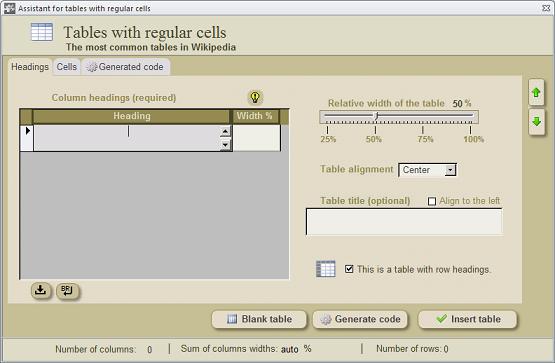
Table title
Table title is centered by default, but you can optionally align the title to the left or to the right.
Table headings
All tables created by this assistant have column headings (255 characters max.). This means
that the first table row is reserved to the column headings. This headings are centered and in
bold type by default, with a background grayish shade of a more intense color than the rest of
the cells.
By default, the tables generated with this assistant do not have row headings. But you have
the option to reserve the first column for row headings. If you choose this option the first
column of data will be the second column.
Alignment of the cell content
By default, the cell content is aligned to the left, except headings, which are centered. But the
assistant offers the option to center the content of data cells.
Cell content is vertically centered by default. If the content of the different cells is very uneven
you might prefer to align vertically the content in some cells. To do this, go to the generated
wikicode and add the string style="vertical-align: top;" to the code line preceding the column:
|- style="vertical-align: top;" | Columns text
Column headings
When you are entering data, be sure to fill the columns from left to right, not letting empty
columns. Otherwise you might obtain odd results.
When you had entered the table data, click on the command button <Generate code> and the
wikicode will appear in the code window. Then click on the command button <Insert table> to
close the assistant and insert the table code into the Edit window.
The generated code -but not the table title- will be saved until you restart the assistant clicking
on the command button <Blank table> to build a new table.
If you forgot to select the point of insertion in the Edit window, an error message will make you
note the omission. When this happens, the Assistant for tables is temporarily hidden until you
place the cursor at the point of insertion and reopen the assistant, or you close the Edit
window. In any case you do not need to enter table data again (except table title), because
table data will always persist until the next time you open the assistant.
|