|
Assistant for Cropped Images
|
Previous Top Next |
For other solutions to display images see: Images
 An assistant to build and insert wikicode for cropped images
|
|
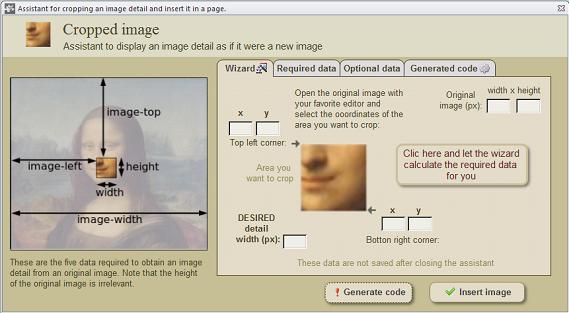
A cropped image is part of an image you can show as if it were a different image. If you
want to show only a part of an existing image, you can crop this part from that image and
show this part as if it were a different image. This allows you to exclude non important
parts of the original image and enlarge important parts.
Required data
The following data are required to crop an image to obtain an image detail:
Image name - Use only the image file name (including extension) and not the complete
address. Both rasterized and Scalable Vector Graphics (SVG) images are allowed.
Virtual width of the original image (image-width) - Virtual width (px) that you want to
assign to the original image. You can give any size, no rasterized and vectorial images
are allowed.matter the real size of the image. What is important here is the final size you
decide to show the image detail. It is common to select a virtual width much bigger than
the real width of the image as stored in Wikipedia or Wikimedia Commons. For example,
if you want to show a detail image with a final with of 200_px, while the detail you want to
show occupies 1/10 of the total width of the image, then you must assign a virtual width
of 10 x 200 = 2000_px, independently from its actual size.
1. Width of the image detail (width) - Final real width (px)
you want to assign to the
image detail.
2. Height of the image detail (height) - Final real hight (px)
you want to assign to
the image detail.
3. X-coordinate of the image detail (image-left) - X-coordinate of
the detail
image's top left corner (in pixels), relative to the top left corner of the box
containing the original image (virtual size).
4. Y-coordinate of the image detail (image-top) - Y- coordinate
of the
detail image's top left corner (in pixes), relative to the top left corner of the box
containing the original image (virtual size).
Header - Adds a header text to the new image. By default, the header will appear
centered and with a transparent background.
Caption - Adds a footnote to the resulting image
Alternative text - Alt text of image, for those readers who cannot see the image
in their browsers
Box background color - Background color of the box containing the image. The
default value is White, but the assistant offers a menu of 10 light shades to
choose.
1. Open the original image with your favorite image editor (for example: Microsoft ®
Paint) and take note of the coordinates of the area you want to crop, that is the
x,y values of the top left corner and the bottom right corner. Enter the data into
the wizard.
2. Enter the dimensions (width x height) of the original image (in pixel).
3. Enter the final desired width (px) you want to show the cropped detail in the
Wikipedia page.
4. Click on the wizard button and let the wizard calculate the required data
for you.
After doing this you can continue entering the image file name and the optional data.
When you have entered all required and optional data, you can click on the <Generate
code> button to generate wikitext code and display this code in the code window.
In the code window, you can make additional modifications if you know the sintax, such
as inserting links changing text format, adding unbreakable spaces, special characters
and so forth, But you can better make those modifications after inserting the image in the
Edit window
|