Find Measurement Points
After you set regions of inspection, you can locate points within those regions on which you can base measurements. You can locate measurement points using edge detection, pattern matching, color pattern matching, and color location.
Finding Features Using Edge Detection
Discontinuities in an image typically represent abrupt changes in pixel intensity values, which characterize the boundaries of objects. Use the edge detection tools to identify and locate sharp discontinuities in an image.
Finding Lines or Circles
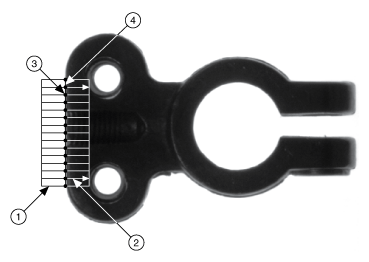
If you want to find points along the edge of an object and find a line describing the edge, use the IMAQ Find Edge, IMAQ Find Straight Edges, and IMAQ Find Concentric Edge VIs. The IMAQ Find Edge and IMAQ Find Straight Edges VIs find edges based on rectangular search areas, as shown in the following figure. The IMAQ Find Concentric Edge VI finds edges based on annular search areas.
 |
|
| 1 Search Region | 3 Detect Edge Points |
| 2 Search Lines | 4 Line Fit to Edge Points |
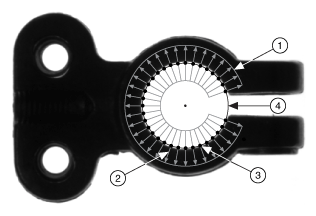
If you want to find points along a circular edge and find the circle that best fits the edge, as shown in the following figure, use the IMAQ Find Circular Edge VI.
 |
|
| 1 Annular Search Region | 3 Detected Edge Points |
| 2 Search Lines | 4 Circle Fit to Edge Points |
The IMAQ Find Edge and IMAQ Find Concentric Edge VIs locate the intersection points between a set of search lines within the search region and the edge of an object. Specify the separation between the lines that the VIs use to detect edges. The VIs determine the intersection points based on their contrast, width, and steepness. The software calculates a best-fit line with outliers rejected or a best-fit circle through the points it found. The VIs return the coordinates of the edges found.
Finding Edge Points Along One Search Contour
Use the IMAQ Simple Edge VI and the IMAQ Edge Tool 2 VI to find edge points along a contour. You can find the first edge, last edge, or all edges along the contour. Use IMAQ Simple Edge when your image contains little noise and the object and background are clearly differentiated. Otherwise, use the IMAQ Edge Tool 2 VI.
The IMAQ Simple Edge VI requires you to input the coordinates of the points along the search contour. Use the IMAQ ROIProfile VI to obtain the coordinates from the ROI descriptor of the contour. If you have a straight line, use the IMAQ GetPointsOnLine VI to obtain the points along the line instead of using an ROI descriptor.
IMAQ ROIProfile and IMAQ GetPointsOnLine determine the edge points based on their contrast and slope. You can specify if you want to find the edge points using subpixel accuracy.
Finding Edge Points Along Multiple Search Contours
Use the IMAQ Rake 2, IMAQ Spoke 2, and IMAQ Concentric Rake 2 VIs to find edge points along multiple search contours. Pass in an ROI descriptor to define the search region for these VIs.
IMAQ Rake works on a rectangular search region. The search lines are drawn parallel to the orientation of the rectangle. Control the number of search lines in the region by specifying the distance, in pixels, between each line. Specify the search direction as left to right or right to left for a horizontally oriented rectangle. Specify the search direction as top to bottom or bottom to top for a vertically oriented rectangle.
IMAQ Spoke 2 works on an annular search region, scanning the search lines that are drawn from the center of the region to the outer boundary and that fall within the search area. Control the number of lines in the region by specifying the angle, in degrees, between each line. Specify the search direction as either going from the center outward or from the outer boundary to the center.
IMAQ Concentric Rake 2 works on an annular search region. The concentric rake is an adaptation of the rake to an annular region. Edge detection is performed along search lines that occur in the search region and that are concentric to the outer circular boundary. Control the number of concentric search lines that are used for the edge detection by specifying the radial distance between the concentric lines in pixels. Specify the direction of the search as either clockwise or counterclockwise.
Finding Points Using Pattern Matching
The pattern matching algorithms in NI Vision measure the similarity between an idealized representation of a feature, called a template, and the feature that may be present in an image. A feature is a specific pattern of pixels in an image. Pattern matching returns the location of the center of the template and the template orientation. Complete the following generalized steps to find features in an image using pattern matching:
- Define a reference or fiducial pattern to use as a template image.
- Use the reference pattern to train the pattern matching algorithm using the IMAQ Learn Pattern 2 VI.
- Define an image or an area of an image as the search area. A small search area can reduce the time to find the features.
- Set the tolerances and parameters to specify how the algorithm operates at run time using the IMAQ Setup Match Pattern 2 VI.
- Test the search algorithm on test images using the IMAQ Match Pattern 2 VI.
- Verify the results using a ranking method.
Defining and Creating Effective Template Images
The selection of an effective template image plays a critical part in obtaining good results. Because the template image represents the pattern that you want to find, make sure that all the important and unique characteristics of the pattern are well defined in the image.
Several factors are critical in creating a template image. These critical factors include symmetry, feature detail, positional information, and background information.
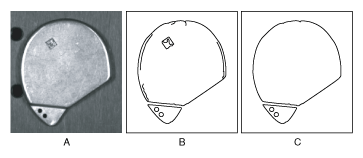
Symmetry
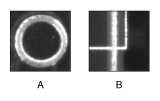
A rotationally symmetric template, shown in Figure A, is less sensitive to changes in rotation than one that is rotationally asymmetric. A rotationally symmetric template provides good positioning information but no orientation information. Figure B shows an example of a rotationally asymmetric template.
Feature Detail
A template with relatively coarse features, shown in Figure B, is less sensitive to variations in size and rotation than a model with fine features, shown in Figure A. However, the model must contain enough detail to identify the feature.
Positional Information
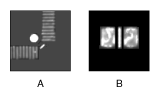
A template with strong edges in both the x- and y-directions is easier to locate. Figure A shows an example of a template with edges in both the x- and y-directions. Figure B shows an example of a template with edges only in the x-direction.
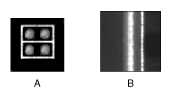
Background Information
Unique background information in a template improves search performance and accuracy. Figure A shows a template that contains very little background information. Figure B shown a template that contains a larger amount of background information that can be used to separate the template from other possible matches.

Training the Pattern Matching Algorithm
After you create a good template image, the pattern matching algorithm has to learn the important features of the template. Use the IMAQ Learn Pattern 2 VI to learn the template. The learning process depends on the type of matching that you expect to perform. If you do not expect the instance of the template in the image to rotate or change its size, the pattern matching algorithm has to learn only those features from the template that are necessary for shift-invariant matching. However, if you want to match the template at any orientation, the learning process must consider the possibility of arbitrary orientations. Use the IMAQ Setup Learn Pattern 2 VI to specify which type of learning mode to use. You can provide a mask to the IMAQ Learn Pattern 2 VI that specifies a pixel area in the image for the learning algorithm to ignore. You can mask portions of the template that vary between inspection images so that the areas are ignored during the matching process to make the overall pattern matching more robust. The mask must be an image the same size as the template image. If you provide a mask to the IMAQ Learn Pattern 2 VI, the VI only learns the pixels in the template that have corresponding pixels in the mask with a value of 0. Mask pixels with a value other than 0 are ignored. Do not use a mask if you want to learn the entire template.
The learning process is usually time intensive because the algorithm attempts to find unique features of the template that allow for fast, accurate matching. The learning mode you choose also affects the speed of the learning process. Learning the template for shift-invariant matching is faster than learning for rotation-invariant matching. You also can save time by training the pattern matching algorithm offline and then saving the template image using the IMAQ Write Image and Vision Info File 2 instance of the IMAQ Write File 2 VI.
Defining a Search Area
Two equally important factors define the success of a pattern matching algorithm: accuracy and speed. You can define a search area to reduce ambiguity in the search process. For example, if your image has multiple instances of a pattern and only one of them is required for the inspection task, the presence of additional instances of the pattern can produce incorrect results. To avoid this, reduce the search area so that only the required pattern lies within the search area.
The time required to locate a pattern in an image depends on both the template size and the search area. By reducing the search area, you can reduce the required search time. Increasing the template size can improve the search time, but doing so reduces match accuracy if the larger template includes an excess of background information.
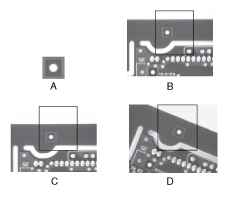
In many inspection applications, you have general information about the location of the fiducial. Use this information to define a search area. For example, in a typical component placement application, each printed circuit board (PCB) being tested may not be placed in the same location with the same orientation. The location of the PCB in various images can move and rotate within a known range of values, as illustrated in the following figure. Figure A shows the template used to locate the PCB in the image. Figure B shows an image containing a PCB with a fiducial you want to locate. Notice the search area around the fiducial. If you know before the matching process begins that the PCB can shift or rotate in the image within a fixed range—as shown in Figure C and Figure D, respectively—you can limit the search for the fiducial to a small region of the image.
Setting Matching Parameters and Tolerances
Every pattern matching algorithm makes assumptions about the images and pattern matching parameters used in machine vision applications. These assumptions work for a high percentage of the applications. However, there may be applications in which the assumptions used in the algorithm are not optimal. Knowing your particular application and the images you want to process is useful in selecting the pattern matching parameters. Use the IMAQ Setup Match Pattern 2 VI to set the following parameters that influence the NI Vision pattern matching algorithm: Match Mode, Minimum Contrast, and Rotation Angle Ranges.
Match Mode
Set the match mode to control how the pattern matching algorithm treats the template at different orientations. If you expect the orientation of valid matches to vary less than ±5° from the template, set the Match Mode control to Shift Invariant. Otherwise, set Match Mode to Rotation Invariant. Shift-invariant matching is faster than rotation-invariant matching.
Minimum Contrast
The pattern matching algorithm ignores all image regions in which contrast values fall below a set minimum contrast value. Contrast is the difference between the smallest and largest pixel values in a region. Set the Minimum Contrast control to slightly below the contrast value of the search area with the lowest contrast.
You can set the minimum contrast to potentially increase the speed of the pattern matching algorithm. If the search image has high contrast overall but contains some low contrast regions, set a high minimum contrast value to exclude all areas of the image with low contrast. Excluding these areas significantly reduces the area in which the pattern matching algorithm must search. However, If the search image has low contrast throughout, set a low minimum contrast to ensure that the pattern matching algorithm looks for the template in all regions of the image.
Rotation Angle Ranges
If you know that the pattern rotation is restricted to a certain range—for example, between –15° and 15°—provide this restriction information to the pattern matching algorithm in the Rotation Angle Ranges control. This information improves your search time because the pattern matching algorithm looks for the pattern at fewer angles. Refer to Chapter 12, Pattern Matching, of the NI Vision Concepts Manual for information about pattern matching.
Testing the Search Algorithm on Test Images
To determine if your selected template or reference pattern is appropriate for your machine vision application, test the template on a few test images by using the IMAQ Match Pattern 2 VI. These test images should reflect the images generated by your machine vision application during true operating conditions. If the pattern matching algorithm locates the reference pattern in all cases, you have selected a good template. Otherwise, refine the current template, or select a better template until both training and testing are successful.
Using a Ranking Method to Verify Results
The manner in which you interpret the IMAQ Match Pattern 2 VI results depends on your application. For typical alignment applications, such as finding a fiducial on a wafer, the most important information is the position and location of the best match. Use the Position and Bounding Box elements of the Matches indicator to get the position and location of a match.
In inspection applications, such as optical character verification (OCV), the score of the best match is more useful. The score of a match returned by the pattern matching algorithm is an indicator of the closeness between the original pattern and the match found in the image. A high score indicates a very close match, while a low score indicates a poor match. The score can be used as a gauge to determine if a printed character is acceptable. Use the Score element of the Matches indicator to get the score corresponding to a match.
Finding Points Using Geometric Matching
The geometric matching algorithm in NI Vision locates regions in a grayscale image that match a model, or template, of a reference pattern. Geometric matching is specialized to locate templates that are characterized by distinct geometric or shape information. Geometric matching finds template matches regardless of lighting variation, blur, noise, occlusion, and geometric transformations such as shifting, rotation, or scaling of the template. Geometric matching returns the location of the center of the template, the template orientation, and the scale of the template.
Complete the following generalized steps to find features in an image using geometric matching.
- Define a reference or fiducial pattern to use as a template image.
- Use the reference pattern to train the geometric matching algorithm using the NI Vision Template Editor. Select Start»All Programs»National Instruments»Vision»Template Editor to launch the NI Vision Template Editor.
- Define an image or an area of an image as the search area. A small search area can reduce the time to find the features.
- Set the tolerances and parameters to specify how the algorithm operates at run time using the IMAQ Setup Match Geometric Pattern VI.
- Test the search algorithm on test images using the IMAQ Match Geometric Pattern VI.
Defining and Creating Effective Template Images
The selection of an effective template image plays a critical part in obtaining good results. Because the template image represents the pattern that you want to find, make sure that all the important and unique characteristics of the pattern are well defined in the image.
The geometric matching algorithm is optimized for locating objects with good geometric information. The following figures show examples of template images with good geometric or shape information.
Geometric matching is not suited for template images that are predominantly defined by grayscale or texture information. The following figure shows examples of template images that do not have good geometric information. The template image in Figure A is characterized by the grayscale or texture information in the image. Figure B contains too many edges and will dramatically increase the time geometric matching takes to locate the template in an image.
Training the Geometric Matching Algorithm
After you create a good template image, the geometric matching algorithm has to learn the important features of the template. Use the NI Vision Template Editor to select the important features in the template. Geometric matching uses the curves found in the template image as the basis for the features that are used for matching. Use the NI Vision Template Editor to remove noisy or unimportant curves from the template image and keep only those curves that are important to locate the template in the image.
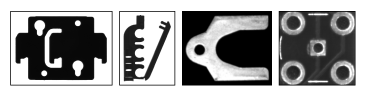
The template image of a pacemaker is shown in Figure A. Figure B shows all the curves that are found in the template image. These images are comprised of curves that are good for matching, such as those along the boundary of the pacemaker, as well as noisy or unimportant curves, such as those found around the barcode and areas of reflection in the image. If you learn the template with the unimportant curves, the geometric matching algorithm will treat these curves as important features that must be found within a valid match region. You can make the matching process more reliable by removing these curves before learning the template. Figure C shows the curves that are used to learn the template after the unimportant curves have been removed using the NI Vision Template Editor.
Once the template image is trained, you can save the template to a file from within the NI Vision Template Editor. Use the IMAQ Read Image and Vision Info VI to read the template file within your application.
Refer to the NI Vision Template Editor Help for more information about training the Geometric Matching algorithm.
Setting Matching Parameters and Tolerances
The geometric matching algorithm makes assumptions about the images and geometric matching parameters used in machine vision applications. These assumptions work for a high percentage of the applications. However, there may be applications in which the assumptions used in the algorithm are not optimal. Knowing your particular application and the images you want to process is useful in selecting the pattern matching parameters. Use the IMAQ Setup Match Geometric Pattern VI to set the following parameters that influence the NI Vision geometric matching algorithm: match mode, rotation angle ranges, scale ranges, and occlusion ranges.
Match Mode
Set the match mode to control the conditions under which the geometric matching algorithm finds the template matches. If you expect the orientation of the valid matches to vary more than ±5° from the template, enable the Rotation option within Match Mode. If you expect the size of the valid matches to change more than ±5%, enable the Scale option within Match Mode. If you expect the valid matches to be partially covered or missing, enable the Occlusion option in Match Mode. Disabling any of these options or limiting their ranges decreases the search time.
Rotation Angle Ranges
If you know the pattern is restricted to a certain range—for example, between –15° and 15° provide this restriction information to the geometric matching algorithm by setting the Rotation Angle (degrees) option in the Range Settings control. This information improves your search time because the geometric matching algorithm looks for the pattern at fewer angles.
Scale Factor Ranges
When the Scale option in Match Mode is enabled, geometric matching searches for occurrences of the template in the image regardless of whether valid matches are of a different size. The default scale range is 75% to 125%. If you know that the scale range of the valid matches is restricted to a certain range—for example, between 90% and 110%—provide this restriction information to the geometric matching algorithm by setting the Scale Factor (%) option within the Range Settings control.
Occlusion Ranges
When the Occlusion option in Match Mode is enabled, geometric matching searches for occurrences of the template in the image, allowing for a specified percentage of the template to be occluded. The default occlusion range is 0% to 25%. If you know that the occlusion range of the valid matches is restricted to a certain range—for example, between 0% and 10%—provide this restriction information to the geometric matching algorithm by setting the Occlusion (%) option within the Range Settings control.
Refer to the Chapter 13, Geometric Matching, of the NI Vision Concepts Manual for more information about geometric matching.
Testing the Search Algorithm on Test Images
To determine if your selected template or reference pattern is appropriate for your machine vision application, test the template on a few test images by using the IMAQ Match Geometric Pattern VI. These test images should reflect the images generated by your machine vision application during true operating conditions. If the geometric matching algorithm locates the reference pattern in all cases, you have selected a good template. Otherwise, refine the current template, or select a better template until both training and testing are successful.
Using Multiple Template Images
Complete the following steps if your application requires locating multiple template images in a target image.
- Use the methods described in Defining and Creating Effective Template Images and Training the Geometric Matching Algorithm to create and train each template image.
- Use the IMAQ Learn Multiple Geometric Patterns VI to combine the templates you trained in the previous step into a Multiple Geometric Template.
If you want to perform the learning process off-line, use the IMAQ Write Multiple Geometric Template VI to save to file the multiple geometric templates created by this step. Use the IMAQ Read Multiple Geometric Template VI to read the multiple geometric template file within your application during the matching process.
- Use the methods described in Setting
Matching Parameters and Tolerances to define how each template matches the target image.

Note Even though the parameters that you create in this step are used only during the match phase, you can pass these parameters to the IMAQ Learn Multiple Geometric Patterns VI during the learn phase. Doing this stores these parameters in the multiple geometric template, and they will be saved to file when you save the multiple geometric template. When you read the multiple geometric template file within your application, it will be part of the multiple geometric template, and will be used during the matching process. If you wish to override some of these parameters during the matching process, you can do so by passing the overriding parameters to the IMAQ Match Multiple Geometric Patterns VI. - Test the multiple template search algorithm on test images using the IMAQ Match Multiple Geometric Patterns VI to match all of the templates. The importance of this step is for the same reason explained in Testing the Search Algorithm on Test Images.
Finding Points Using Color Pattern Matching
Color pattern matching algorithms provide a quick way to locate objects when color is present. Use color pattern matching if your images have the following qualities:
- The object you want to locate has color information that is very different from the background, and you want to find a very precise location of the object in the image.
- The object to locate has grayscale properties that are very difficult to characterize or that are very similar to other objects in the search image. In such cases, grayscale pattern matching can give inaccurate results. If the object has color information that differentiates it from the other objects in the scene, color provides the machine vision software with the additional information to locate the object.
Color pattern matching returns the location of the center of the template and the template orientation. Complete the following general steps to find features in an image using color pattern matching:
- Define a reference or fiducial pattern in the form of a template image.
- Use the reference pattern to train the color pattern matching algorithm using the IMAQ Setup Learn Color Pattern VI.
- Define an image or an area of an image as the search area. A small search area can reduce the time to find the features.
- Set the Feature Mode control to Color and Shape.
- Set the tolerances and parameters to specify how the algorithm operates at run time using the IMAQ Setup Match Color Pattern VI.
- Test the search tool on test images using the IMAQ Match Color Pattern VI.
- Verify the results using a ranking method.
Defining and Creating Good Color Template Images
The selection of a good template image plays a critical part in obtaining accurate results with the color pattern matching algorithm. Because the template image represents the color and the pattern that you want to find, make sure that all the important and unique characteristics of the pattern are well defined in the image.
Several factors are critical in creating a template image. These critical factors include color information, symmetry, feature detail, positional information, and background information. Refer to Defining and Creating Effective Template Images for more information about some of these factors.
Color Information
A template with colors that are unique to the pattern provides better results than a template that contains many colors, especially colors found in the background or other objects in the image.
Symmetry
A rotationally symmetric template in the luminance plane is less sensitive to changes in rotation than one that is rotationally asymmetric.
Feature Detail
A template with relatively coarse features is less sensitive to variations in size and rotation than a model with fine features. However, the model must contain enough detail to identify it.
Positional Information
A color template whose luminance plane contains strong edges in both the x- and y- directions is easier to locate.
Background Information
Unique background information in a template improves search performance and accuracy during the grayscale pattern matching phase. This requirement could conflict with the color information requirement of color pattern matching because background colors may interfere with the color location phase. Avoid this problem by choosing a template with sufficient background information for grayscale pattern matching while specifying the exclusion of the background color during the color location phase. Refer to Training the Color Pattern Matching Algorithm for more information about how to ignore colors.
Training the Color Pattern Matching Algorithm
After you have created a good template image, the color pattern matching algorithm needs to learn the important features of the template. The learning process depends on the type of matching that you expect to perform. By default, the color pattern matching algorithm learns only those features from the template that are necessary for shift-invariant matching. However, if you want to match the template at any orientation, the learning process must consider the possibility of arbitrary orientations.
Use the IMAQ Setup Learn Color Pattern VI to specify which type of learning mode to use. Then use the IMAQ Learn Color Pattern VI to learn the template.
Exclude colors in the template that you are not interested in using during the search phase. Ignore colors that make your template difficult to locate. When a template differs from several regions of the search image by only its primary color or colors, consider ignoring the predominant common color to improve search performance. Typically, the predominant color is the background color of the template.
Use the IMAQ Setup Learn Color Pattern VI to ignore colors. You can ignore certain predefined colors by using the Ignore Black and White control. To ignore other colors, first learn the colors to ignore using the IMAQ ColorLearn VI. Then set the Ignore Color Spectra control of the IMAQ Setup Learn Color Pattern VI to the resulting color spectrum.
The learning process is time-intensive because the algorithm attempts to find unique features of the template that allow for fast, accurate matching. However, you can train the pattern matching algorithm offline, and save the template image using the IMAQ Write Image and Vision Info File 2 instance of the IMAQ Write File 2 VI.
Defining a Search Area
Two equally important factors define the success of a color pattern matching algorithm, accuracy and speed. You can define a search area to reduce ambiguity in the search process. For example, if your image has multiple instances of a pattern and only one instance is required for the inspection task, the presence of additional instances of the pattern can produce incorrect results. To avoid this, reduce the search area so that only the required pattern lies within the search area. For instance, in the fuse box inspection example, use the location of the fuses to be inspected to define the search area. Because the inspected fuse box may not be in the exact location or have the same orientation in the image as the previous one, the search area you define should be large enough to accommodate these variations in the position of the box. The following figure shows how search areas can be selected for different objects.
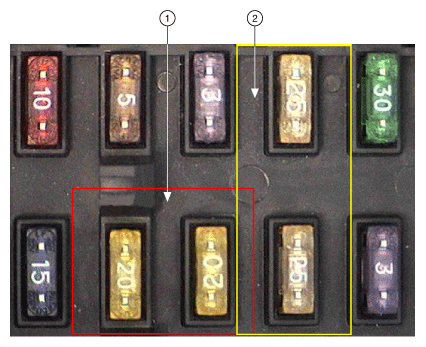 |
|
| 1 Search Area for 20 Amp Fuses | 2 Search Area for 25 Amp Fuses |
The time required to locate a pattern in an image depends on both the template size and the search area. By reducing the search area, you can reduce the required search time. Increasing the template size can improve the search time, but doing so reduces match accuracy if the larger template includes an excess of background information.
Setting Matching Parameters and Tolerances
Every color pattern matching algorithm makes assumptions about the images and color pattern matching parameters used in machine vision applications. These assumptions work for a high percentage of the applications. However, there may be applications in which the assumptions used in the algorithm are not optimal. In such cases you must modify the color pattern matching parameters. Knowing your particular application and the images you want to process is useful in selecting the pattern matching parameters. Use the IMAQ Setup Match Color Pattern VI to set the following parameters that influence color pattern matching: color sensitivity, search strategy, color score weight, ignore colors, minimum contrast, and rotation angle ranges.
Color Sensitivity
Use the color sensitivity to control the granularity of the color information in the template image. If the background and objects in the image contain colors that are very close to colors in the template image, use a higher color sensitivity setting. A higher sensitivity setting distinguishes colors with very close hue values. Three color sensitivity settings are available in NI Vision: low, medium, and high. Use the default low setting if the colors in the template are very different from the colors in the background or other objects that you are not interested in. Increase the color sensitivity settings as the color differences decrease. Use the Color Sensitivity control of the IMAQ Setup Match Color Pattern VI to set the color sensitivity. Refer to Chapter 15, Color Inspection, of the NI Vision Concepts Manual for more information about color sensitivity.
Search Strategy
Use the search strategy to optimize the speed of the color pattern matching algorithm. The search strategy controls the step size, subsampling factor, and percentage of color information used from the template.
Choose from these strategies:
- Conservative—Uses a very small step size, the least amount of subsampling, and all the color information present in the template. The conservative strategy is the most reliable method to look for a template in any image at potentially reduced speed.
|
Note Use the conservative strategy if you have multiple targets located very close to each other in the image. |
- Balanced—Uses values in between the aggressive and conservative strategies.
- Aggressive—Uses a large step size, a lot of subsampling, and all the color spectrum information from the template.
- Very Aggressive—Uses the largest step size, the most subsampling, and only the dominant color from the template to search for the template. Use this strategy when the color in the template is almost uniform, the template is well contrasted from the background and there is a good amount of separation between different occurrences of the template in the image. This strategy is the fastest way to find templates in an image.
Decide on the best strategy by experimenting with the different options. Use the Search Strategy control to select a search strategy.
Color Score Weight
When you search for a template using both color and shape information, the color and shape scores generated during the match process are combined to generate the final color pattern matching score. The color score weight determines the contribution of the color score to the final color pattern matching score. If the color information of the templates is superior to the shape information of the template, set the weight higher. For example, if you use a weight of 1000, the algorithm finds each match by using both color and shape information and then ranks the matches based entirely on their color scores. If the weight is 0, the matches are still found using color and shape information, but they are ranked based entirely on their shape scores. Use the Color Score Weight control to set the color score weight.
Minimum Contrast
Use the minimum contrast to increase the speed of the color pattern matching algorithm. The color pattern matching algorithm ignores all image regions where grayscale contrast values fall beneath a minimum contrast value. Use the Minimum Contrast control to set the minimum contrast. Refer to Setting Matching Parameters and Tolerances for more information about minimum contrast.
Rotation Angle Ranges
Refer to Setting Matching Parameters and Tolerances for information about rotation angle ranges.
Testing the Search Algorithm on Test Images
Refer to Testing the Search_Algorithm on Test Images for information about testing the search algorithm.
Finding Points Using Color Location
Color location algorithms provide a quick way to locate regions in an image with specific colors. Use color location when your application has the following characteristics:
- Requires the location and the number of regions in an image with their specific color information
- Relies on the cumulative color information in the region instead of the color arrangement in the region
- Does not require the orientation of the region
- Does not always require the location with subpixel accuracy
- Does not require shape information for the region
Complete the following general steps to find features in an image using color location:
- Define a reference pattern in the form of a template image.
- Use the reference pattern to train the color location algorithm Using the IMAQ Learn Color Pattern VI.
- Define an image or an area of an image as the search area. A small search area can reduce the time to find the features.
- Set the Feature Mode control of the IMAQ Setup Learn Color Pattern VI to Color.
- Set the tolerances and parameters to specify how the algorithm operates at run time using the IMAQ Setup Match Color Pattern VI.
- Test the color location algorithm on test images using the IMAQ Match Color Pattern VI.
- Verify the results using a ranking method.
You can save the template image using the IMAQ Write Image and Vision Info File 2 instance of the IMAQ Write File 2 VI.