Define Regions of Interest
A region of interest (ROI) is an area of an image in which you want to focus your image analysis. The following table describes each of the ROI tools and the manner in which you use them. You can define an ROI interactively, programmatically, or with an image mask.
| Icon | Tool Name | Function |
|
|
Selection Tool | Select an ROI in the image and adjust the position of its control points
and contours. Action: Click ROI or control points. |
|
|
Point | Select a pixel in the image. Action: Click the position of the pixel. |
|
|
Line | Draw a line in the image. Action: Click the initial position and click again at the final position. |
|
|
Rectangle | Draw a rectangle or square in the image. Action: Click one corner and drag to the opposite corner. |
|
|
Oval | Draw an oval or circle in the image. Action: Click the center position and drag to the required size. |
|
|
Polygon | Draw a polygon in the image. Action: Click to place a new vertex and double-click to complete the ROI element. |
|
|
Freehand Region | Draw a freehand region in the image. Action: Click the initial position, drag to the required shape and release the mouse button to complete the shape. |
|
|
Annulus | Draw an annulus in the image. Action: Click the center position and drag to the required size. Adjust the inner and outer radii, and adjust the start and end angle. |
|
|
Zoom | Zoom-in or zoom-out in an image. Action: Click the image to zoom in. Hold down the <Shift> key and click to zoom out. |
|
|
Pan | Pan around an image. Action: Click an initial position, drag to the required position and release the mouse button to complete the pan. |
|
|
Broken Line | Draw a broken line in the image. Action: Click to place a new vertex and double-click to complete the ROI element. |
|
|
Freehand Line | Draw a freehand line in the image. Action: Click the initial position, drag to the required shape, and release the mouse button to complete the shape. |
|
|
Rotated Rectangle | Draw a rotated rectangle in the image. Action: Click one corner and drag to the opposite corner to create the rectangle. Then click the lines inside the rectangle and drag to adjust the rotation angle. |


Hold down the <Shift> key when drawing an ROI if you want to constrain the ROI to the horizontal, vertical, or diagonal axes, when possible. Use the selection tool to position an ROI by its control points or vertices. ROIs are context sensitive, meaning that the cursor actions differ depending on the ROI with which you interact. For example, if you move your cursor over the side of a rectangle, the cursor changes to indicate that you can click and drag the side to resize the rectangle. If you want to draw more than one ROI in an image display environment, hold down the <Ctrl> key while drawing additional ROIs.
Defining Regions Interactively
You can interactively define an ROI using the ROI tools palette in three ways: with the Image Display control, in a separate floating window, or as part of an ROI constructor window.
Defining an ROI in the Image Display Control
To define an ROI within the Image Display control, select an ROI tool from the tools palette, and draw an ROI on your image.
You can configure which ROI tools are present on the control. Complete the following steps to configure the ROI tools palette during design time:
- Right-click the ROI tools palette and select Visible Items»ROI Tool Button Visibility.
- Deselect the tools you do not want to appear in the ROI tools palette. If you do not want any of the tools to appear, click All Hidden.
- Click OK to implement the changes.
To get or set ROIs programmatically, use the property node for the Image Display control.
Defining an ROI in an External Window
The following list describes how you can display the tools palette in an external window and manipulate the palette. You can find all the following VIs on the Vision Utilities»Region of Interest palette.
- Use the IMAQ WindToolsShow VI to display the tools window in a floating window.
- Use the IMAQ WindToolsSetup VI to configure the appearance of the tools window.
- Use the IMAQ WindToolsMove VI to move the tools palette.
- Use the IMAQ WindToolsClose VI to close the tools palette.
 |
Note If you want to draw an ROI without displaying the tools palette in an external window, use the IMAQ WindToolsSelect VI. This VI allows you to select a contour from the tools palette without opening the palette. |
Defining an ROI Using an ROI Constructor
The IMAQ ConstructROI VI enables you to incorporate into your application a LabVIEW modal window in which you select an ROI. This modal window—called an ROI constructor—stops the execution of your application until the user either selects an ROI or clicks Cancel to exit the window. The ROI constructor is convenient because it saves you the effort of writing code that behaves similarly. If you want to customize the behavior of the ROI constructor more than is possible with the IMAQ ConstructROI VI, use the Image Display control or the external display window to implement your own ROI constructor.
Complete the following steps to invoke an ROI constructor and define an ROI from within the ROI constructor window:
- Use the IMAQ ConstructROI VI to display an image and the tools palette in an ROI constructor window, as shown in the following figure.
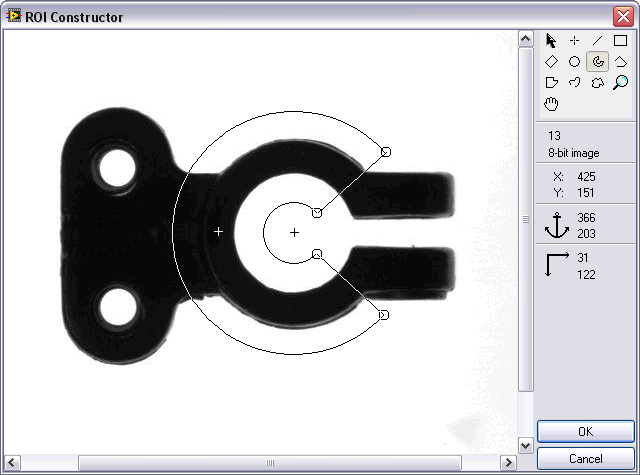
- Select an ROI tool from the tools palette.
- Draw an ROI on your image. Resize and reposition the ROI until it designates the area you want to inspect.
- Click OK to output a descriptor of the region you selected. You can input the ROI descriptor into many analysis and processing functions. You also can convert the ROI descriptor into an image mask, which you can use to process selected regions in the image. Use the IMAQ ROIToMask VI to convert the ROI descriptor into an image mask.
You can also use the IMAQ Select Rectangle, IMAQ Select Point, IMAQ Select Line, and IMAQ Select Annulus VIs to define regions of interest. Complete the following steps to use these VIs:
- Call the VI to display an image in an ROI Constructor window. Only the tools specific to that VI are available for you to use.
- Select an ROI tool from the tools palette.
- Draw an ROI on your image. Resize or reposition the ROI until it covers the area you want to process.
- Click OK to output a simple description of the ROI. You can use this
description as an input for the VIs that measure grayscale intensity:
- IMAQ Light Meter (Point)—Uses the output of IMAQ Select Point
- IMAQ Light Meter (Line)—Uses the output of IMAQ Select Line
- IMAQ Light Meter (Rectangle)—Uses the output of IMAQ Select Rectangle
Tools Palette Transformation
The tools palette shown in the following figure is a component of external display windows and ROI constructors. The tools palette automatically transforms from the palette on the left to the palette on the right when you manipulate a region tool in a display window or ROI constructor. The palette on the right displays the characteristics of the ROI you are drawing.
 |
|
| 1 Pixel Intensity | 4 Anchoring coordinates of an ROI |
| 2 Image Type Indicator (8-bit, Signed 16-bit, Unsigned 16-bit, Float, Complex, 32-bit RGB, HSL, 64-bit RGB) | 5 Size of an active ROI |
| 3 Coordinates of the mouse on the active image window | 6 Length and horizontal angle of a line region |
Defining Regions Programmatically
When you have an automated application, you may need to define ROIs programmatically. You can programmatically define regions in two ways:
-
Specify the elements of an ROI descriptor, which are described as follows:
- Global rectangle—Four integers that describe the bounding rectangle containing all of the shapes in the ROI descriptor.
- Contours—Each of the individual shapes that define
an ROI, as follows:
- ID—Specifies if the contour is the external or internal edge of an ROI. If the contour is external, all of the area inside of it is considered part of the ROI. Because external contours are calculated first, internal contours override external contours, giving you the ability to exclude regions inside external contours.
- Type—The shape type of the contour.
- Coordinates—An array containing the coordinates that define the contour.
- Specify regions by providing basic parameters that describe the region you want to define. For example, define a point by providing the x-coordinate and y-coordinate. Define a line by specifying the start and end coordinates. Define a rectangle by specifying the coordinates of the top/left point, bottom/right point, and the rotation angle in thousandths of degrees.
The Region of Interest Conversion VIs convert simple data types—such as points, lines, rectangles, and annuluses—into an ROI descriptor. Use the following VIs to convert an ROI contour encoded by a simple description to an ROI descriptor for that contour:
- IMAQ Convert Point to ROI—Converts a point specified by its x- and y-coordinates.
- IMAQ Convert Line to ROI—Converts a line specified by its start and end points.
- IMAQ Convert Rectangle to ROI—Converts a rectangle specified by its top-left and bottom-right points and rotation angle.
- IMAQ Convert Annulus to ROI—Converts an annulus specified by its center point, inner and outer radii, and start and end angles.
- IMAQ Convert Rectangle to ROI (Polygon)—Converts a rectangle specified by its top-left and bottom-right points and rotation angle to an ROI descriptor that uses a polygon to represent the rectangle.
Use the following VIs to convert an ROI contour encoded by an ROI descriptor to a simple description for the contour:
- IMAQ Convert ROI to Point—The output point is specified by its x- and y-coordinates.
- IMAQ Convert ROI to Line—The output line is specified by its start and end points.
- IMAQ Convert ROI to Rectangle—The output rectangle is specified by its top-left point, bottom-right point, and rotation angle.
- IMAQ Convert ROI to Annulus—The output annulus is specified by its center point, inner and outer radii, and start and end angles.
Defining Regions with Masks
You can define regions to process with image masks. An image mask is an 8-bit image of the same size as or smaller than the image you want to process. Pixels in the image mask determine if the corresponding pixel in the image to process needs to be processed. If a pixel in the image mask has a value different than 0, the corresponding pixel in the image to process is processed. If a pixel in the image mask has a value of 0, the corresponding pixel in the image to process is left unchanged.
Use masks when you need to make intensity measurements on particles in an image. First, threshold your image to make a new binary image. You can input the binary image or a labeled version of the binary image as an image mask to the intensity measurement function. If you want to make color comparisons, convert the binary image into an ROI descriptor using the IMAQ MaskToROI VI.