Create an Image
Use the IMAQ Create VI to create an image reference. When you create an image, specify one of the following image data types:
- Grayscale (U8, default)—8-bit unsigned
- Grayscale (U16)—16-bit unsigned
- Grayscale (I16)—16-bit signed
- Grayscale (SGL)—Floating point
- Complex (CSG)—64-bit complex
- RGB (U32)—32-bit RGB
- HSL (U32)—32-bit HSL
- RGB (U64)—64-bit RGB
You can create multiple images by executing IMAQ Create as many times as you want, but each image you create requires a unique name. Determine the number of required images through an analysis of your intended application. Base your decision on different processing phases and whether you need to keep the original image after each processing phase.
 |
Note If you plan to use filtering or particle analysis VIs on the image, you must make sure to have an appropriate border size for the image. The default border size is three pixels. |
When you create an image, NI Vision creates an internal image structure to hold properties of the image, such as its name and border size. However, no memory is allocated to store the image pixels at this time. NI Vision VIs automatically allocate the appropriate amount of memory when the image size is modified. For example, VIs that acquire or resample an image alter the image size so they allocate the appropriate memory space for the image pixels. The output of IMAQ Create is a reference to the image structure. Supply this reference as an input to all subsequent NI Vision functions.
During development, you may want to examine the contents of your image at run time. You can use a LabVIEW image probe to view the contents of your image during execution. To create a probe, right-click the image wire and select Probe.
Most VIs belonging to the NI Vision library require an input of one or more image references. The number of image references a VI takes depends on the image processing function and the type of image you want to use.
NI Vision VIs that analyze the image but do not modify the contents require the input of only one image reference. VIs that process the contents of images may require a reference to the source image(s) and to a destination image, or the VIs may have an optional destination image. If you do not provide a destination image, the VI modifies the source image.
At the end of your application, dispose of each image that you created using the IMAQ Dispose VI.
Input and Output Combinations
Depending on the type of function a VI performs, different combinations of input and output are possible. You can use this flexibility to decide which image to process and where to store the resulting image. If no destination image is wired, the source image is used and passed to the destination output.
The figures in the following sections show several VI connector panes used in NI Vision.
Image Analysis
The following connector pane applies only to VIs that analyze an image and therefore do not modify either the size or contents of the image. Examples of these types of operations include particle analysis and histogram calculations.
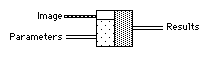
Image Masks
The following connector pane introduces an Image Mask.
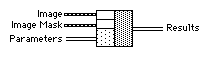
The presence of an Image Mask input indicates that the processing or analysis is dependent on the contents of another image: the Image Mask. The only pixels in Image that are processed are those whose corresponding pixels in Image Mask are non-zero. If an Image Mask pixel is 0, the corresponding Image pixel is not changed.
|
Note The image mask must be an 8-bit image for all NI Vision VIs except the IMAQ Quantify VI, which supports both 8-bit and 16-bit image masks. |
If you want to apply a processing or analysis function to the entire image, do not connect the Image Mask input. Connecting the same image to both inputs Image and Image Mask also gives the same effect as leaving the input Image Mask unconnected, except in this case the Image must be an 8-bit image.
Image Filling
The following connector pane applies to VIs performing an operation that fills an image.
Examples of this type of operation include reading a file, acquiring an image from an NI image acquisition device, or transforming a 2D array into an image. This type of VI can modify the size of an image.
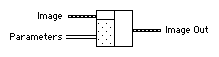
Image Processing
The following connector pane applies to VIs that process an image.

This connector is the most common type in NI Vision. The Image Src input receives the image to process. The Image Dst input can receive either another image or the original, depending on your goals. If two different images are connected to the two inputs, the original Image Src image is not modified. As shown in the following diagrams, if the Image Dst and Image Src inputs receive the same image, or if nothing is connected to Image Dst, the processed image is placed into the original image, and the original image data is lost.

The Image Dst input is the image that receives the processing results. Depending on the functionality of the VI, this image can be either the same or a different image type as that of the source image. Individual VI descriptions include the type of image that can be connected to the Image inputs. The image connected to Image Dst is resized to the source image size.
Arithmetic and Logical Operations
The following connector pane applies to VIs that perform arithmetic or logical operations between two images.
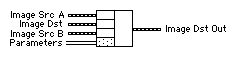
Two source images exist for the destination image. You can perform an operation between two images, A and B, and then either store the result in another image, Image Dst, or in one of the two source images, A or B. In the latter case, you can consider the original data to be unnecessary after the processing has occurred. The following combinations are possible in this pane.

In the pane on the left, the three images are all different. Image Src A and Image Src B are intact after processing and the results from this operation are stored in Image Dst.
In the center pane, Image Src A also is connected to the Image Dst, which therefore receives the results from the operation. In this operation, the source data for Image Src A is overwritten.
In the pane on the right, Image Src B receives the results from the operation and its source data is overwritten.
Most operations between two images require that the images have the same type and size. However, arithmetic operations can work between two different types of images.