Display an Image
You can display images in LabVIEW using two methods. You can display an image in an external window using the external display VIs on the External Display function palette. You can also display an image directly on the front panel using the Image Display control on the Vision control palette.
External Window Display
Display an image in an external window using the IMAQ WindDraw VI. You can display images in up to 16 different external windows. Use the IMAQ WindSetup VI to configure the appearance of each external window. For example, you can decide if the window has scroll bars, is resizable, or has a title bar. You also can use the IMAQ WindMove VI to position the external image window at a particular location on the monitor.
 |
Note External image windows are not LabVIEW panels. They are managed directly by NI Vision. |
You can use a color palette to display grayscale images by applying a color palette to the window. You can use the IMAQ GetPalette VI to obtain predefined color palettes. For example, if you need to display a binary image—an image containing particle regions with pixel values of 1 and a background region with pixel values of 0—apply the predefined binary palette. Refer to the NI Vision Concepts Manual for more information about color palettes.
 |
Note At the end of your application, you must close all open external windows using the IMAQ WindClose VI. |
Image Display Control
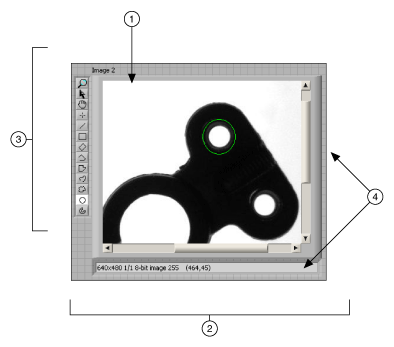
Use the Image Display control to display an image on the LabVIEW front panel, as shown in the following figure. You can access the Image Display control by right-clicking the front panel and selecting Vision.
 |
|
| 1 Display Area | 3 ROI Tools Template |
| 2 Image Information Indicator | 4 Scrollbars |
To display an image, wire the image output of an NI Vision VI into the Image Display terminal on the block diagram, as shown in the following figure.

The Image Display control contains the following elements:
- Display area—Displays an image.
- Image information indicator—Displays information about your image and the ROI that you are currently drawing.
- ROI tools palette—Contains tools for drawing ROIs, panning, and zooming. Unlike external display windows, each Image Display control uses its own set of tools.
- Scrollbars—Allows you to position the image in the display area.
During design time, you can customize the appearance of the control by rearranging the control elements, configuring properties through the shortcut menu, or selecting the control and clicking Edit»Customize Control.
During run time, you can customize many parts of the control using property nodes.
 |
Note Not all functionality available during design time is available at run time. |
To create a property node, right-click the control and select Create»Property Node. Click the Property Node once to see the properties you can configure. Properties specific to the Image Display control appear at the end of the list.
The following list describes a subset of the properties available for the Image Display control:
-
Snapshot Mode—Determines if the control makes a copy of the image or has a reference to the image. When you enable the Snapshot Mode, if the inspection image changes later in your application, the Image Display control continues to display the image as it was when the image was wired into the Image Display control.
Enabling the Snapshot Mode may reduce the speed of your application because the control makes a copy of the image. Enable this property when you want to display a snapshot of the image in time. Disable this property when you need to display results quickly, such as during a grab acquisition. The Snapshot Mode property is disabled by default.
 |
Note To cause the Image Display control to refresh the image immediately, use the Refresh Image method. To create a method, right-click the control, and select Create»Invoke Node. Click the Invoke Node once to see the available methods. Methods specific to the Image Display control appear at the end of the shortcut menu. |
- Palette—Determines which color palette the Image Display control uses to display images. You can configure the control to use a predefined color palette or a custom color palette. Define a custom color palette with the User Palette property node. You also can change the color palette of the control or an image probe at run time by right-clicking the Image Display control.
- Maximum Contour Count—Sets the maximum number of ROI contours a user can draw on an image display.
The Image Display control also includes the following methods:
- Get Last Event—Returns the last user event, resulting from mouse movements and clicks, on the Image Display control. This method has the same behavior as the IMAQ WindLastEvent VI for external display windows.
- Clear ROI—Removes any ROIs on the Image Display control.
- Refresh Image—Refreshes the display to show the latest image. This method is useful if the snapshot control is disabled, but you want the Image Display control to show the latest changes to the image.