Buffer Management
From NI-IMAQdx
Buffer Management
The IMAQ Create VI and IMAQ Dispose VIs manage image buffers in LabVIEW.
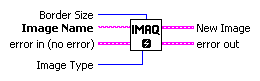
IMAQ Create, as shown in the following figure, allocates an image buffer. Image Name is a label for the buffer created. Each buffer must have a unique name. Image Type specifies the type of image being created. Use Grayscale (U8) for 8-bit monochrome images, Grayscale (I16) for 16-bit monochrome images, and RGB (U32) for RGB color images.
| Note If Image Type is set to a value incompatible with the current video mode, NI-IMAQdx automatically changes the value to a compatible one when acquiring images. |
New Image contains pointer information to the buffer, which is initially empty. When you wire New Image to the Image in input of an image acquisition VI, the image acquisition VI allocates the correct amount of memory for the acquisition. If you are going to process the image, you might need to provide a value for Border Size. Border Size is the width, in pixels, of a border created around an image. Some image processing functions, such as labeling or morphology, require a border.
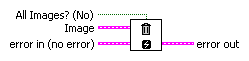
IMAQ Dispose, as shown in the following figure, frees the memory allocated for the image buffer. Call this VI only after the image is no longer required for processing.
Buffers for One-shot Acquisitions
For a one-shot acquisition, you can request only one of the available buffer numbers. For a continuous acquisition, you can request any present or future buffer number. You can also request the next logical buffer or the buffer containing the most recently acquired data. With high-level grab acquisitions, the buffer number defaults to the next transferred buffer.
When you complete the buffer acquisition step, the driver returns the actual buffer number with the image.
Detecting Overwritten Internal Buffers
NI-IMAQdx is able to detect overwritten internal buffers. You can configure the driver to manage an overwritten buffer in one of the following ways.
- Get newest valid buffer
- Get oldest valid buffer
- Fail and return an error
In all cases, the camera continues to transfer data when a buffer is overwritten.
The default overwrite mode for all types of acquisition is to get the newest valid buffer. This option, which National Instruments recommends for most applications, enables you to process the most recent image. If you need to get the image closest in time to a requested buffer, configure the driver to get the oldest valid buffer. If your application requires that every image be processed, configure the driver to fail when a buffer is overwritten so that you are alerted.