Each IPFX Server to be monitored must have its details entered into the Failover Server.
To add a new IPFX Server to be monitored:
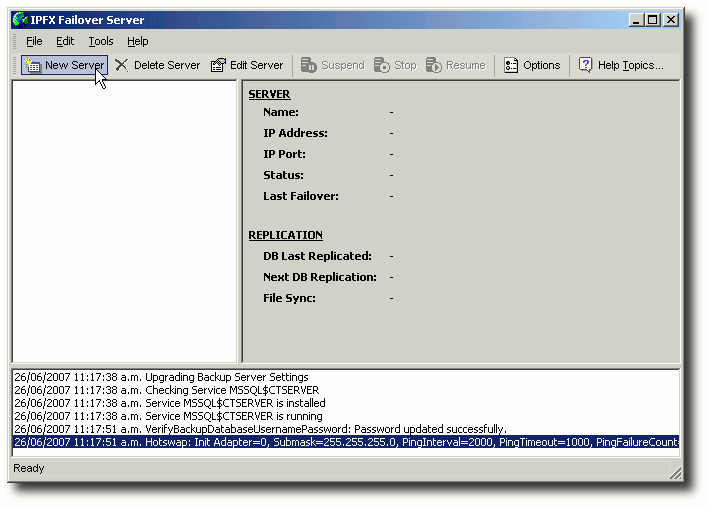
- Click New Server the toolbar of the Failover Server window:

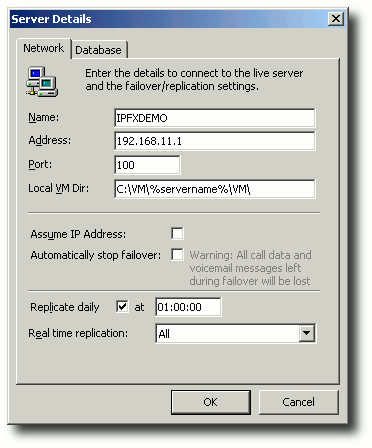
- The Server Details window appears:

Enter the details of the IPFX Server you want to monitor:
Name: The network name of the IPFX Server.
Address: The IP address of the IPFX Server.
Port: The port number used by the IPFX Server. A standard IPFX Server communicates on port 100
Local VM Dir: The directory on the Failover Server in which you wish to store this IPFX Server's replicated files.
Assume IP address: Check this box to have the Failover Server adopt the same IP address as the failed server during failover. If not checked, the IPFX Server will retain its own IP address during failover. See the IPFX Failover Server White Paper to determine which option is appropriate for your organisation.
Automatically stop failover: Check this box to automatically stop the failover server when the failed server comes back online (not available if the Assume IP address option is chosen).
Replicate daily: To back up data from the IPFXServer at a specific time each day, check this box and enter the backup time into the text field provided.
Real time replication: This option is only available if the Failover (Hot) module has been purchased. Choose from two modes of real time replication: All to replicate all data to the Failover Server dynamically, or Configuration to replicate the IPFX Server's configuration dynamically and all other data daily at the time specified above.
Remember to consider bandwidth usage to determine whether a Hot Failover Server can be feasibly implemented.
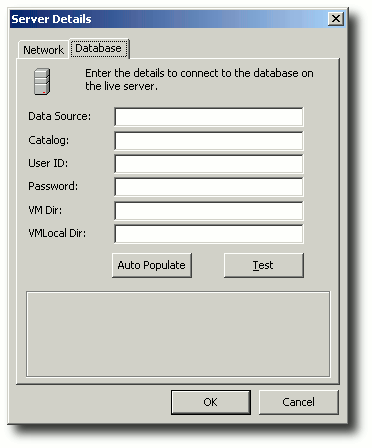
- Click the Database tab:

- Click Auto Populate. The Failover Server will attempt to contact the IPFX Server and automatically populate the form with the relevant login details. If you receive an error message, check that you have entered the details on the Network Tab correctly.
- Data Source: The named instance of SQL that constitutes the database.
- Catalog: The catalog within SQL Server.
- User ID: The user name (sa, by default) that grants access to the monitored IPFX Server's database.
- Password: The database password associated with the User ID.
- VM Dir: The monitored IPFX Server's VM directory .
- VMLocalDir: The monitored IPFX Server's VMLOCAL directory.
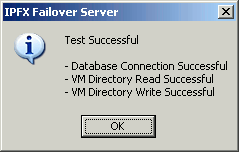
- Click Test to confirm that the monitored database is accessible. If the Failover Server can successfully connect to the monitored IPFX Server, the following message appears:

Click OK to exit the confirmation message.
- Click OK in the Server Details window to begin monitoring this IPFX Server.
- You will be asked if you wish to replicate the CT Server's database immediately:

- Select Yes to back up the Primary Server's database immediately.
- Select No to back up the database at the time chosen in the Network tab.
- You have now finished adding a monitored IPFX server. An icon representing the Server will appear in the list at the left of the main Failover Server form.