


Begin by taking a look at the dialog box you need to create.
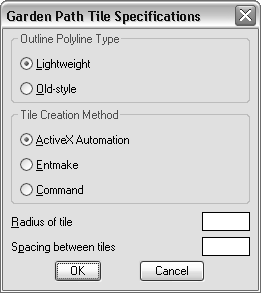
The dialog box contains the following elements:
- Two
sets of radio buttons.
One set of buttons determines the polyline style of the boundary, and the other set of buttons specifies the tile entity creation method (ActiveX, entmake, or command). Only one radio button in a set can be selected at one time.
- Edit boxes for specifying the radius of tiles and the spacing between tiles.
- A standard set of OK and Cancel buttons.
Dialog box components are referred to as tiles in DCL. Writing the complete contents of a dialog box DCL file may seem overwhelming. The trick is to sketch out what you want, break it down into sections, then write each section.
- Open a new file in the VLISP text editor window.
- Enter the following
statement in the new file:
label = "Garden Path Tile Specifications";
This DCL statement defines the title of the dialog box window.
- Define the radio buttons for specifying
polyline type by adding the following code:
: boxed_radio_column { // defines the radio button areaslabel = "Outline Polyline Type";
: radio_button { // defines the lightweight radio buttonlabel = "&Lightweight";
key = "gp_lw";
value = "1";
}
: radio_button { // defines the old-style polyline radio buttonlabel = "&Old-style";
key = "gp_hw";
}
}
The boxed_radio_column DCL directive defines a box boundary and allows you to specify a label for the set of buttons. Within the boundary, you specify the radio buttons you need by adding radio_button directives. Each radio button requires a label and a key. The key is the name by which your AutoLISP code can refer to the button.
Notice that the radio button labeled “lightweight” is given a value of 1. A value of 1 (a string, not an integer) assigned to a button makes it the default choice in a row of buttons. In other words, when you first display the dialog, this button will be selected. Also notice that in DCL files, double-slash characters, not semicolons as in AutoLISP, indicate a comment.
- Define the radio column for the selection
of the entity creation style by adding the following code:
: boxed_radio_column { // defines the radio button areaslabel = "Tile Creation Method";
: radio_button { // defines the ActiveX radio buttonlabel = "&ActiveX Automation";
key = "gp_actx";
value = "1";
}
: radio_button { // defines the (entmake) radio buttonlabel = "&Entmake";
key = "gp_emake";
}
: radio_button { // defines the (command) radio buttonlabel = "&Command";
key = "gp_cmd";
}
}
- Add the following code to
define the edit box tiles that allow users to enter the numbers
specifying tile size and spacing:
: edit_box { // defines the Radius of Tile edit boxlabel = "&Radius of tile";
key = "gp_trad";
edit_width = 6;
}
: edit_box { // defines the Spacing Between Tiles edit boxlabel = "S&pacing between tiles";
key = "gp_spac";
edit_width = 6;
}
Notice that this definition does not set any initial values for the edit boxes. You will set default values for each edit box in your AutoLISP program.
- Add the following code for the OK and Cancel
buttons:
: row { // defines the OK/Cancel button row: spacer { width = 1; }: button { // defines the OK buttonlabel = "OK";
is_default = true;
key = "accept";
width = 8;
fixed_width = true;
}
: button { // defines the Cancel buttonlabel = "Cancel";
is_cancel = true;
key = "cancel";
width = 8;
fixed_width = true;
}
: spacer { width = 1;}}
Both buttons are defined within a row, so they line up horizontally.
- Scroll to the beginning of the text editor
window and insert the following statement as the first line in your
DCL:
gp_mainDialog : dialog { - The dialog directive
requires a closing brace, so scroll to the end of the file and add
the brace as the last line of DCL code:
}