Application Notifications
From Project Silk
| Silk 1.0 - June 2011 |
| Application Notifications |
|
|
Introduction
All web applications that users consider responsive have one thing in common: they provide appropriate and timely feedback to the user. This feedback can come in many forms, including a save or success message following a completed task, subtle animations in response to a user interface (UI) gesture, a progress message for long-running tasks or input error messages displayed before a page is submitted.
How the application surfaces the notifications to the user is almost as important as the information itself. Intrusive message boxes, modal dialogs, and overlays (floating messages) that require the user to dismiss messages, can interrupt the user's workflow, get in the way, and degrade the overall user experience.
In addition to providing feedback during normal application use, the website must also provide quality feedback when a non-recoverable error occurs. Quality feedback means providing understandable information about what has occurred, along with clear instructions on how to proceed.
What You Will Learn in This Chapter
In this chapter you will discover:
- How to provide unobtrusive user notification messages.
- How to handle multiple simultaneous notification messages raised by the application.
- The benefits of encapsulating the display and management of user notification in a single JavaScript object.
- How to display a helpful global error page.
- How to set up a global error handler for Ajax requests.
- Alternatives to modal dialogs for prompting users.
- How to enable application notifications on the desktop with the Pinned Sites API.
The technologies discussed in this chapter are jQuery UI Widgets and Pinned Sites in Windows® Internet Explorer® 9.
For a comprehensive look at input validation error messages, see Chapter 10, "Data, Caching, and Validation."
Notifying the User
Providing a high-quality application notification experience requires careful planning with emphasis on where notifications will be displayed, what events initiate a message, how potential multiple simultaneous messages will be handled, and how to decouple the message originator from the object tasked with displaying the message.
During the design phase of the Mileage Stats application, the Project Silk team discussed where and how notification messages would be displayed. We spent time prototyping several different notification designs.
Where notification messages are displayed is an essential part of the overall application user experience (UX) and user interface design. Our initial design called for messages and progress bars to be displayed within the boundaries of each jQuery UI widget. After building several prototypes and performing usability testing, the team determined this design was unnecessary because the UI loads very fast, alleviating the need for a loading progress bar in this application. The team decided that displaying user messages in a single location made for a much better experience than having messages displayed within individual widgets.
Throughout application development, the team tailored application events that triggered user messages based on usability testing. Initially, the team displayed messages each time an Ajax request was invoked. This caused the UI to be too busy, so we associated a time delay with the message so that it would only display if the request took longer than the time delay. This too, got messy, requiring a good deal of code with little or no value added to the application. In the end, the "less is more" principle triumphed, resulting in a good balance of informative messages.
Interactive and engaging applications such as Mileage Stats can execute multiple, asynchronous operations, such as the Dashboard page that loads data for several jQuery UI widgets in addition to the chart widget. Each of these operations loads data for a region of the UI. Any of these operations is a potential point of failure requiring an error message. It's important that the application notification implementation be able to manage multiple simultaneous or nearly simultaneous messages.
From an architectural design perspective, it's critical that message initiators not be responsible for determining how to coordinate the display of messages in the UI. Decoupling the message initiator from the rendering object allows both of them to evolve independently and to be tested in isolation.
The above section provides a glimpse into how the team worked together to maintain the delicate balance of UX, UI, and engineering concerns. It's this type of designer-developer collaboration that enabled the team to deliver a successful notification feature.
Where Notification Messages are Displayed
Mileage Stats is composed of widgets. The decision to create and use a widget for displaying notification messages is a natural architectural design fit for this application. Widgets have flexible and powerful UI capabilities, provide for encapsulation of behavior, and can have external dependencies like publish and subscribe (pub/sub) injected into their options object during creation.
Mileage Stats uses a single widget called status for displaying messages to the user. The status widget subscribes to the Mileage Stats status pub/sub message. It also handles the placement and rendering of messages as well as the coordination of multiple simultaneous messages.
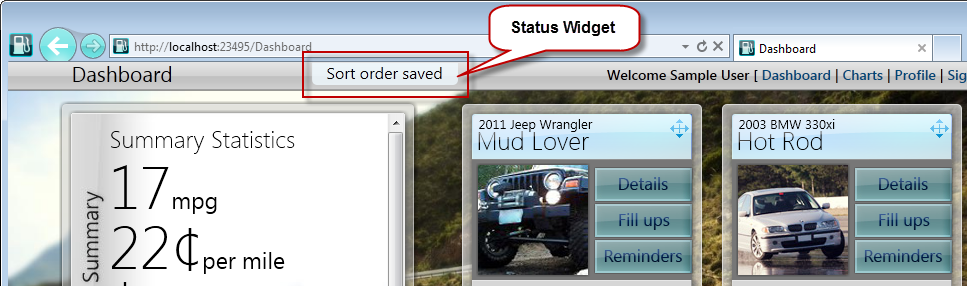
The status widget is rendered within the header widget UI, as pictured above. This top, semi-central location was chosen because it's easier for the user to notice the message in this location, as opposed to a message area along the bottom of the browser window. The balance of easily noticed, easy-to-read, yet unobtrusive user notifications, took time, patience, and usability testing, but the multiple design iterations were worth the extra investment of time.
How Notification Messages are Initiated
Mileage Stats notification messages are initiated by widgets and communicated to the status widget using the pub/sub JavaScript object. Like other pub/sub messages, the status message has an associated payload object that is passed with the message.

The code snippet below is from the vehicleDetails widget. The _publishStatus method is responsible for making the pub/sub call. It's called internally by other widget methods to initiate the display of a message. The status argument is the message payload and is forwarded in the publish call. The publish method was passed in the widget options object when the widget was created and points to the pubsub JavaScript object. The jQuery isFunction method verifies that publish is a valid JavaScript function object before it's called.
| JavaScript |
|
|---|---|
// Contained in mstats.vehicle-details.js
_publishStatus: function (status) {
    this.options.publish(mstats.events.status, status);
}, | |
As stated earlier, Mileage Stats does not bother the user with data request messages. However, when initiating an Ajax operation such as a save or delete, it's important to keep the user informed by updating the UI as the request proceeds and concludes.
The following functions show how easy it is to initiate the display of a user message:
- The _showDeletingMessage function is called after the user confirms his intent to delete the vehicle. This message is intended to inform the user that the vehicle deletion has been submitted to the server.
- The _showDeletedMessage function is called after a successful deletion of the vehicle, informing the user that the deletion was successful.
- The _showDeleteErrorMessage function is called if an error occurred while deleting the vehicle.
| JavaScript |
|
|---|---|
// contained in mstats.vehicle-details.js
_showDeletingMessage: function () {
  this._publishStatus({
    type: 'saving',
    message: 'Deleting the selected vehicle ...',
    duration: 5000
  });
},
_showDeletedMessage: function () {
  this._publishStatus({
    type: 'saved',
    message: 'Vehicle deleted.',
    duration: 5000
  });
},
_showDeleteErrorMessage: function () {
  this._publishStatus({
    type: 'saveError',
    message: 'An error occurred deleting the selected vehicle. Please try again.',
    duration: 10000
  });
}
| |
Each function creates an object literal containing a type, message, and duration property. The type property is used by the status widget to prioritize multiple or overlapping display message requests. The message is the text of the message to display and the duration is how long the message should display.
For detailed information on the inner working of the Mileage Stats pub/sub implementation, see Chapter 8, "Communication."
How Individual or Multiple Notification Messages are Displayed
In the following _create method, the status widget subscribes to the status event. When this event is raised, the _statusSubscription method is invoked.
The _statusSubscription method is responsible for displaying and hiding messages as well as managing multiple simultaneous messages. If a message is being displayed and another message with a higher priority arrives, the higher priority message will be shown.
| JavaScript |
|
|---|---|
// contained in mstats.status.js
_create: function () {
  // handle global status events
  this.options.subscribe(mstats.events.status, this._statusSubscription, this);
},

...

_statusSubscription: function (status) {
  var that = this;

  status.priority = that._getPriority(status);

  // cancel displaying the current message if its priority is lower than
  // the new message. (the lower the int, the higher priority)
  if (that.currentStatus && (status.priority < that.currentStatus.priority)) {
    clearTimeout(that.currentStatus.timer);
  }

  that.currentStatus = status;

  that.element.text(status.message).show();

  // set the message for the duration
  that.currentStatus.timer = setTimeout(function () {
    that.element.fadeOut();
    that.currentStatus = null;
  }, status.duration || that.options.duration);
}, | |
User Session Timeout Notification
Mileage Stats uses forms authentication, with a session timeout threshold of 20 minutes. If the session has timed out, the request (Ajax or non-Ajax) is redirected to the page specified by the forms authentication loginUrl in the web.config file.
In traditional websites that perform page reloads between pages, it’s common to redirect the user to a sign-in page when their session times out. Applications like Mileage Stats that make heavy use of Ajax calls to retrieve data, perform few full-page reloads. Consequently, if a session timeout occurs, it’s usually during an Ajax request. Let's examine what happens when an Ajax request is redirected because of an authentication session timeout:
- Ajax JavaScript Object Notation (JSON) data request initiated.
- Forms authentication runtime detects an expired session and redirects the request to the sign-in page.
- A parsing error occurs because the Ajax handler is expecting JSON data and not HTML. The HTML is the content of the sign-in page to which the request was redirected.
- An Ajax error callback is invoked.
- A global Ajax error callback is invoked.
Errors that can occur anywhere in the application can often be handled in a centralized location so that individual objects don't need to repeat the same error handling code. Mileage Stats implements the global ajaxError method handler shown below to catch errors occurring during an Ajax request. The primary purpose of this method in Mileage Stats is to identify whether the initiating Ajax request caused a session timeout error and, if so, redirect the user to the sign-in page.
When looking at the code below, "jqXHR.status === 200" appears out of place or incorrect. Remember, this method is only executed when an Ajax error occurs. If the session times out and the request is redirected to the sign-in page, the response status code will be 200 because the redirect succeeded. In addition to checking for the response status code, this method also verifies that the returned HTML contains the sign-in page's title. If both conditions are met, the browser is redirected to the sign-in page.
| JavaScript |
|
|---|---|
// contained in mileagestats.js
// setup default error handler for redirects due to session timeout.
$(document).ajaxError(function (ev, jqXHR, settings, errorThrown) {
      if ((jqXHR.status === 200)
          && (jqXHR.responseText.indexOf('Mileage Stats Sign In') !== -1)) {
      window.location.replace(mstats.getRelativeEndpointUrl('/Auth/SignIn'));
    }
}); | |
| If the originating Ajax calling code also implements an error handler, the originating Ajax caller's error handler will be called first, then the above global Ajax error handler will be called. |
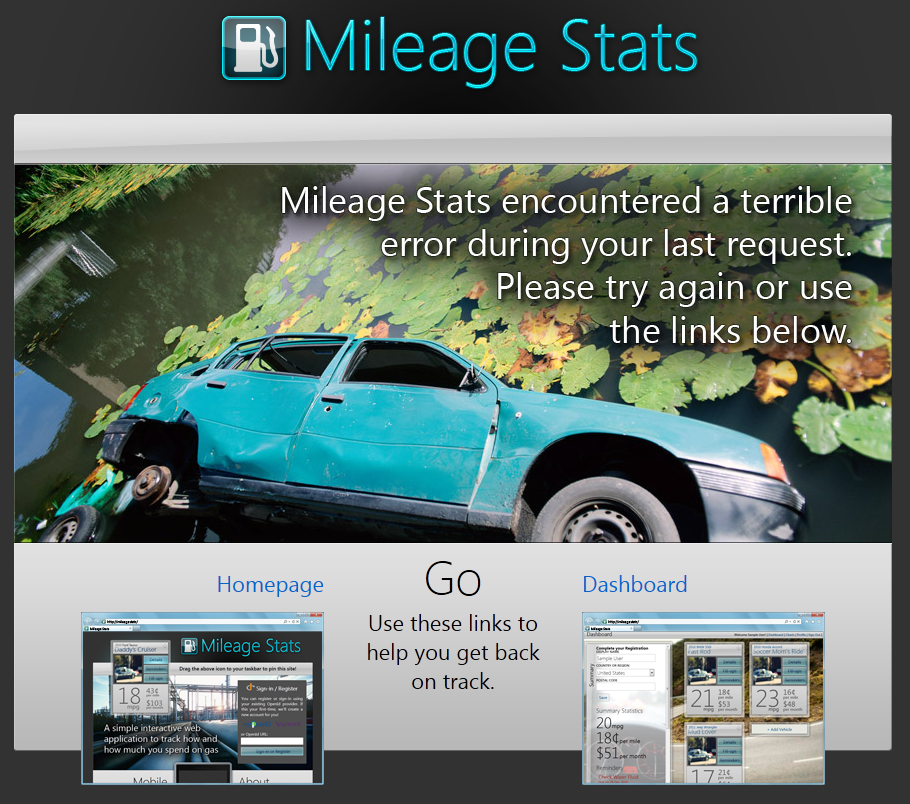
Website Error Notification
ASP.NET provides you with the ability to specify a default error page for their website that the ASP.NET runtime will redirect to when an unhandled exception occurs. This error page is configured in the web.config file customErrors section.
| C# |
|
|---|---|
// Contained in web.config <customErrors defaultRedirect="GenericError.htm" mode="RemoteOnly" /> | |
The error page should look and feel like it is part of the website, contain a brief explanation of why the user has been redirected to this page, and provide links to continue using the site.
Prompting Users
During the design phase of Project Silk, the team had a goal of not prompting users with modal dialogs. Website UX designers are getting away from modal dialogs that ask the user questions like, "Are you sure?" Instead, designers prefer an undo system, allowing users to undo the previous task. The undo feature also enhances the application by extending undo capabilities to tasks that did not require a confirmation dialog.
Since Mileage Stats is only a sample application, it has limited functionality. A production application could implement this undo feature. The team preferred the undo feature, but other features took priority.
The code below uses the JavaScript confirm function to validate the user's request to fulfill a maintenance reminder.
| JavaScript |
|
|---|---|
// contained in mstats.reminders.js
fulfillReminder: function (fulfillmentUrl) {
    var shouldfulfill = confirm('Are you sure you want to fulfill this reminder?');
    if (shouldfulfill) {
        this._fulfillReminder(fulfillmentUrl);
    }
}, | |
| The jQuery UI dialog provides an alternative to using the JavaScript confirm dialog. If you are leveraging jQuery UI plug-ins, you should consider using the jQuery UI dialog for consistency in your UI. |
Desktop Notifications
Given that modern web applications can provide excellent user experiences that rival desktop applications, the team wanted to take the next logical step and integrate the Mileage Stats application with the user's desktop to provide appropriate dynamic user notifications. This integration was made possible by the Internet Explorer 9 Pinned Site API.
Websites that implement the Pinned Site API can feel more like a native Windows application. They can take advantage of the Microsoft® Windows® 7 taskbar capabilities and, when launched, the browser window is customized specifically for the site. The full Pinned Sites experience requires Internet Explorer 9 running on Windows 7. Windows Vista® provides fewer Pinned Sites features—site pinning, customized reduced chrome, and the disabling of browser add-ons.
Mileage Stats uses Pinned Sites to provide Windows 7 taskbar notifications that indicate whether the user has one or more overdue maintenance reminders. In addition, a dynamic jump list provides a direct link to each overdue maintenance reminder.

| Jump list items will be available whether the site is opened in a browser or not. However, the notification icons are only displayed when the site is opened in the browser. |
The two images below contrast Mileage Stats running in a normal browser window and a customized Pinned Sites browser window. The lower image shows the clean, pared down browser window with potentially distracting browser features removed from view, allowing the user to focus on the application features. Applications run in the customized browser window when they are launched from a taskbar or Start Menu Pinned Sites icon.
In addition to a cleaner browser window, Pinned Sites also allows the developer to customize the color of the browser back and forward buttons and displays the website favicon to the left of the back button. This favicon is also a link to the website home page.
Implementing Pinned Sites
Microsoft provides documentation for implementing Pinned Sites in their web applications on MSDN®. The title of this topic is, "Pinned Sites Developer Documentation," and is located at http://msdn.microsoft.com/en-us/library/gg491731(v=VS.85).aspx.
Pinned Sites in Mileage Stats
The following sections will not attempt to duplicate the MSDN documentation just mentioned nor cover every line of code pertaining to Pinned Sites. Instead, the Mileage Stats implementation will be explained, enabling you to understand pieces, requirements, capabilities, and value of the Pinned Sites API.
The Pinned Sites implementation in Mileage Stats includes feature detection, site pinning, dynamic jump list updating, and display of notification icons. These features are encapsulated in the mstats.pinnedSite JavaScript object that is contained in the mstats.pinnedsite.js file. The pinnedStite object is initialized differently depending on whether or not the user is signed in. This initialization will be described below.
Feature Detection
Pinned Sites feature detection is provided by the Internet Explorer 9 msIsSiteMode function. Verifying that the page is opened as a pinned site before executing Pinned Site API methods prevents unnecessary JavaScript errors.
The msIsSiteMode function returns true if the current page is launched as a pinned site; false if it is not. The below isPinned function wraps the msIsSiteMode call and returns false if the page is not launched as a pinned site, or the browser is not Internet Explorer 9.
| JavaScript |
|
|---|---|
// Contained in mstats.pinnedsite.js
isPinned: function () {
    try {
        return window.external.msIsSiteMode();
    }
    catch (e) {
        return false;
    }
} | |
Enabling Website Pinning
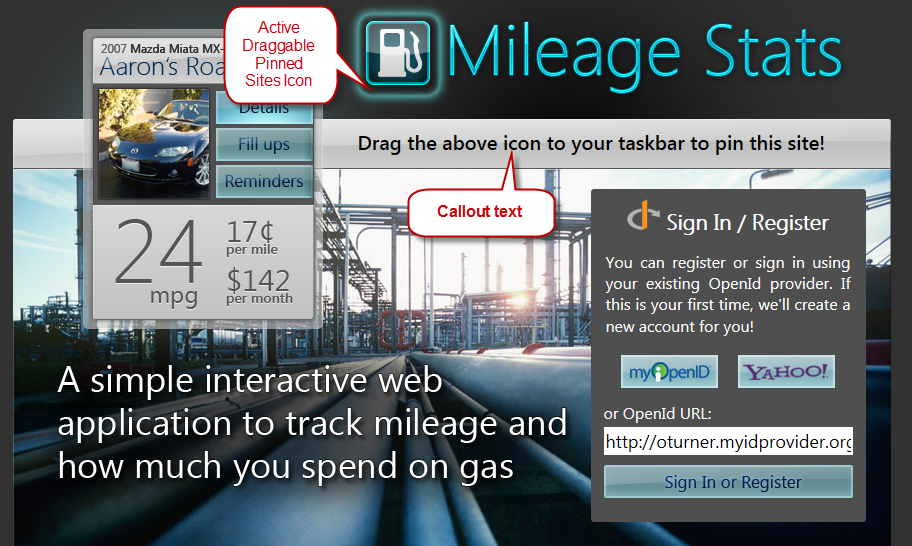
Unauthenticated users visiting the site are directed to the landing page, which is shown below. This page allows users to sign in, pin the site, and view the Mileage Stats video (not pictured). The Pinned Sites icon will glow when it is draggable, allowing the user to pin the site to the taskbar or Start Menu. The callout text displays for 5 seconds when the page loads. It will also show and hide the text as the user moves her mouse over or away from the Pinned Sites icon.
| Developers are not required to implement a draggable site icon as Mileage Stats does to enable site pinning. Providing a draggable icon allows the website more control over the pinning experience. Without a draggable icon, sites can still be pinned by dragging the tab or the favicon to the taskbar. |
The Pinned Sites JavaScript object is initialized when the above page loads with the below JavaScript function.
| CSHTML |
|
|---|---|
// Contained in Index.cshtml
<script>
  $(function () {
    mstats.pinnedSite.intializePinndedSiteImage();
  });
</script> | |
If the browser is Internet Explorer 9 and the website is not currently pinned, the intializePinndedSiteImage method will attach appropriate event handlers for hiding and showing the callout text. It also adds the active CSS class to the Pinned Sites icon so that the icon appears to glow.
| JavaScript |
|
|---|---|
// Contained in mstats.pinnedsite.js
intializePinndedSiteImage: function () {
  try {
    // Do not enable site pinning for non-Internet Explorer 9 browsers
    // Do not show the callout if the site is already pinned
    if (!(document.documentMode === undefined || mstats.pinnedSite.isPinned())) {
      $('#pinnedSiteImage')
            .bind('mousedown mouseout', mstats.pinnedSite.hideCallout)
            .bind('mouseover', mstats.pinnedSite.showCallout)
            .addClass('active');
      $('#pinnedSiteCallout').show();
      setTimeout(mstats.pinnedSite.hideCallout, 5000);
    }
  }
  catch (e) {
    // Fail silently. Pinned Site API not supported.
  }
}, | |
The HTML snippet below shows the required msPinSite class applied to the Pinned Sites icon. This class is used by Internet Explorer 9 to enable the user to drag the Pinned Sites icon to the taskbar or Start Menu and pin the site.
| CSHTML |
|
|---|---|
// Contained in Index.cshtml <img id="pinnedSiteImage" class="msPinSite" ... /> | |
To call the user's attention to the draggable Pinned Sites icon, the active CSS class below adds an attractive outer glow to it.
| CSS |
|
|---|---|
// Contained in static.css
#pinnedSiteImage.active
{
    cursor: pointer;
    box-shadow: 0px 0px 15px #6Dffff, inset 0px 0px 10px #6Dffff;
    border-radius: 12px;
} | |
The user can pin a website by dragging the Pinned Sites icon, browser tab, or favicon to the taskbar or Start Menu. Internet Explorer 9 integrates with the Windows shell to accomplish the pinning.
Dynamic Jump List Updating and Notification Icons
Mileage Stats uses the jump list and notification icons to notify users of overdue maintenance reminders. When users click on the jump list entry, they will be taken to that reminder. The notification overlay icon displays 1, 2, 3, or 3+ to provide a taskbar indication of outstanding reminders.

On the initial page load after the user authenticates, the client-side widgets and JavaScript objects are invoked by code in the mileagestats.js file. The pinnedSite object is initialized by passing it a delegate to the data manager's sendRequest method.
| JavaScript |
|
|---|---|
// Contained in mileagestats.js mstats.pinnedSite.intializeData(mstats.dataManager.sendRequest); | |
The initializeData function saves the sendRequestFunc in the sendRequest property for future calls to the data manager by the requeryJumpList function.
| JavaScript |
|
|---|---|
// Contained in mstats.pinnedsite.js
intializeData: function (sendRequestFunc) {
  sendRequest = sendRequestFunc;
  mstats.pinnedSite.requeryJumpList();
}, | |
The below requeryJumpList function is called when the pinnedSite object is initialized and called by the layoutManager widget when a reminder is fulfilled. It's the layout manager's call that initializes the dynamic updating of the jump list and notification icon.
| Only the essential lines of code that demonstrate the loading of the jump list and updating of the notification icon are listed below. |
All of the below msSite functions are provided by Internet Explorer 9. After using feature detection to determine if the site is pinned, the jump list and overlay icon are cleared, and a new jump list is created.
Not shown below is the Ajax call to the data manager to get the array of overdue reminders. If that Ajax request is successful and the data.Reminders array has data, a URL will be constructed for each data item and added to the jump list. Next, the appropriate overlay icon is set. Finally, msSiteModeShowJumpList is called to update the jump list.
| JavaScript |
|
|---|---|
// Contained in mstats.pinnedsite.js
requeryJumpList: function () {
  try {
    if (mstats.pinnedSite.isPinned()) {
      ...
      var g_ext = window.external,
      ...
      g_ext.msSiteModeClearJumpList();
      g_ext.msSiteModeCreateJumpList("Reminders");
      g_ext.msSiteModeClearIconOverlay();

      if (data.Reminders) {
        for (i = 0; i < data.Reminders.length; i += 1) {
          reminderUrl = mstats.getRelativeEndpointUrl('/reminder/details/' +
            data.Reminders[i].Reminder.ReminderId.toString());
          g_ext.msSiteModeAddJumpListItem(data.Reminders[i].FullTitle, reminderUrl,
            "./favicon.ico", "self");
        }

        if (data.Reminders.length > 0) {
          iconOverlayUrl = '/content/overlay-' + data.Reminders.length + '.ico';
          iconOverlayMessage = 'You have ' + data.Reminders.length.toString() +
            ' maintenance tasks that are ready to be accomplished.';
          if (data.Reminders.length > 3) {
            iconOverlayUrl = '/content/overlay-3plus.ico';
          }
          g_ext.msSiteModeSetIconOverlay(iconOverlayUrl, iconOverlayMessage);
        }
      }

      g_ext.msSiteModeShowJumpList();
... | |
The above code demonstrates that with a small investment, you can deliver dynamic desktop notifications in your websites.
Requirement for Jump List Items to Appear
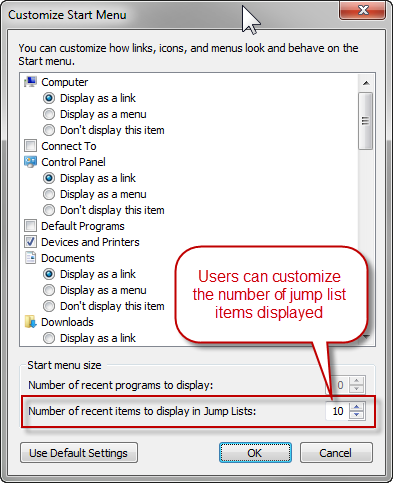
The Windows 7 taskbar jump list items can be disabled by your users, preventing them from displaying even though the website has been pinned to the taskbar.
If your website implements the jump list feature, you should provide this information to your users and advise them that the "Store and display recently opened items in the Start Menu and the taskbar" property setting needs to be checked for the jump list items to show up.
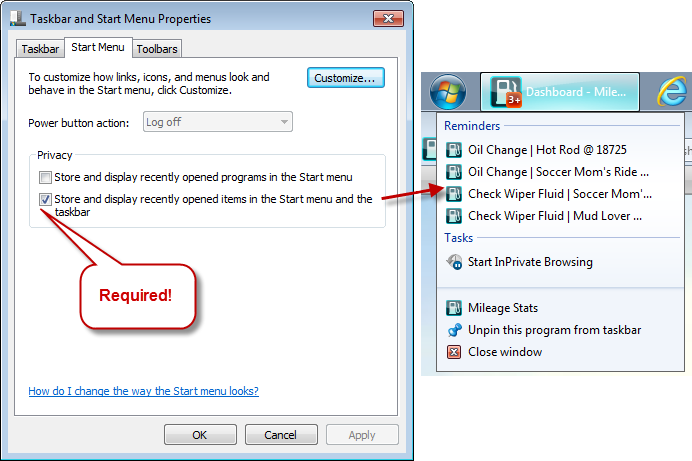
In addition be being able to disable jump list items, users can customize the number of jump list items displayed on their computers. The default value is 10 and can be changed in the Customize Start Menu dialog below. This dialog is opened by clicking the Customize button in the Taskbar and Start Menu Properties dialog shown above.
Summary
Providing timely feedback that is uniformly displayed, context sensitive, and understandable to your users without breaking their workflow takes planning by designers and developers alike. Your users will appreciate this extra effort, which results in a polished user experience. By encapsulating the display and management of user notifications in a single JavaScript object, your application will be easier to code, maintain over time, and test. You have also learned about integrating your website with the Windows 7 desktop to provide users with dynamic notifications and jump list items, as well as browsing your site using a customized browser window.
Further Reading
For a comprehensive look at input validation error messages, see Chapter 10, "Data, Caching, and Validation."
For detailed information on the inner working of the Mileage Stats pub/sub implementation, see Chapter 8, "Communication."
For more information about the isFunction method, see jQuery.isFunction():
http://api.jquery.com/jQuery.isFunction/
For more information about Pinned Sites, see the Pinned Sites developer documentation:
http://msdn.microsoft.com/en-us/library/gg491731(v=VS.85).aspx
To report documentation errors or provide feedback on this documentation, please send email to pagdoc@microsoft.com
Copyright © 2011 by Microsoft Corporation. All rights reserved.