Server-Side Implementation
From Project Silk
| Silk 1.0 - June 2011 |
| Server-Side Implementation |
|
|
Introduction
Crafting a well-architected web server application requires meeting the needs of the web client while properly factoring the web server .NET Framework code. A web server application is responsible for more than just returning HTML content given a URL. Data models, data access and storage, security, communication, resource management, and internationalization are all part of creating a web server application. This chapter covers ways you can integrate technologies in the Microsoft web platform into a coherent architecture that is reliable, testable, and capable of handling demanding web client applications.
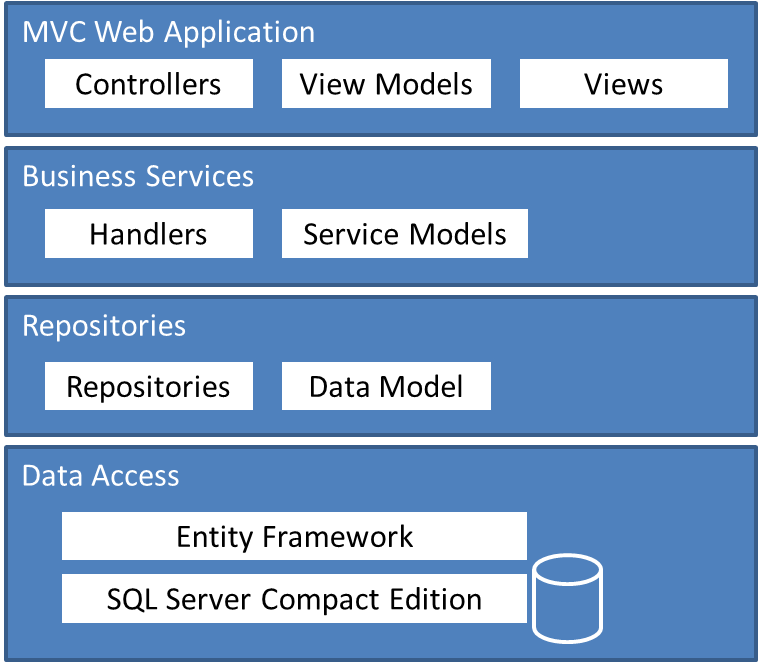
The following diagram shows the architecture of the Mileage Stats Reference Implementation (Mileage Stats). The data access and repository layers are covered first, then the MVC and business services layers are discussed. In the context of these layers, we will also discuss the distinctions between data models, domain models, and view models. Lastly, we’ll show you how to provide asynchronous data and validation to web clients.
What you will learn in this chapter
- Leveraging Entity Framework and SQL Server Compact to create a data model.
- Techniques to separate concerns between your data model, business logic, and user interface.
- How to support interactive web clients with asynchronous data.
- Managing data validation at each level of the stack.
The technologies discussed in this chapter are ASP.NET MVC 3, Entity Framework 4, SQL Server Compact Edition 4, and Unity Application Block 2.0.
Creating a Data Access Layer
Data access is a key part of your application. The choice of storage technology and data access patterns can affect the entire application. This section covers an approach using rapid modeling techniques and tools while allowing you to migrate to high-scale data storage in the future.
A well-designed data access layer captures key truths about the data and avoids conditional logic specific to the application. When you separate concerns that are specific to data access from those that specific to the application’s logic, the application remains robust and maintainable as you add features over time. The typical concerns of a data access layer include the type of data, the relationships between entities, and constraints.
The data you store is often in a format that is optimized for the storage technology, such as a relational database. Frequently, this format is not convenient for consumption by the application. For example, duration may be stored as a number representing the number of computer clock ticks, but having an instance of a TimeSpan would be easier for the application to use. In this case the data access layer should encapsulate the translation between the storage and in-memory formats. Ideally, the data access layer should not contain any user interface or application logic. It should fully abstract the underlying storage implementation.
In Mileage Stats, the MileageStats.Model project contains the data model. The data model is part of the data access layer. The structure and strong-typing of the classes in this project express the data types, relationships, and constraints inherent to the data. For example, the PricePerUnit property of the FillupEntry class is a double to allow for dollar and cents, the Fillups property of the Vehicle class is an ICollection<FillupEntry> to express a one-to-many relationship, and the DueDate property of the Reminder class is a nullable DateTime to allow it to be optional.
When your application has significant complexity or conditional interaction with the data, you should consider creating a separate domain model that is distinct from your data model. See the "Composing Application Logic" section for guidance about whether or not to create a separate domain model.
Rapid Data Modeling using the Entity Framework and SQL Server Compact
The Entity Framework provides three ways for you to rapidly create a data model. You can use the code-first approach to author standard classes that the Entity Framework uses to generate a database schema. Alternatively, you can use the database-first approach where the Entity Framework generates data model classes from an existing database. Finally, you could chose use the model-first approach where an Entity Data Model (.EDMX) can be used to generate the code and database.
The code-first approach is well suited for scenarios like Mileage Stats where developers are defining a new data model that will likely evolve as the application is written and there is not an existing database. If you have an existing database, prefer to use stored procedures, or have a data architect on your team then you may prefer a more traditional database modeling techniques that lets you generate the data model code from the database.
Using SQL Server Compact with the Entity Framework allows you to use an on-disk database that can easily be recreated whenever your schema changes. It can be seeded with a small dataset useful for debugging and unit testing. SQL Server Compact provides a minimal footprint and can be migrated to SQL Server Express, SQL Server, or SQL Azure when the application is deployed.
|
|
|---|
| SQL Server Compact provides query and update functionality, but does not support conditional syntax (such as IF EXISTS) nor stored procedures. Consider other SQL Server editions as your starting point if you need database-centric logic. |
Mileage Stats uses the code-first approach with the Entity Framework and SQL Server Compact. This allowed the data model to be built quickly, adapt to changes, and minimized the day-to-day cost of database setup for the development team.
The Entity Framework lets you easily seed your database with sample data each time the database is rebuilt. This gives you the opportunity to use realistic sample data while you develop the application. We discovered many issues early in the development process of Mileage Stats because the sample data forced the user interface and application logic to work with realistic data.
To use the code-first approach, you first create plain old CLR object (POCO) classes. The Entity Framework then infers the database schema from your class structure and your property types. In the following example, the FillupEntry class defines properties that the Entity Framework can map to a database schema.
| C# |
|
|---|---|
// contained in FillupEntry.cs
public class FillupEntry
{
  ...

public int FillupEntryId { get; set; }
  public int VehicleId { get; set; }
  public DateTime Date { get; set; }
  public int Odometer { get; set; }
  public double PricePerUnit { get; set; }
 public string Vendor { get; set; }
 public double TotalCost
{
get { return (this.PricePerUnit*this.TotalUnits) + this.TransactionFee; }
}

...
} | |
The Entity Framework maps property types like double, string, and int to their equivalent SQL data type. Fields that represent unique entity identifiers such as FillupEntryId and VehicleId are automatically populated. Calculated properties like TotalCost can be added that are not saved to the database.
The Entity Framework has three mechanisms for determining the database schema from the class definition:
- Inspection of the classes to create a schema. Some of the decisions the Entity Framework makes are based on convention. For example, property names that end in Id are considered unique identifiers. They are auto-populated with database generated values when inserted in the database.
- Inspection of data annotation attributes attached to properties. These attributes are found in the System.ComponentModel.DataAnnotations namespace. For example, the KeyAttribute indicates a unique entity identifier. Attributes such as RequiredAttribute and StringLengthAttribute cause the Entity Framework to create column constraints in the database.
- Calls to the DbModelBuilder as part of database creation. These methods directly determine the data types, entity relationships, and constraints for the database schema.
| Using the data annotation attributes with the Entity Framework affects how the Entity Framework generates the database schema as well as performing validation of values when the data is saving using DbContext.SaveChanges. However, using the DbModelBuilder only changes the database schema. Which approach you choose can change the error messages you see when invalid data is submitted as well as whether a database call is made. |
See the "Further Reading" section for the Entity Framework documentation. It contains the detailed API reference and steps to apply each of these techniques.
Mileage Stats used the DbModelBuilder approach to define the storage schema and did not apply any data annotation attributes to the data model classes. This kept database-specific concerns from polluting the data model and allowed changing the database schema, if necessary, for other kinds of database deployments. This approach was part of the decision to create a separate data model and domain model. See the "Creating a Business Services Layer" section for more information on this decision.
The domain model in Mileage Stats uses data annotation attributes extensively. See the "Data Validation" section for details on using attributes for validation.
Using the DbModelBuilder to Create a Data Model
In Mileage Stats, the MileageStats.Data.SqlCE project contains the MileageStatsDbContext class. A data model built using the Entity Framework has at least one class derived from DbContext. This class provides the starting point for accessing the data model. It is also used for defining the model which results in a database schema.
The MileageStatsDbContext class overrides the OnModelCreating virtual method and uses the DbModelBuilder parameter to provide the Entity Framework more information about the schema. Defining each entity is factored out into separate methods that MileageStatsDbContext .OnModelCreating invokes. The following example is one of those methods. It builds the model for the Vehicle class.
| C# |
|
|---|---|
// contained in MileageStatsDbContext.cs
private void SetupVehicleEntity(DbModelBuilder modelBuilder)
{
modelBuilder.Entity<Vehicle>().HasKey(v => v.VehicleId);
modelBuilder.Entity<Vehicle>().Property(v => v.VehicleId)
.HasDatabaseGeneratedOption(
DatabaseGeneratedOption.Identity);
modelBuilder.Entity<Vehicle>().Property(v => v.Name)
.IsRequired();
modelBuilder.Entity<Vehicle>().Property(v => v.Name)
.HasMaxLength(100);
modelBuilder.Entity<Vehicle>().Property(v => v.SortOrder);
modelBuilder.Entity<Vehicle>().Property(v => v.MakeName)
.HasMaxLength(50);
modelBuilder.Entity<Vehicle>().Property(v => v.ModelName)
.HasMaxLength(50);
modelBuilder.Entity<Vehicle>().HasOptional(v => v.Photo);
modelBuilder.Entity<Vehicle>().HasMany(v => v.Fillups);
modelBuilder.Entity<Vehicle>().HasMany(v => v.Reminders);
} | |
DbModelBuilder provides a fluent API that allows you to chain calls together because each method returns an object that can be used in subsequent calls. The calls above use the Entity<T> method to locate the entity based on the type of the class. The chained Property method locates a property for that entity. Lambda expressions like v => v.VehicleEntryId allow the Property method to work without having to provide the name of the property as a string. The last method call defines the data model type, relationship, or constraint.
It is possible for you to use data annotation attributes in conjunction with calls to DbModelBuilder. Data annotation attributes provide a decentralized approach where relationships and constraints are attached to the class properties. The DbModelBuilder approach provides you centralized control of the data model and a more powerful set of modeling options. You should be careful to keep the constraints in sync when mixing approaches. For this reason, it is recommended to choose either using data annotation attributes or the DbModelBuilder, and avoid mixing approaches.
| There is an order of precedence in the Entity Framework when all three mechanisms are used: DbModelBuilder calls override data annotation attributes which override convention by inspection. |
Creating the Database
Once you define the data model in code, you need to create the database. When you use the code-first approach, the Entity Framework doesn't create your database until the first request for data occurs. You should create the database on application start up rather than on the first request so that the first user isn't forced to wait. Initializing during application startup also reduces the chance of a race condition during database creation.
| Many web applications built using the Entity Framework contain the auto-generated WebActivatorAttribute code. This attribute automatically calls the database creation and initialization code. Mileage Stats forgoes this approach because the Unity dependency injection container controls the lifetime of the MileageStatsDbContext instance. |
In Global.asax.cs, the Application_Start method initializes the dependency injection container and then initializes the database. The InitializeDatabase method uses the dependency injection container to resolve an instance of the IRepositoryInitializer and then calls the Initialize method. In the following example, the constructor of the RepositoryInitializer configures the database connection and initializer and the Initialize method requests some data to ensure the database is created.
| C# |
|
|---|---|
// contained in RepositoryInitializer.cs
publicRepositoryInitializer(IUnitOfWorkunitOfWork)
{
  ...
Database.DefaultConnectionFactory =
newSqlCeConnectionFactory("System.Data.SqlServerCe.4.0");

Database.SetInitializer(
newDropCreateIfModelChangesSqlCeInitializer<MileageStatsDbContext>());
}

public void Initialize()
{
this.Context.Set<Country>().ToList().Count();

  ...
} | |
Initializing the Database
The Entity Framework lets you control how your database is created and initialized through the IDatabaseInitializer<T> interface and the Database.SetInitializer method. You can write the initializer with the logic you need in order to create and populate your database.
In Mileage Stats, the MileageStats.Data.SqlCe project contains three classes that can initialize the database: CreateIfNotExistsSqlCeInitializer, DropCreateAlwaysSqlCeInitializer, and DropCreateIfModelChangesSqlCeInitializer. All three inherit from the SqlCeInitializer base class that implements the IDatabaseInitializer<T> interface.
| When you use NuGet to add the Entity Framework to your project, the package manager will generate some default initializers similar to those found in Mileage Stats. Mileage Stats classes are modified versions of the original generated classes. The modifications allow each initializer to share the database seeding code used to start the application with some useful sample data. |
Each class implements a different strategy for creating the database. Mileage Stats defaults to the DropCreateIfModelChangesSqlCeInitializer to drop and create the database anytime the model schema changes. This can be very useful during product development when the data model is evolving and the database doesn't contain real data.
When deployed to a production environment, you should change the default initializer to CreateIfNotExistsSqlCeInitializer. If you deploy a new version of the application where the schema needs to be upgraded you would either need to author an initializer that upgrades the database, or run upgrade scripts pre-deployment of the newer version. Otherwise, you would lose all the data stored in the database.
Optimized Data Access
Many application data models are hierarchical and connected with one-to-many and many-to-many relationships between entities. On the other hand, web applications are connectionless and stateless; they take a request and produce a response. You should avoid loading large model hierarchies for requests that only need a subset of the data. Overloading data places additional processor, memory, and bandwidth pressure on the server and that can limit scalability and performance.
Fortunately, the Entity Framework provides powerful querying support in the DbSet class that allows you to return just the data you need. In Mileage Stats, the VehicleRepository class uses the Where and Include methods on the DbSet to control the data retrieved as shown in the following code.
| C# |
|
|---|---|
// contained in VehicleRepository.cs
public Vehicle GetVehicle(int userId, int vehicleId)
{
return this.GetDbSet<Vehicle>()
.Include("Fillups")
.Include("Reminders")
.Where(v => v.VehicleId == vehicleId && v.UserId == userId)
.Single();
} | |
The Entity Framework requires ICollection<T> properties like Vehicles, Fill-ups, and Reminders be explicitly included. Properties marked optional by data-annotation attributes or DbModelBuilder calls such as the Vehicles.Photo property must also be explicitly included to be retrieved.
The Entity Framework has additional features to support lazy loading properties and change tracking. When using the code-first approach, lazy loading is done by applying the virtual keyword, and change tracking is done through having standard get and set methods along with using ICollection<T> for one-to-many relationships. The Entity Framework also supports these features through implementing the IEntityWithChangeTracker or IEntityWithRelationships interfaces.
Implementing the Repository Pattern
The Repository pattern assists the data model in separating data storage concerns from the application logic. This pattern is especially beneficial when you use the Entity Framework because it allows you to hide Entity Framework-specific classes such as DbContext and DbSet, to optimize the shape of the data returned to the application, to coordinate updates, and to unit test your application without requiring access to physical data storage. See the "Further Reading" section for a formal definition of the repository pattern.
In the repository pattern, a repository is a set of interfaces and implementations providing methods for data access. The interfaces do not expose any types specific to data storage. You can choose how many repositories to create based on how granular you want to factor the methods and the expected data access pattern from your application.
In Mileage Stats, the MileageStats.Data project contains the repository interfaces and the MileageStats.Data.SqlCe project contains the implementation. The Mileage Stats repositories map closely to the data entities to match the usage pattern from the business services layer. The following code shows the IReminderRepository interface.
| C# |
|
|---|---|
// contained in IReminderRepository.cs
public interface IReminderRepository
{
void Create(int vehicleId, Reminder reminder);
Reminder GetReminder(int reminderId);
void Update(Reminder reminder);
void Delete(int reminderId);

IEnumerable<Reminder> GetRemindersForVehicle(int vehicleId);
IEnumerable<Reminder> GetOverdueReminders(int vehicleId,
DateTime forDate, int forOdometer);

IEnumerable<Reminder> GetUpcomingReminders(int vehicleId,
DateTime forStartDate, DateTime forEndDate,
int odometer, int warningOdometer);

IEnumerable<Reminder> GetFulfilledRemindersForVehicle(int vehicleId);
} | |
| Note that the IReminderRepository interface returns collections as IEnumerable<T>, rather than IList<T> or ICollection<T>. This was an intentional design choice to prevent the addition of entities to the collections directly. To create a new reminder, the developer must use the Create method. Also note that our actual implementation of the IReminderRepository calls ToList() before returning the IEnumerable<T>. This is to ensure that the query is executed inside the repository. If ToList() was not called, then the repository would return an IQueryable<T> and the database would not be hit until something iterated over the IQueryable<T>. The problem with returning an IQueryable<T> is that a developer consuming the API is likely to assume that query has already executed and that they are working with the results. If they iterate the query more than once, it will result in multiple calls to the database. If you specifically want your repository to return queries instead of results, use the IQueryable<T> on the interface in order to make the intention explicit. |
Because web applications and services follow a request/response pattern, incoming data is built from the POST form data. This means the incoming object class was not retrieved from the DbContext and cannot be updated because it is not attached to the context. Using the repository pattern with the Entity Framework provides the proper place to deal with attached and detached entities, as well as setting entity state.
In the following example, the Update method in the VehicleRepository is passed an entity that is not attached to the Entity Framework context. The Update method locates the corresponding attached entity, updates the attached entity, and ensures the attached entity state is set correctly.
| C# |
|
|---|---|
// contained in VehicleRepository.cs
public void Update(Vehicle updatedVehicle)
{
Vehicle vehicleToUpdate =
this.GetDbSet<Vehicle>().Where(v => v.VehicleId ==
updatedVehicle.VehicleId).First();

vehicleToUpdate.Name = updatedVehicle.Name;
vehicleToUpdate.Year = updatedVehicle.Year;
vehicleToUpdate.MakeName = updatedVehicle.MakeName;
vehicleToUpdate.ModelName = updatedVehicle.ModelName;
vehicleToUpdate.SortOrder = updatedVehicle.SortOrder;
vehicleToUpdate.PhotoId = updatedVehicle.PhotoId;

this.SetEntityState(vehicleToUpdate,
vehicleToUpdate.VehicleId == 0 ? EntityState.Added : EntityState.Modified);
 this.UnitOfWork.SaveChanges();
} | |
Composing Application Logic
Web client applications built for rich user interactivity are often more complex than those built for clients that post back synchronously on each mouse click and always displaying static HTML in response. Web applications that provide interactive behavior on a single page (via AJAX method calls, JavaScript templates, and secondary resource requests) require thoughtful composition of server application code. This section covers several techniques and considerations to help you create maintainable applications that provide a rich set of services to interactive clients.
Factoring application code with ASP.NET MVC
Because ASP.NET MVC is a web platform technology built around a design pattern, following the MVC pattern is a key step in properly factoring your application logic. Well-designed MVC applications have controllers and actions that are small, and views that are simple. Keeping your application code DRY (Don't Repeat Yourself) as the application is built is far easier than trying to clean it up later.
| The routes you create in global.asax.cs define the URL hierarchy of your application. Defining your URL strategy, routes, and controller topology early in a project can help prevent having to change your client application code later. |
Since the majority of the application logic is contained within the models, many MVC applications contain different kinds of models:
- View models are built solely for a view to data-bind against. These models are contained within the MVC application and often follow the same composition hierarchy as the views. They are focused on presentation concerns. That is, they are only concerned with presenting data in the user interface. Sometimes a special type of view model is also used, called a form model, to represent the data coming into an application from the user.
- Domain models are built based on the problem domain. They are focused on handling the business logic of the application. They represent the logical behavior of the application independent of the user interface and the storage mechanism. They may be annotated or extended to support some application features such as validation or authentication. Because these models are easy to round-trip to the client browser, they are sometimes contained within view models. Domain models are sometimes referred to as application models or service models as well.
- Data models are built for data services and storage. These are not exposed by the application and are often encapsulated behind a services layer.
Organizing your application into these categories of models is a way of separating concerns in your code. This separation is increasingly important as an application grows in complexity. If you find that changes to your application logic are affecting storage or presentations concern (or vice versa), this is an indication that you should factor the code into separate models.
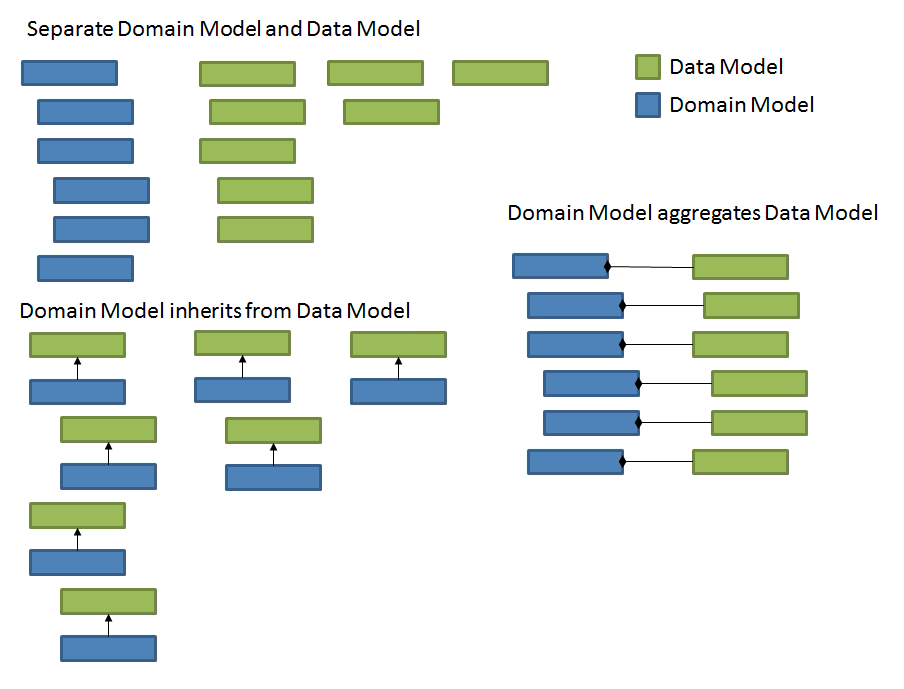
In some cases the models may be very similar to one another. In other cases, the models may radically diverge. If your domain model and your data model are very similar you can consider aggregation to contain an instance of your data model class within your application model class. If your application and data models have a matching hierarchy and compatible interfaces, you can also consider inheritance to derive your application model classes from your data model classes. The following illustration shows the three approaches to domain and data model design.
| The inheritance approach provides the advantage of less coding as you reuse your data model as your domain model, but at the cost of tighter coupling. If you can ensure you will not need to substitute a different data model and that the domain and data models will not deviate, the inheritance approach can be effective. |
As you're writing your controller actions, you should factor complex methods into helper methods or classes in your models and services layer. You should prefer action filter attributes such as the HttpPostAttribute to avoid writing conditional logic in each action that inspects the HttpContext. Also, use action filters for cross-cutting concerns such as authentication (e.g. AuthorizeAttribute) and error handling (e.g. HandleErrorAttribute). Ideally methods that handle GET should contain only a few method calls and not contain much conditional logic; methods that handle POST should validate the incoming data, perform the update when the data is valid, and conditionally return a view depending on the success of the update. The following examples from Mileage Stats show two versions of the Add method (first the GET version and then the POST version). In these examples, the generic method Using<T> is a helper method used to delegate logic to the classes in the services layer.
| C# |
|
|---|---|
// contained in FillupController.cs
[Authorize]
public ActionResult Add(int vehicleId)
{
var vehicles = Using<GetVehicleListForUser>()
.Execute(CurrentUserId);

var vehicle = vehicles.First(v => v.VehicleId == vehicleId);

var newFillupEntry = new FillupEntryFormModel
{
Odometer = (vehicle.Odometer.HasValue)    ? vehicle.Odometer.Value : 0
};

var fillups = Using<GetFillupsForVehicle>()
.Execute(vehicleId)
.OrderByDescending(f => f.Date);

var viewModel = new FillupAddViewModel
{
VehicleList = new VehicleListViewModel(vehicles, vehicleId)        {IsCollapsed = true},
FillupEntry = newFillupEntry,
Fillups = new SelectedItemList<Model.FillupEntry>(fillups),
};

ViewBag.IsFirstFillup = (!fillups.Any());

return View(viewModel);
} | |
| C# |
|
|---|---|
// contained in FillupController.cs
[Authorize]
[HttpPost]
public ActionResult Add(int vehicleId, FillupEntryFormModel model)
{
var vehicles = Using<GetVehicleListForUser>()
.Execute(CurrentUserId );

if (ModelState.IsValid)
{
var errors = Using<CanAddFillup>()
.Execute(CurrentUserId, vehicleId, model);

ModelState.AddModelErrors(errors, "AddFillup");

if (ModelState.IsValid)
{
Using<AddFillupToVehicle>()
     .Execute(CurrentUserId, vehicleId, model);

TempData["LastActionMessage"] = Resources     .VehicleController_AddFillupSuccessMessage;

return RedirectToAction("List", "Fillup",     new { vehicleId = vehicleId });
}
}

var fillups = Using<GetFillupsForVehicle>()
.Execute(vehicleId)
.OrderByDescending(f => f.Date);

var viewModel = new FillupAddViewModel
{
VehicleList = new VehicleListViewModel(vehicles, vehicleId)
 { IsCollapsed = true },
FillupEntry = model,
Fillups = new SelectedItemList<Model.FillupEntry>(fillups),
};

ViewBag.IsFirstFillup = (!fillups.Any());

return View(viewModel);
} | |
Injecting dependences through the controller's constructor is also beneficial when unit testing. Since the controller depends on interfaces and not concrete implementations, we can easily replace the actual dependencies with mock implementations. This allowed us test just the code for the action and not the entire functional stack.
After factoring your models and controller actions, your views will use the models to produce the HTML. When building views, you should keep the amount of code to an absolute minimum. Code contained in views is not easily testable. Errors in views are harder to debug because the exception occurs during the rendering pass by the view engine. Some very simple logic in views is acceptable. For example, looping over items to build a repeating section of the user interface or conditional logic for toggling the visibility of specific sections. However, if you find that you need something more complicated then try to push that logic into the view model. If the logic is a cross cutting concern then consider placing the logic inside an HTML helper extension method. Examples of built-in HTML helper extension methods in MVC include BeginForm, RenderPartial, and ActionLink. Any HTML that is repeated in multiple views is a candidate for being factored into a partial view.
| The MVC Razor syntax allows you to write code more compactly as well as easily mix code and markup. Don't let this powerful view engine tempt you into writing a lot of code within your views. Instead, let it help you keep the code you do write clear and maintainable. |
Design checklist for MVC applications
The following checklist is useful when reviewing your MVC web application code.
Check | When reviewing your MVC web application code |
|---|---|
☐ | Each controller handles a common set of concerns, either for particular model type or a related set of interactions with the user. |
☐ | Actions methods consist of a linear set of calls to helper methods, helper classes, or model classes. They do not contain complex branching conditional logic. They should be easy to unit test and self-documenting. |
☐ | The same code is not repeated in multiple action methods. Action filter attributes are used to handle cross-cutting concerns. |
☐ | The majority of the application logic is contained within the model or service layer. |
☐ | The hierarchy of model classes used by controller actions and views is built to be effective for the application. If required, separate data model classes are contained within another assembly. |
☐ | Views contain only small conditional statements and calls to HTML helper methods. |
☐ | The same HTML is not repeated in multiple views. Commonly used HTML is factored into partial views. |
- See the "Further Reading" section for links to more MVC best practices.
Creating a Business Services Layer
As you factor your application code from your controllers' action methods into helper methods and classes, you may find there are a set of classes and methods that help to properly retrieve, validate, and update data in your data model. This business logic code is distinguished from the controller code because it encapsulates logical operations on the data model and is not specific to any view.
When you have a significant amount of business logic, you may need to create a business services layer. The business services layer is another layer of abstraction, and there is a cost to adding the layer to the application. However, adding this layer allows you to test the business logic in isolation, as well as simplifying the tests for your controllers. Since the service layer is unaware of the user interface, you can also reuse it when exposing additional interfaces in the future such as a web service (using service technologies like Windows Communication Foundation). This can allow you to support both desktop and mobile clients without needing to modify the business service layer.
When deciding whether or not to create a business services layer, you should also consider the decision of whether or not to create a separate domain model. See the "Factoring application code with ASP.NET MVC" section for details on the different kinds of models and techniques for separating a domain model from a data model. Creating a separate domain model along with a business services layer is most beneficial when you need to fully encapsulate your data model, your data model does not perform validation, and the domain model functionality will make it easier for you to write your controllers and views. However, a separate domain model and data model does incur cost transforming between the two models.
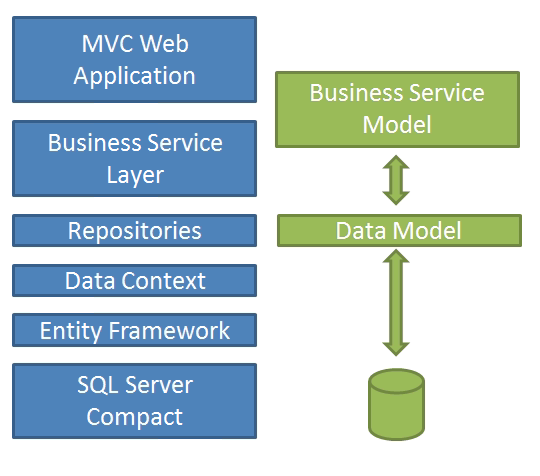
The services layer in Mileage Stats consists primarily of handlers and models. The handlers are a set of classes that implement the core behavior of the application. They are completely independent from and unaware of any concerns related the user interface. Reading over the names of the handler classes is like reading a list describing the features of Mileage Stats. The models are a second set of classes in the services layer. They differ from both the data models and the view models. The data models in Mileage Stats are primarily concerned with persisting data to the database. The view models are very specific to needs of the user interface. However, the models in the services layer are not concerned with either persistence or the user interface. The handlers and the models in the services layer represent the business logic of the application. Together they provide validation, calculation of statistics, and other similar services.
For more information on data validation, see the "Data Validation" section.
The following illustration shows the high level design of the service layer and data model.
In following example from Mileage Stats, we see the Execute method from the AddFillupToVehicle handler. This handler is represented as a single class with a single public method. We chose the convention of naming the method Execute. The general dependencies of the handler are injected into the constructor of the handler. Any specific values that may be needed to invoke the handler are passed as arguments into the Execute method. Unity is responsible for managing and injecting the dependencies for the handler’s constructor. Whereas the Execute method will be invoked by some consumer and it is expected that the consumer will provide the necessary arguments. In the case of Mileage Stats the consumer is a controller action.
Also note that the handler has two private helper methods AdjustSurroundingFillupEntries and ToEntry. These helper methods are responsible for calculating the statistics and converting the data to the form needed by the data layer respectively. C#
|
|
|
|---|---|
// contained in AddFillupToVehicle.cs
public virtual void Execute(int userId, int vehicleId,   ICreateFillupEntryCommand newFillup)
{
if (newFillup == null) throw new ArgumentNullException("newFillup");

try
{
var vehicle = _vehicleRepository.GetVehicle(userId, vehicleId);

if (vehicle != null)
{
newFillup.VehicleId = vehicleId;
var fillup = newFillup;

var entity = ToEntry(fillup);
AdjustSurroundingFillupEntries(entity);

_fillupRepository.Create(userId, vehicleId, entity);
// update calculated value
newFillup.Distance = entity.Distance;
}
}
catch (InvalidOperationException ex)
{
throw new BusinessServicesException(Resources.UnableToAddFillupToVehicleExceptionMessage, ex);
}
}
} | |
In Mileage Stats, the handlers are responsible for implementing the core business logic of the application. The controllers have the responsibility of accepting the users input and invoking the handler. Controllers then take the results of invoking handlers and compose any data necessary for rendering views. This data frequently takes the form of classes that we call view models.
Overall, the business services layer provide functionality that makes writing controllers, actions, and views much easier.
Supporting Interactive Web Clients
Interactive web clients asynchronously communicate with the server and manipulate the document object model (DOM). Because multiple interactions can occur simultaneously, managing state and tracking events can be difficult. This section outlines ways the web application server can support web clients by providing services that reduce the complexity of the JavaScript.
Providing HTML Structure
Traditionally, the server in a web application returns HTML as content that the browser client directly renders. Because interactive web clients manipulate the HTML structure, you will need to focus less on the appearance of the HTML and more on providing a useful hierarchy for the client. You should think of the HTML structure as part of the contract between the client and the server.
In order to modify the content, web clients first need to locate elements in the DOM. The popular jQuery library provides a powerful selector syntax that can be used to locate elements in many ways (e.g. by ID, class, relative position, etc.). If the web client depends on the hierarchical structure of the HTML you produce, you will likely break the client application when you modify the structure. See the "Client-Side Architecture" chapter for more information on the usage of jQuery within Mileage Stats.
To avoid tightly coupling the client JavaScript with the HTML structure, you can use data- (pronounced "data dash") attributes on your HTML. The data- attributes are attributes whose names are prefixed with "data-".
Many JavaScript developers use the id and class attributes to locate elements. The id attribute is limited since there can be only one per element and their values are generally expected to be unique within a page. The class attributes cause confusion because they are also used to apply layout and style to the element through Cascading Style Sheets (CSS).
Since data- attributes are orthogonal to the HTML structure, they allow you to restructure the HTML without impacting the client. See the "Client-Side Data Management, Caching, and Validation" chapter for more information on how clients can consume and use data- attributes.
Below are two data- attribute examples from Mileage Stats. In the first example the data-vehicle-id attribute allows the client to locate the associated element. Notice that we are rendering the value for the data- attribute on the server and that it will be consumed by JavaScript on the client.
| HTML |
|
|---|---|
// contained in Views\Vehicle\List.cshtml
<a class="list-item@(item.Reminder.IsOverdue ?"overdue": null)"
href="@Url.Action("Details","Reminder", new { id = item.Reminder.ReminderId })"
data-vehicle-id="@item.Vehicle.VehicleId">
  ...
</a> | |
In the second example, the data-chart-url attribute provides the client a URL to use in an AJAX call.
| HTML |
|
|---|---|
// contained in Views\Vehicle\List.cshtml
<div id="main-chart"class="article framed"
data-chart-url="@Url.Action("JsonGetFleetStatisticSeries","Home")"> | |
Ideally, your JavaScript should use only data- attribute to locate elements and to discover contextual data from the server. However, there are cases where using a selector to manipulate all elements of a given element name, unique ID, or class is a more practical approach. In these cases, you should author the JavaScript code to allow for the case where the set of selected elements is empty.
| If you have developers writing the web client independent of the web application, we strongly recommend you ensure agreement on the expected HTML structure before coding the web client JavaScript. |
Using View Model and View Bag
ASP.NET MVC 3 introduced the ViewBag. ViewBag is a dynamic object that wraps the ViewData property that you might recognize from previous versions of ASP.NET MVC. ViewBag is a name/value keyed collection that lets you store any loosely-typed data you like. This differs from the Model property on view which contains strongly-type data. Having two ways to provide the view data can cause confusion about when to use View.Model vs. ViewBag.
The strongly-typed View.Model has several benefits over ViewBag. It enables IntelliSense auto-complete in the view. It provides type safety when generating the view model from a controller action. Additionally, many of the helpers are specifically designed to work with a strongly-type model and they can extract metadata from the model to help automatically construct a view.
When you use the View.Model in a form element, you will have an associated controller action (marked with the HttpPostAttribute) that accepts the model as a parameter. When the form is submitted, the MVC model binder will use the posted form data to construct and populate an instance of your view model class.
Often the view model representing the form that is passed into a controller action will be significantly different from the view model returned from the controller action. In those cases you may choose to create a form model that embodies just the data from the form. An example of this in Mileage Stats is the Add action on VehicleController. It has a parameter of type VehicleFormModel and returns a view model of type VehicleAddViewModel. The VehicleAddViewModel contains data such as the current user and a list of vehicles, as well as the original form model.
You should prefer to create a view model specific to each of your views. This provides you complete control over the data sent to and from the client. It also reduces confusion by making the relationship between views and view models explicit. Likewise, using form models that are specific to views prevents the ASP.NET MVC model binder from setting properties that you didn't expect to receive from the client. In many cases, if you follow this practice you will never need to use ViewBag.
However, there can be cases when your view needs additional data that doesn't belong in your view model and you don't want to round-trip to the client. In these cases, consider placing the data in ViewBag.
In Mileage Stats, the _ProfileForm partial view uses the User class as the View.Model. Part of the view is a drop-down list of countries. The following example shows the ViewBag used to populate the drop-down list of countries.
| CSHTML |
|
|---|---|
//contained in Views\Shared\_ProfileForm.cshtml
@modelMileageStats.Domain.Models.User
...
<divclass="editor-label">
@Html.LabelFor(model => model.Country)
</div>
<divclass="editor-field">
@Html.DropDownListFor(model => model.Country, ViewBag.CountryListasSelectList,
"-- Select country --",new{ @class ="editor-textbox"})
@Html.ValidationMessageFor(model => model.Country)
</div>
...
<divclass="editor-commands">
<buttondata-action="profile-save"class="button generic small editor-submit"type="submit">
<imgsrc="@Url.Content(
      "~/Content/button-save.png")"
      title="Save Profile"alt="Save"/>
</button>
</div>
<divstyle="clear: both;">
</div>
@Html.ValidationSummary(true) | |
Mileage Stats could have had a separate view model class containing the User and an ICollection<Country>. However, doing so would reduce the reusability of the partial view because every view model up the hierarchy of views and partial views would have to contain this new view model.
Providing Data Asynchronously
Requesting data asynchronously is at the heart of a responsive, interactive web client. You could use web services, Windows Communication Framework (WCF) services, or even write an HttpHandler to serve data to the client. Fortunately, ASP.NET MVC web applications are a great endpoint for serving data to web clients. You can use the same routing, controllers, security, and models that you do for returning HTML structure when returning data. This allows the web client to use the relative URLs you provided in the data- attributes as well as some knowledge of the site's URL structure to create requests for data.
Choosing a Data Format
Web clients typically request data as HTML, JavaScript Object Notation (JSON), XML, or as binary (i.e. images, video, etc.) from the server. Each of these formats helps the web client in different ways. You can think of the initial request as just the first data request in a series of requests the client will make.
The JSON format is the recommended choice when the web client needs to bind data to existing HTML elements, generate new HTML from the data, transform the data, or make conditional logic decisions about the data. JSON is a very concise format that has serialization support on the client and in ASP.NET MVC. Because JSON contains no markup, it helps separate user interface and data service concerns.
The HTML format is useful when the client will make minimal or no changes to the returned content and likely place the entire HTML result into a pre-determined area of the page. This can work well for scenarios like advertisements, content aggregators, and content management systems.
The XML format is useful when the client receives data based on a pre-defined schema. XML is also used when working open-standards formats such as Really Simple Syndication (RSS), Atom, and oData. Web clients can use the known schema structure to process the XML into HTML (often using XSLT).
Binary formats are generally employed for media. Images are the most common example; the server returns an img element with a src attribute, the browser makes a secondary request to the server and then renders the binary result as an image.
| Not all browsers send the same data to the server when requesting images and other resources. Some browsers will send authentication headers and cookies while others will not. If you have secondary requests that must be authenticated you will need to verify those requests work on the browsers you intend to support. In addition, you should test both in the ASP.NET development server and in an IIS deployed web application. |
Supporting a particular format in ASP.NET MVC consists of returning a JsonResult, ContentResult, or FileResult instead of a ViewResult from your action methods.
The following example from Mileage Stats returns a JsonResult. The view model is created and then the Controller.Json method is called to convert the object into JSON for the response.
| C# |
|
|---|---|
// contained in VehicleController.cs
[Authorize]
[HttpPost]
publicJsonResultJsonDetails(int id)
{
VehicleModel vehicle = Using<GetVehicleById>()
.Execute(CurrentUserId, vehicleId: id);

IEnumerable<ReminderSummaryModel> overdue = Using<GetOverdueRemindersForVehicle>()
.Execute(id, DateTime.UtcNow, vehicle.Odometer ?? 0);

JsonVehicleViewModel vm = ToJsonVehicleViewModel(vehicle, overdue);

return Json(vm);
} } | |
| Controller actions that return a JsonResult are easy to unit test because you can directly inspect the JsonResult.Data property. Conversely, debugging a serialization issue with a JsonResult is harder because it requires inspecting the returned data from the web service in the web client. |
Factoring Controller Actions for AJAX
You should continue following the design guidance for factoring your application logic when you incorporate actions that provide asynchronous data.
If you decide to create a separate set of URLs for returning data (i.e. create an independent data service API), you may choose to create separate controllers and routes. This is beneficial when you expect multiple types of clients (e.g. web client, Silverlight, etc.) to use the data actions, but only the web client to use the view-based actions.
If your data actions are closely related to your view-based actions, you may choose to put data actions in the same controller as the view-based actions. Mileage Stats is an example of this scenario because the data actions focus on the same domain models as the view-based actions.
If your web client needs to use the same URL and request different data formats, you may extend your controller action methods by using the HttpRequestBase.IsAjaxRequest extension method to determine which format of result to call. This is beneficial when you can reuse your view model as your JSON model. If you find that you have large if-else blocks in your controller actions, you should factor the view-based and JSON actions into different helper methods. Alternatively, you could author a custom AjaxAttribute action filter that uses IsAjaxRequest and provide overloaded action methods similar to how the HttpPostAttribute works.
When errors occur, your data actions can throw exceptions just like view-based actions. The jQuery method supports beforeSend, send, success, error, and complete handlers you can use to handle server responses and failures. If you don't want the friendly error page HTML content returned when a JSON data action throws an exception, you may need to apply a different HandleErrorAttribute to your data actions.
As you design your data actions, you should consider how many round trips to the server will be required for each interaction with the user. Every AJAX request requires separate threading on the client as well as resources for the connection, server response, data download, and client processing. If you create overly granular data actions, your web client may suffer performance issues managing a large number of requests to satisfy a user action. If you create monolithic data actions, your web client and server may suffer performance issues because of both the creation and processing of data that isn't required.
| If you haven't already, you may find it helpful to use web browser debugging and tracing tools such as Internet Explorer developer tools, Fiddler, and FireBug to see the relative cost of the different parts of each round trip to the server. Depending on the connection speed and distance between your users and your server, creating a connection can be much more costly than downloading the data once the connection is made. Many web applications created for users across the globe favor requesting larger chunks of data when data cannot be cached closer to the user. |
Data Validation
Interactive web applications need to let the user know when they have provided data that is invalid. Data validation checks need to happen on the client to inform the user in the context of what they are trying to accomplish, on the server to protect from untrustworthy callers, and in the database to ensure data integrity. Having data validation occur at multiple levels in the stack makes creating common and consistent validation logic important to the user experience. This section covers data validation techniques you can use to validate your data on both the server and the client.
Data Annotation Attributes
Applying data annotation attributes to your model allows ASP.NET MVC and the Entity Framework to provide data validation at the server level. As mentioned in the "Creating a Data Model" section, the Entity Framework also inspects data annotation attributes on your entity classes to create the database schema. You can find the standard data annotation attributes in the System.ComponentModel.DataAnnotations namespace. In this section, data annotation attributes that provide validation are referred to as validation attributes.
In Mileage Stats, data annotations are most commonly found on the form models. The following example shows the validation attributes applied to the VehicleFormModel class in the MileageStats.Domain project. The attributes applied to the VehicleFormModel.Name property validate the name is not null, is not an empty string, is no more than 20 characters, and does not contain script injection characters. Validation attributes also support localization. By using the resource names the error messages are loaded from a RESX file.
| C# |
|
|---|---|
// Contained in VehicleFormModel.cs
[StringLength(20,
ErrorMessageResourceName = "VehicleNameStringLengthValidationError",
ErrorMessageResourceType = typeof(Resources))]
[TextLineInputValidator]
[Required(AllowEmptyStrings = false,
ErrorMessageResourceName = "VehicleNameRequired",
ErrorMessageResourceType = typeof(Resources))]
public string Name { get; set; } | |
Validating Data in MVC
The ASP.NET MVC default model binder uses the Validator and ValidationContext classes when parsing incoming data into an instance of your model class. These two classes work together to validate the data based on the validation attributes you have applied.
If any of the validation fails, AddModelError is called on the ModelState class. ModelState.IsValid returns false when ModelState has one or more errors. Because all this happens before your action is called, validating data in your controller actions is that much easier. The following example shows the FillupController using ModelState.IsValid before making the update.
| C# |
|
|---|---|
// contained in FillupController.cs
[Authorize]
[HttpPost]
...
{
var vehicles = Using<GetVehicleListForUser>()
.Execute(CurrentUserId );

if (ModelState.IsValid)
{
var errors = Using<CanAddFillup>()
.Execute(CurrentUserId, vehicleId, model);

ModelState.AddModelErrors(errors, "AddFillup");

if (ModelState.IsValid)
{
Using<AddFillupToVehicle>().Execute(CurrentUserId, vehicleId, model);

TempData["LastActionMessage"] = Resources.VehicleController_AddFillupSuccessMessage;
return RedirectToAction("List", "Fillup", new { vehicleId = vehicleId });
}
}

...

var viewModel = new FillupAddViewModel
{
...
};

return View(viewModel);
} | |
| In the previous example, invoking the handler CanAddFillup returns a collection ValidationResult. These are validation results returned from the business services layer. The AddModelErrors extension method iterates over the ValidationResult collection and calls ModelState.AddModelError for each. This level of indirection keeps the business services layer from depending on ASP.NET MVC. |
Creating Custom Validation Attributes
When the standard validation attributes don't provide what you need, you can write your own. All the standard validation attributes derive from the ValidationAttribute class containing the abstract IsValid method to implement.
The following example shows the implementation to validate a postal code. The implementation is simpler than would be used in many applications, but it shows cross-field validation on a model object.
| C# |
|
|---|---|
// contained in PostalCodeValidatorAttribute.cs
protected override ValidationResult IsValid(object value, ValidationContext context)
{
varuserToValidate = context.ObjectInstance as User;
var memberNames = new List<string>() { context.MemberName };

if (userToValidate != null)
{
if (string.IsNullOrEmpty(userToValidate.Country) &&
string.IsNullOrEmpty(userToValidate.PostalCode))
{
return ValidationResult.Success;
}
if (string.IsNullOrEmpty(userToValidate.PostalCode))
{
return ValidationResult.Success;
}
if (userToValidate.Country == Resources.UnitedStatesDisplayString)
{
if (USPostalCodeRegex.IsMatch(userToValidate.PostalCode))
{
return ValidationResult.Success;
}
return new ValidationResult(Resources.USPostalCodeValidationErrorMessage,
memberNames);
}
else
{
if (InternationalPostalCodeRegex.IsMatch(userToValidate.PostalCode))
{
return ValidationResult.Success;
}
return new ValidationResult(
Resources.InternationalPostalCodeValidationErrorMessage, memberNames);
}
}
return ValidationResult.Success;
} | |
Handling Complex Data Validation
You may have noticed in the earlier example that the FillupController.Add method calls ModelState.IsValid twice. The CanAddFillup handler in the following example contains validation logic that uses multiple objects in the domain model and requires additional database access. This validation logic is not suited for a single custom ValidationAttribute. It returns a collection of validation results that the controller uses to call ModelState.AddModelError. In cases like these, you should factor complex validation logic into helper methods or a business services layer.
| C# |
|
|---|---|
// contained in CanAddFillup.cs
public virtual IEnumerable<ValidationResult> Execute(int userId, int vehicleId, ICreateFillupEntryCommand fillup)
{
var foundVehicle = _vehicleRepository.GetVehicle(userId, vehicleId);

if (foundVehicle == null)
{
yield return new ValidationResult(Resources.VehicleNotFound);
}
else
{
var fillups = _fillupRepository.GetFillups(vehicleId);

if (!fillups.Any()) yield break;

var priorFillup = fillups.Where(f => f.Date < fillup.Date).FirstOrDefault();

if ((priorFillup != null) && (priorFillup.Odometer >= fillup.Odometer))
{
yield return new ValidationResult(
"Odometer",
string.Format(CultureInfo.CurrentUICulture,Resources.OdometerNotGreaterThanPrior,
priorFillup.Odometer));
}
}
} | |
Supporting Validation on the Client
ASP.NET MVC supports client-side validation of data by sharing validation information from the server. This is done by implementing the IClientValidatable interface on your validation attributes. IClientValidatable contains only the GetClientValidationRules method that returns a ModelClientValidationRule collection.
In the following example, the PostalCodeValidatorAttribute implements GetClientValidationRules by returning a single ModelClientValidationRule. By setting the ValidationType property to "postalcode" the client will use the validation routine with the same name registered on the client. The validation parameters are added to provide the client-side code the information it needs to implement the validation rule.
| C# |
|
|---|---|
public IEnumerable<ModelClientValidationRule> GetClientValidationRules(
ModelMetadata metadata, ControllerContext context)
{
var rule = new ModelClientValidationRule()
{
ErrorMessage = Resources.InvalidInputCharacter,
ValidationType = "postalcode"
};

rule.ValidationParameters.Add("internationalerrormessage",
Resources.InternationalPostalCodeValidationErrorMessage);
rule.ValidationParameters.Add("unitedstateserrormessage",
Resources.USPostalCodeValidationErrorMessage);
rule.ValidationParameters.Add("internationalpattern",
Resources.InternationalPostalCodeRegex);
rule.ValidationParameters.Add("unitedstatespattern",
Resources.USPostalCodeRegex);

return new List<ModelClientValidationRule>() { rule };
} | |
When MVC HTML helper extension methods such as TextBoxFor and EditorFor are called, MVC inspects the property definition for validation attributes. When a validation attribute implements IClientValidatable, MVC uses the client validation rules to include data-val attributes. The following HTML fragment shows the data-val attributes present on the postal code field in the registration form.
| HTML |
|
|---|---|
<input data-val="true"
data-val-length="Postal code must be less than 10 characters."
data-val-length-max="10"
data-val-postalcode="Only alpha-numeric characters and [.,_-&#39;] are allowed."
data-val-postalcode-internationalerrormessage=
"Postal codes must be alphanumeric and ten characters or less."
data-val-postalcode-internationalpattern="^[\d\w]{0,10}$"
data-val-postalcode-unitedstateserrormessage=
"United States postal codes must be five digit numbers."
data-val-postalcode-unitedstatespattern="^[\d]{5}$"
data-val-textlineinput=
"Only alpha-numeric characters and [.,_-&#39;] are allowed."
data-val-textlineinput-pattern="^(?!.*--)[A-Za-z0-9\.,'_ \-]*$"
id="PostalCode" maxlength="10" name="PostalCode" size="10" type="text" value=""
/>
<span class="field-validation-valid" data-valmsg-for="PostalCode"
data-valmsg-replace="true">
</span> | |
The MVC validation JavaScript (jquery.validate.js and jquery.validate.unobtrusive.js) provides for the standard validation attributes and provides you methods to register validation routines and unobtrusive validation adapters. The following example shows the registration of the postalcode client-side validation routine. Notice how it uses the params object to access the data-val attributes.
| JavaScript |
|
|---|---|
// contained in mstats.validation.js
$.validator.addMethod('postalcode', function (value, element, params) {
if (!value) {
return true; // not testing 'is required' here!
}
try {
var country = $('#Country').val(),
postalCode = $('#PostalCode').val(),
usMatch = postalCode.match(params.unitedStatesPattern),
internationalMatch = postalCode.match(params.internationalPattern),
message = '',
match;

if (country.toLowerCase() === 'united states') {
message = params.unitedStatesErrorMessage;
match = usMatch;
} else {
message = params.internationalErrorMessage;
match = internationalMatch;
}

$.extend($.validator.messages, {
postalcode: message
});

return (match && (match.index === 0) &&
(match[0].length === postalCode.length));
} catch (e) {
return false;
}
}); | |
IClientValidatable helps you to share validation information, but you still have two copies of your validation logic to maintain. You may choose remote validators (i.e. implementing validation actions in your controller) and call them using AJAX from the client. However, the round trip to the server will not be as responsive as validating directly on the client.
| It is important to remember that client-side validation only helps improve the user experience and is not a substitute for proper validation and security on the server. Hackers won't use your web client JavaScript or even the browser when maliciously posting data to the web application on the server, so you must ensure that any client-side validation is repeated on the server before any data changes occur. |
Validating Validation
Because validation occurs at multiple levels of the stack, you may end up with duplicate validation attributes and validation logic to keep in sync. While proper factoring of your application logic, your models, and data validation information can help, you should always unit test each layer in isolation to make sure the validation works as expected.
While you don't need to unit test the standard validation attributes, you should unit test that the validation attributes are properly applied to your model and validate as expected (just as if you had written code inside the setter of your model property). The following example shows a unit test verifying the Title of the Reminder is required.
| C# |
|
|---|---|
// contained in ReminderFixture.cs
[Fact]
public void WhenTitleSetToNull_ThenValidationFails()
{
Reminder target = new Reminder();

target.Title = null;

var validationContext = new ValidationContext(target, null, null);
var validationResults = new List<ValidationResult>();
bool actual = Validator.TryValidateObject(target, validationContext, validationResults, true);

Assert.False(actual);
Assert.Equal(1, validationResults.Count);
Assert.Equal(1, validationResults[0].MemberNames.Count());
Assert.Equal("Title", validationResults[0].MemberNames.First());
} | |
| The true parameter at the end of the TryValidateObject call is important – it causes the validation of all properties. It means that your unit test has to ensure that all other properties are set to valid values when you try to verify that one invalid property fails validation. |
Other Considerations
This section briefly covers some other areas of server architecture you may want to consider.
Dependency Injection
Mileage Stats uses Unity for dependency injection. The unity.config file in the web application maps interfaces to concrete classes. It also determines the lifetime for each mapping. For example, Unity ensures the VehicleController constructor provides implementations of the IUserServices, ICountryServices, IServiceLocator and IChartDataService interfaces.
In an effort to manage dependencies and improve testability in the MVC pattern, ASP.NET MVC also provides a dependency resolver. This allows ASP.NET MVC applications a suitable place to resolve dependencies for framework created objects like controllers or action filters. In the following example, Mileage Stats registers Unity as the MVC dependency resolver as part of initializing the dependency injection container for the application.
| C# |
|
|---|---|
// contained in global.asax.cs
privatestaticvoidInitializeDependencyInjectionContainer()
{
  IUnityContainer container = new UnityContainerFactory()      .CreateConfiguredContainer();
  var serviceLocator = new UnityServiceLocator(container);
  ServiceLocator.SetLocatorProvider(() => serviceLocator);
  DependencyResolver.SetResolver(new UnityDependencyResolver(container));
} | |
See the "Further Reading" section for more information on dependency injection and Unity.
Unit Testing
One of the key reasons ASP.NET MVC follows the MVC pattern is to allow for unit testing of the application logic. The System.Web.Abstractions assembly was introduced primarily to allow substitution of mocked instances of classes like HttpContextBase during unit testing. You should unit test as much of your application logic as possible; it will not only help ensure the quality of your application, but will also help identify design issues early when they are less expensive to fix.
Mileage Stats uses the xUnit unit test framework as well as Moq for mocking interfaces. The application is unit tested at the data model, business services, and controller layers. As mentioned in the "Composing Application Logic" section, keeping controller actions simple and factoring application logic into a business services layer makes unit testing much easier. Mileage Stats is an example of reaping those benefits. Unit testing was much easier because interfaces like IUserServices could be mocked.
For more information on quality assurance see the chapter "Testing Web Applications."
Error Management
Web clients expect proper HTTP status code responses when a web application cannot fulfill a request. This means you should avoid hiding errors like a resource not being found (404), failure to authorize (403), and server errors (500+). ASP.NET MVC will respond with the correct HTTP status code when no valid route is found and based on the type of exception when an exception is thrown from a controller action. There may be cases where you need to catch an exception from a call and throw a different exception type.
Generally, users don't want to see all the developer details for an exception. ASP.NET MVC provides a HandleErrorAttribute that provides a friendly error page when an exception occurs. The friendly page displayed is determined in the web.config customErrors section. Mileage Stats applies the HandleErrorAttribute to all controller actions in the RegisterGlobalFilters methods.
Although friendly errors are an improvement, the user experience shouldn't be interrupted with HTTP error code if the user enters an invalid value. Use the Post/Redirect/Get pattern (PRG) when handling a POST action. When the user has submitted invalid data, you should return the same view as the GET action populated with the incoming data. When a POST action succeeds, it can redirect.
In the following example, if a ReminderFormModel doesn't pass data validation, the Add view result is returned populated with the reminder data that was passed into the action method.
| C# |
|
|---|---|
//contained in ReminderController.cs[HttpPost]
public ActionResult Add(int vehicleId, ReminderFormModel reminder)
{
if ((reminder != null) && ModelState.IsValid)
{
var errors = Using<CanAddReminder>().Execute(CurrentUserId, reminder);
ModelState.AddModelErrors(errors, "Add");

if (ModelState.IsValid)
{
Using<AddReminderToVehicle>().Execute(CurrentUserId, vehicleId, reminder);
return RedirectToAction("Details", "Reminder", new { id = reminder.ReminderId });
}
}

var vehicles = Using<GetVehicleListForUser>()
.Execute(CurrentUserId);

var vehicle = vehicles.First(v => v.VehicleId == vehicleId);

var reminders = Using<GetUnfulfilledRemindersForVehicle>()
.Execute(CurrentUserId, vehicleId, vehicle.Odometer ?? 0)
.Select(r => new ReminderSummaryModel(r, r.IsOverdue ?? false));

var viewModel = new ReminderAddViewModel
{
VehicleList = new VehicleListViewModel(vehicles, vehicleId) { IsCollapsed = true },
Reminder = reminder,
Reminders = new SelectedItemList<ReminderSummaryModel>(reminders),
};

return View(viewModel);
} | |
Concurrency
Because Mileage Stats tracks vehicles per user account, concurrency conflict detection and management was not a scenario for the application. Even though we choose not to make use of it, the Entity Framework does supports optimistic concurrency by adding time stamps to the data model and taking appropriate action when handling the DbUpdateConcurrencyException.
Summary
Hopefully you now have a frame of reference for architecting your server-side web application. There are many different choices you will make to structure your site, factor code, and model data. Successful architectures properly balance the layers of abstraction required to solve the problem at hand while keeping an eye on future features and technologies.
Key takeaways:
- Understand your web client needs and build a contract for the HTML structure, URL structure, and data formats between the client and server early in the process.
- Decide on whether or not to create a business services layer along with deciding whether or not to create separate domain and data models.
- Create slim controllers by placing the majority of your application logic in your domain models, a services layer, or helper classes and methods.
- Keep application logic simple and partitioned.
- Provide a data API that allows web clients to consume data asynchronously in the right format and granularity for the application.
- Structure your validation logic to support validation both on the client and on the server.
Further Reading
ADO.NET Entity Framework on MSDN:
http://msdn.microsoft.com/library/bb399572.aspx
The Repository Pattern on MSDN:
http://msdn.microsoft.com/en-us/library/ff649690.aspx
Unit of Work pattern:
http://www.martinfowler.com/eaaCatalog/unitOfWork.html
Catalog of Patterns of Enterprise Application Architecture:
http://martinfowler.com/eaaCatalog/
Evans, Eric. Domain-Driven Design: Tackling Complexity in the Heart of Software. Addison-Wesley Professional, 2003.
Nilsson, Jimmy. Applying Domain-Driven Design and Patterns: With Examples in C# and .NET. Addison-Wesley Professional, 2006.
Understanding Models, Views, and Controllers on ASP.NET:
http://www.asp.net/mvc/tutorials/understanding-models-views-and-controllers-cs
Best Practices for ASP.NET MVC:
http://blogs.msdn.com/b/aspnetue/archive/2010/09/17/second_2d00_post.aspx
Dependency Injection on MSDN Magazine:
http://msdn.microsoft.com/en-us/magazine/cc163739.aspx
Unity Application Block on MSDN:
http://www.msdn.com/unity
Post/Redirect/Get pattern:
http://en.wikipedia.org/wiki/Post/Redirect/Get
To report documentation errors or provide feedback on this documentation, please send email to pagdoc@microsoft.com
Copyright © 2011 by Microsoft Corporation. All rights reserved.