Security
From Project Silk
| Silk 1.0 - June 2011 |
| Security |
|
|
Introduction
This chapter addresses security-related topics for the Mileage Stats Reference Implementation (Mileage Stats) and is divided into three sections. The first section introduces security threats relevant to Mileage Stats. The second section provides a guided tour of Mileage Stats security features that provide countermeasures against the relevant threats. The third section describes possible security modifications to adjust for changes in the deployment environment and security requirements for the application. After reading this chapter, you should have an understanding of how relevant security threats are mitigated in Mileage Stats and of some of the extensibility points for its security.
In this chapter you will learn:
- Key security threats that you should address in any web application, including unauthorized access, malicious input, content injection, cross-site scripting, eavesdropping, message tampering, message replay, and cross-site request forgery.
- Security features in Mileage Stats that provide countermeasures against the relevant threats for authentication, input validation, anti-forgery, and JavaScript Object Notation (JSON) hijacking.
- Security modifications to adjust for changes in the deployment environment and security requirements for the application.
This chapter will cover some security features of ASP.NET and ASP.NET MVC and OpenID.
Security Threats
The section describes a few key security threats that need to be addressed in any web application. If you're already familiar with the security threats below and how to mitigate them, skip to the next section where the security features for Mileage Stats are described.
Unauthorized Access
To prevent just anyone from casually accessing your website and changing data, you will need to limit who can access it. This is typically accomplished by requiring users to authenticate. The most common form of authentication requires a user to provide his user name and password as credentials. Once verified, the user is permitted access. If the credentials are not recognized by the website, the user is not allowed access.
Malicious Input – Content Injection and Cross-Site Scripting
There are a variety of methods whereby malicious users can attempt to corrupt content by uploading malicious input to your website. Such attacks can result in data corruption or even make your website unusable. If links can be uploaded to a website, a malicious user can potentially execute a cross-site scripting (XSS) attack, enabling them to collect potentially sensitive form data and security information for later exploitation. A common way to prevent the uploading of malicious input to a website is to limit the length and type of input that users are allowed to provide. It is important to limit the range of characters that a user is able to provide for text input. If you remove the ability to submit tags by filtering out tag characters ("<" and ">"), it goes a long way towards preventing malicious users from submitting scripts or HTML tags. As a rule of thumb, input allowed for submission to the website should be as limited as possible based on expected length, content, and data type for a particular data field.
Eavesdropping, Message Tampering, and Message Replay
Eavesdropping, message tampering, and message replay are grouped together because they are often encountered and mitigated by similar measures. A common and relatively simple way to exploit a web application through eavesdropping is to use a network data capture utility to find and record HTTP requests and responses between a website and a client. Without protection from eavesdropping and tampering, an attacker can alter the contents of a captured HTTP request and re-submit it to the website. This type of attack is commonly referred to as a message replay attack. Even if the website requires authentication, it processes the request as if it came from the client since it contains a legitimate security token. HTTP requests can be altered to cause the website to behave undesirably, deleting data, changing data, or causing large numbers of transactions to be executed. A common way to mitigate message replay in web applications using HTTP is by requiring communication via Secure Sockets Layer (SSL). When you use SSL in a non-anonymous mode, you prevent the ability to replay messages back to the server. Two additional and very important benefits of using SSL are that it prevents any sensitive content in the HTTP traffic from being disclosed to eavesdroppers and prevents messages from being tampered with.
Cross-Site Request Forgery
Cross-site request forgery (CSRF, often pronounced as "sea surf",) is an attack whereby malicious commands are sent to a website from the browser of a trusted user. An attacker constructs a seemingly harmless HTML element on a different website that surreptitiously calls the target website and attempts to do something malicious while posing as a trusted user. CSRF has great potential to damage the website being exploited; an attacker can potentially tamper with or delete data, or execute large numbers of unwanted transactions on the targeted website.
This section is intended as an introductory overview and is not a substitute for more comprehensive guidance or a threat model. For more information on ASP.NET security, see the ASP.NET Web Application Security reference at the end of this chapter.
Web Platform Security
This section describes some of the out-of-the-box security built into the various components of the web application platform.
MVC View Encoding
The Razor syntax uses the @ operator in MVC views to specify Microsoft® .NET Framework code. Any output written to the client in the view from code using the @ operator is automatically HTML encoded for you. This traps malicious content by preventing it from being rendered back to the client. Trapping malicious content goes hand-in-hand with input filtering, because you should never assume that any data that comes from users or other applications is safe.
ASP.NET Input Filtering
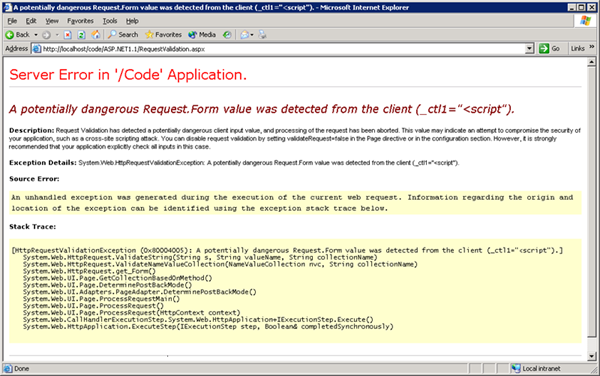
Starting with version 1.1, ASP.NET started providing input filtering out of the box as a secure default. Any attempt to submit a request containing bracketed tags "<" or ">" in any of its form data, query string parameters, or cookies results in an error page indicating that malicious input has been detected. The figure below is a screenshot of the default ASP.NET input validation failure page:
While this is good to have as a secure default, you should still be validating user input in your application because this is only a very basic means of filtering input.
Protecting Application-Specific Data
Sometimes applications host their own data sources instead of accessing them from a centrally hosted location. Whenever you create an application-specific data source, it should be hosted in the App_Data subdirectory. For example, if you add a SQL membership provider for a specific application, the Microsoft SQL Server® Express .mdf file should be created in the App_Data directory. ASP.NET protects application-specific data in a few different ways. Files stored in the App_Data folder cannot be accessed directly by clients because the folder is protected from browsing by default.
An additional layer of protection for application-specific data files is configured using HTTP handlers in the machine's web.config. Requests for certain file types are routed to the ASP.NET HttpForbiddenHandler by default. The code below shows the configuration to handle HTTP requests for .mdf and .mdb files used by SQL Server Express and Microsoft Access®, respectively, via the HttpForbiddenHandler in the machine's web.config file:
| XML |
|
|---|---|
<!--contained in machine's default web.config--> <addpath="*.mdf"verb="*"type="System.Web.HttpForbiddenHandler"validate="True"/> <addpath="*.ldf"verb="*"type="System.Web.HttpForbiddenHandler"validate="True"/> | |
Note that the HTTP handlers defined above are for standard ASP.NET applications. Handlers for an ASP.NET MVC application are defined via route mappings in the application's Global.asax.cs file. These files would normally be inaccessible when using ASP.NET MVC unless you explicitly create a route mapping for them or you configure ASP.NET MVC to ignore routing for the file type and let ASP.NET handle them using the settings described above. Neither of them is recommended for ASP.NET MVC applications because the files should be protected from client browsing by routing all requests to the MVC controllers. For more information on MVC routing best practices, see the reference on "Best Practices for ASP.NET MVC" on the ASP.NET and Web Tools Developer Content Team's blog at the end of this chapter.
Mileage Stats Application Security
This section explains security measures implemented in Mileage Stats that mitigate security threats against it.
Authentication
Mileage Stats implements authentication using a third-party authentication provider (OpenID) and ASP.NET forms authentication tickets to prevent unauthorized access. Whenever an unauthenticated user attempts to access the site, she is redirected to the login URL via ASP.NET forms authentication. The diagram below depicts the logical flow for user authentication in Mileage Stats.
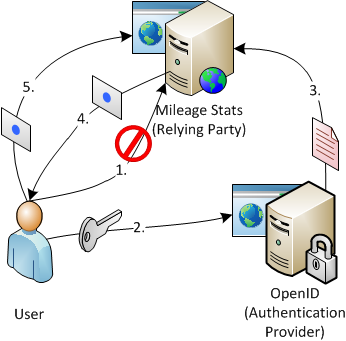
- The user attempts to access the site without authenticating first and is redirected to the Mileage Stats home page.
- The user navigates from the Mileage Stats home page to the OpenID sign-in page to authenticate.
- An authentication result is attached to the response by OpenID and picked up by Mileage Stats for processing.
- Mileage Stats converts a successful authentication result from OpenID to an encrypted ASP.NET forms authentication ticket and caches it client-side as a session cookie in the web browser.
- The user accesses the site successfully with a valid forms ticket. Whenever a request is processed with a valid authentication ticket, the expiration time of the ticket is reset to provide a sliding expiration window.
The significance of this authentication model is that a third party (OpenID) is responsible for managing and validating the user's credentials as opposed to more commonly encountered authentication models in which the owner of the website is the same party maintaining and validating the user's credentials.
While out-of-the box ASP.NET forms authentication is not being used, encrypted forms authentication tickets and forms ticket validation are being leveraged programmatically. Forms ticketing is an effective mechanism that you can leverage to work with OpenID authentication instead of creating a security ticketing mechanism from the ground up.
There are several configuration settings and segments of code responsible for implementing authentication end-to-end in Mileage Stats. Let's take a look at the configuration and major components.
Configuration
While the forms tickets are being generated manually in Mileage Stats, the code still leverages the configuration settings used for configuring out-of-the-box forms authentication. The following configuration snippet in Mileage Stats web.config is responsible for configuring the application for forms authentication and setting the login redirect URL:
| XML |
|
|---|---|
<!--contained in web.config--> <authenticationmode="Forms"> <formsloginUrl="~/Auth/SignIn"timeout="20"/> </authentication> | |
The relying party class validates a user's credentials with an authentication provider, then uses them to create a forms authentication ticket. The relying party implementation is configured in the unity.config file:
| XML |
|
|---|---|
<!--contained in unity.config--> <!--NOTE: This is a real openId authentication mechanism--> <typetype="MileageStats.Web.Authentication.IOpenIdRelyingParty, MileageStats.Web" mapTo="MileageStats.Web.Authentication.DefaultOpenIdRelyingParty, MileageStats.Web"> <lifetimetype="perRequest"/> </type> | |
Note that there are two unity.config files, and the one used by Mileage Stats depends on which solution configuration is selected when you compile the application. The one shown above is used when the Release solution configuration is selected. When Debug is selected, a different unity.config is used that contains a mock authentication relying party class that can be used to get the application up and running. The mock authenticator will put the user through a mock authentication workflow that does not validate any credentials. To deploy the application, we strongly recommend that you compile the application using the Release solution configuration to use the actual relying party class that actually validates user credentials.
Both the mock authenticator and the OpenID relying party class implement the IOpenIdRelyingParty interface, which acts as a wrapper around the DotNetOpenAuth interfaces to expose only what is required to interact with the authentication provider and to process the results. Implementing IOpenIdRelyingParty enables you to configure a different relying party implementation if your application requirements change.
AuthController
AuthController is an Model View Controller (MVC) controller in Mileage Stats that is responsible for handling the user redirect for authentication and converting the response from a successful authentication attempt into an ASP.NET forms authentication ticket. The AuthController uses the relying party implementation specified in the unity.config file. AuthController's SignInWithProvider method is invoked to redirect the user to the authentication provider's sign-in page. The code snippet below shows the SignInWithProvider method:
| C# |
|
|---|---|
// contained in AuthController.cs
publicActionResultSignInWithProvider(stringproviderUrl)
{
if(string.IsNullOrEmpty(providerUrl))
{
returnthis.RedirectToAction("SignIn");
}

varfetch =newFetchRequest();
varreturnUrl =this.Url.Action("SignInResponse","Auth",null,
this.Request.Url.Scheme);

try
{
returnthis.relyingParty.RedirectToProvider(providerUrl, returnUrl, fetch);
}
catch(Exception)
{
this.TempData["Message"] =
Resources.AuthController_SignIn_UnableToAuthenticateWithProvider;
returnthis.RedirectToAction("SignIn");
}
} | |
The AuthController's SignInResponse method is invoked to process the response from the user's authentication attempt with the authentication provider. SignInResponse calls the GetResponse method on the relying party class and processes the result. If the result is a successful authentication, AuthController creates an ASP.NET forms authentication ticket and attaches it to the response. If anything other than a successful authentication result is returned from the authentication provider, the user is redirected back to the authentication provider's sign-in page.
| C# |
|
|---|---|
// contained in AuthController.cs
publicActionResultSignInResponse(stringreturnUrl)
{
varresponse =this.relyingParty.GetResponse();

switch(response.Status)
{
caseAuthenticationStatus.Authenticated:
varuser =this.userServices.GetOrCreateUser(response.ClaimedIdentifier);
this.formsAuthentication.SetAuthCookie(this.HttpContext,
UserAuthenticationTicketBuilder.CreateAuthenticationTicket(user));

returnthis.RedirectToRoute("Dashboard");

caseAuthenticationStatus.Canceled:
this.TempData["Message"] ="Cancelled Authentication";
returnthis.RedirectToAction("SignIn");

caseAuthenticationStatus.Failed:
this.TempData["Message"] = response.Exception.Message;
returnthis.RedirectToAction("SignIn");

default:
this.TempData["Message"] =
Resources.AuthController_SignInResponse_Unable_to_authenticate;
returnthis.RedirectToAction("SignIn");
}
} | |
The below sequence diagram shows the calls made in AuthController.SignInResponse to authenticate the user with the relying party and to attach the encrypted forms ticket as a cookie if the authentication attempt was successful.
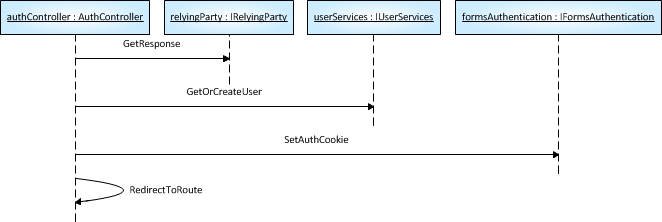
- AuthController calls the GetResponse method of its referenced IOpenIdRelyingParty implementation to get the authentication result from the authentication provider.
- AuthController calls the GetOrCreateUser method of its referenced IUserServices implementation
- AuthController calls the SetAuthCookie method of its referenced IFormsAuthentication implementation.
- AuthController invokes its own ReDirectToRoute method and sends the user to its landing page after a successful authentication.
Let's take a closer look at the relying party implementation used in Mileage Stats.
DefaultOpenIdRelyingParty
DefaultOpenIdRelyingParty implements IOpenIdRelyingParty, which is a facade for the OpenIdRelyingParty class provided as part of DotNetOpenAuth that validates the user's credentials with OpenID. The code snippet below shows the RedirectToProvider method on the DefaultOpenIdRelyingParty class, which is responsible for redirecting the user to the authentication provider's login page:
| C# |
|
|---|---|
// contained in DefaultOpenIdRelyingParty.cs
publicActionResultRedirectToProvider(stringproviderUrl,stringreturnUrl,
FetchRequestfetch)
{
IAuthenticationRequestauthenticationRequest =
this.relyingParty.CreateRequest(providerUrl,Realm.AutoDetect,
newUri(returnUrl));
authenticationRequest.AddExtension(fetch);

return
newOutgoingRequestActionResult(authenticationRequest.RedirectingResponse);
} | |
Forms Authentication Sliding Expiration
Sliding expiration of the forms authentication ticket in Mileage Stats is accomplished by resetting the expiration of the ticket every time the user makes a new request to the server. Normally this would be enabled by setting the slidingExpiration attribute to true on the forms security configuration in the web.config; however, since the ticket is being manually created and attached to the response in the AuthController, it needs to be refreshed manually. A custom handler for the HttpApplication.PostAuthenticateRequest event implements the sliding expiration for the forms ticket:
| C# |
|
|---|---|
// contained in Global.asax.cs
privatevoidPostAuthenticateRequestHandler(objectsender,EventArgse)
{
HttpCookieauthCookie =
this.Context.Request.Cookies[FormsAuthentication.FormsCookieName];
if(IsValidAuthCookie(authCookie))
{
varformsAuthentication =
ServiceLocator.Current.GetInstance<IFormsAuthentication>();

varticket = formsAuthentication.Decrypt(authCookie.Value);
varmileageStatsIdentity =newMileageStatsIdentity(ticket);
this.Context.User =newGenericPrincipal(mileageStatsIdentity,null);

// Reset cookie for a sliding expiration.
formsAuthentication.SetAuthCookie(this.Context, ticket);
}
} | |
The advantage of using a forms ticket with a sliding expiration is that it does not force the user to re-authenticate if he maintains a reasonable level of frequent activity in the application. Otherwise, the user would be redirected to authenticate after a fixed amount of time had elapsed after authenticating. While this greatly enhances the usability of the application, it is also a potential security risk since the user's authenticated session can be kept alive indefinitely by submitting requests to the server before the sliding expiration time on the forms ticket has passed. This can be mitigated by introducing an additional timeout value that does not slide, after which the ticket will expire regardless of user activity. While this approach is effective, it was not implemented in Mileage Stats because it would add complexity to the forms ticket handling that is beyond the scope of the application.
Input Validation
One of the key methods of preventing an application from accepting malicious content is validating any input before it is accepted by the application. While out-of-the-box ASP.NET input validation does a good job of preventing script or HTML injection, it is not always practical to use this mechanism in an ASP.NET MVC application. In Mileage Stats, this mechanism is disabled to handle input validation directly within the MVC model classes. If you don't implement your own input validation and rely on the built-in ASP.NET input validation instead, two things will happen: first, the input will not be validated until after the controller has processed it and before the view has rendered. Next, you will get the default "yellow screen of death" input validation page, which is not a pleasant user experience. When the out-of-the box ASP.NET input validation is disabled, you also lose HTML encoding on your input. To account for this, the @ operator in Razor syntax automatically HTML-encodes output that is rendered in an MVC view.
Although input validation can be done on the client side to reduce round trips to the server, it must also be performed on the server since client-side validation can be bypassed by an attacker. One of the advantages of ASP.NET MVC is that it can be configured to render client-side validation based on server-side validation attributes defined on MVC model properties. This provides a single point in the application to define and maintain data validation rules. For example, in Mileage Stats, the _ProfileForm view is configured to use the MileageStats.ServicesModel.User class as its MVC model via the @model directive. If you look at the DisplayName property on the class, you will see attributes to limit the length of the value, require a value for the property, and use a custom text input validator that filters input using a regular expression:
| C# |
|
|---|---|
// contained in User.cs
[StringLength(15,
ErrorMessageResourceName ="UserDisplayNameStringLengthValidationError",
ErrorMessageResourceType =typeof(Resources))]
[TextLineInputValidator]
[Required(AllowEmptyStrings =false,
ErrorMessageResourceName ="UserDisplayNameRequired",
ErrorMessageResourceType =typeof(Resources))]
[Display(Name ="UserDisplayNameLabelText", ResourceType =typeof(Resources))]
publicstringDisplayName {get;set; } | |
Take a look at the custom input validator class behind the TextLineInputValidator attribute:
| C# |
|
|---|---|
//contained in TextLineValidatorAttribute.cs
public class TextLineInputValidatorAttribute : RegularExpressionAttribute,
                                                IClientValidatable
{
  public TextLineInputValidatorAttribute()
    : base(Resources.TextLineInputValidatorRegEx)
  {
    this.ErrorMessage = Resources.InvalidInputCharacter;
  }

  public IEnumerable<ModelClientValidationRule>
    GetClientValidationRules(ModelMetadata metadata, ControllerContext context)
  {
    var rule = new ModelClientValidationRule()
    {
      ErrorMessage = Resources.InvalidInputCharacter,
      ValidationType = "textlineinput"
    };

    rule.ValidationParameters.Add("pattern", Resources.TextLineInputValidatorRegEx);
    return new List<ModelClientValidationRule>() { rule };
  }
} | |
The TextLineInputValidatorAttribute class uses a set of regular expressions it loads from the resources file. If any of the regular expression patterns are matched in the input, it fails validation. The regular expression pattern used to validate text input is ^(?!.*--)[A-Za-z0-9\.,'_ \-]*$. This limits the text assigned to the property to alphanumeric characters and allows only a limited range of punctuation characters. Notice that the regular expression pattern is matching on known characters that are legitimate rather than excluding invalid characters. By default, everything else outside of what's been explicitly defined in the regular expression is not allowed in application data. The list that limits input by only allowing what is known to be valid is commonly referred to as a safe list. The advantage of safe lists is that anything that falls outside of the valid set of characters is not allowed; you don't have to worry about accidentally omitting a character from the regular expression that shouldn't be allowed in the application input.
What's nice about this is that the client-side validation for these properties is generated for you based on the server-side validation defined in the MVC model when the HTML for the MVC view is rendered. The following code shows you what the rendered client-side validation looks like for the user display name form field when you view the HTML source of the page.
| HTML |
|
|---|---|
<!-- rendered HTML in the client browser --> <input data-val="true" data-val-length="Display name must be less than 15 characters." data-val-length-max="15" data-val-required="Display name is required." data-val-textlineinput="Only alpha-numeric characters and [.,_-&#39;] are allowed." data-val-textlineinput-pattern="^(?!.*--)[A-Za-z0-9\.,'_ \-]*$" id="DisplayName" maxlength="15" name="DisplayName" type="text" value="Sample User" /> | |
| If you want to accept HTML tags or other types of input that would normally be rejected by simple input validation, you can leverage the same mechanism to do it. However, you will need to create more sophisticated patterns to allow the input you want to accept while still excluding the input that you don't want submitted to your application. |
Anti-Forgery
As previously explained in the Security Concepts section, Cross-Site Request Forgery (CSRF) is a security threat that has a high damage potential and should be protected against. ASP.NET MVC has a simple, yet effective mechanism for mitigating CSRF attacks. In your MVC view content, add an @Html.AntiForgeryToken directive to the view, as below:
| CSHTML |
|
|---|---|
<!-- contained in _ProfileForm.cshtml --> @modelMileageStats.ServicesModel.User @Html.AntiForgeryToken() | |
When the view HTML is rendered to the client, MVC places a unique value for the user in a hidden form field and in a session cookie. The form field in the rendered HTML might look like this:
| HTML |
|
|---|---|
<!-- rendered HTML in the client browser --> <input name="__RequestVerificationToken" type="hidden" value="H4zpQFvPdmEdGCLsFgeByj0xg+BODBjIMvtSl5anoNaOfX4V69Pt1OvnjIbZuYrpgzWxWHIjbn zFOLxP5SzVR4cM9XZeV78IPi8K4ewkM3k2oFkplrXL4uoAqy+aoSOg8s1m1qxrE7oeBBtvezEHCAs6nKE h2jAwn3w0MwmhkcDQiJfJK7hGvN0jXA4d7S8x7rbLxp4Y8IJZS9wka2eOLg==" /> | |
There's another piece to implementing the anti-forgery tokens in ASP.NET MVC. You must also put a ValidateAntiForgeryToken attribute on corresponding MVC controller actions that you want to protect. Below is an example of the attribute decorating the edit action on the ProfileController class:
| C# |
|
|---|---|
// contained in ProfileController.cs [HttpPost] [ValidateInput(false)] [ValidateAntiForgeryToken] publicActionResultEdit(UserupdatedUser) | |
When ASP.NET MVC checks for a request forgery, it verifies that the request verification token form field and cookies are present and that the values match each other. If either the cookie or the form field values are missing, or the values don't match, ASP.NET MVC does not process the action and returns an authorization failure instead.
| MVC anti-forgery tokens do not work using HTTP GET requests because the _RequestVerificationToken value from the client needs to be sent as a posted value. Therefore, it is important to make sure that you only accept client requests that use HTTP POST when you want to implement anti-forgery tokens. This shouldn't be an issue because you should already be using only HTTP POST for data updates and using HTTP GET exclusively for read-only operations. |
If you want to implement more tightly controlled anti-forgery measures so that the tokens will only validate to a particular set of MVC views and actions, you can pass a salt as a parameter to the @Html.AntiForgeryToken directive in the MVC model. Make sure that you are using the same salt values in the @Html.AntiForgeryToken directive in the MVC model and in the parameter for the ValidateAntiForgeryToken attribute on the MVC controller action; otherwise, the anti-forgery token will not validate properly when the MVC action is called. For more information about using a salt with an MVC anti-forgery token, see the reference to "Prevent Cross-Site Request Forgery (CSRF) using ASP.NET MVC'sAntiForgeryToken()helper" at the end of the chapter.
JSON Hijacking Prevention
In some situations, it may be possible for an attacker to get at data via a JSON request using an attack that closely resembles a CSRF attack. If an attacker can get a user to click on a malicious link that makes a JSON request via HTTP GET and returns a JSON array, it may dump the contents of the array in the response, making it accessible to the attacker. The mitigation for JSON hijacking is fairly straightforward: either you can make sure to never return JSON arrays in a response, or you can restrict JSON requests to responding only to requests using the HTTP POST action. To configure a JSON action on an MVC controller to respond to requests only via HTTP POST, add the HttpPost attribute to it. The code snippet below shows the HttpPost attribute on the ProfileController's JsonEdit action.
| C# |
|
|---|---|
// contained in ProfileController.cs [HttpPost] [ValidateInput(false)] publicActionResultJsonEdit(UserupdatedUser) | |
This may not be an issue if you don't care whether or not someone can gain unauthorized access to data that is not sensitive; however, as a general practice you should protect your JSON calls against hijacking. For more information, see the reference to JSON Hijacking in the "Further Reading" section at the end of the chapter.
Additional Security Considerations
This section covers additional security considerations when deploying and configuring Mileage Stats. Securing communication between the client and the server is a key feature for protecting the data that goes back and forth between them. You may want to use a different method of authenticating users for the application, whether that means using a different relying party for the existing authentication mechanism or switching to an ASP.NET membership provider. If you expand the functionality of your application, you may want to restrict different levels of functionality to a limited subset of application users. In some cases, you may want to deploy the data tier to SQL Server or SQL Server Express instead of running it on SQL Server Compact Edition.
Securing Communication between Client and Server
When properly configured, Secure Sockets Layer (SSL) is a very effective mechanism to prevent eavesdropping, session hijacking, message replay and tampering between the client and the server. Mileage Stats does not use SSL out of the box because it depends on your infrastructure and not on the application itself. There's already a lot of documentation on how to set up SSL on your server, so the specifics won't be covered here. For more information, see the reference on "How to Set Up SSL on IIS 7" in the "Further Reading" section at the end of this chapter. Make sure that when you configure SSL on your server that you do not configure anonymous SSL. Otherwise, communication between the client and server will still be susceptible to several different attacks.
| Warning: When communicating with the server via SSL, a client verifies the identity of the server with which it is communicating by checking the host name provided in the SSL certificate against the URL of the server. Sometimes the client does not have a certificate that can be used to identify the server, and sometimes the server is configured to use SSL protocols that do not incorporate identification of the server; these are examples of anonymous SSL. Anonymous SSL can be configured on some web servers or by using an SSL certificate on the server that cannot be verified against the host's identity. While this provides protection against tampering and eavesdropping, it does not protect against message replay or spoofing attacks where one party can pose as the other during communication. |
Once SSL has been set up in your environment, there are two changes to the web.config that you'll need to make in Mileage Stats. The first configuration change is to require ASP.NET forms authentication to use SSL.
The requireSSL attribute needs to be added to the forms element:
| XML |
|
|---|---|
<!--contained in web.config--> <authenticationmode="Forms"> <formsloginUrl="~/Auth/SignIn"timeout="20"requireSSL="true"/> </authentication> | |
The default timeout for a forms authentication ticket is 20 minutes, though you should feel free to adjust this to a reasonable time to achieve the usability of the sliding expiration while minimizing the security risk of indefinitely authenticated users.
The second configuration change is for OpenID to require an SSL communication with the relying party.
| XML |
|
|---|---|
<!--contained in web.config--> <openid> <relyingParty> <securityrequireSsl="true"/> | |
The value of requireSsl needs to be set to true. That way you can ensure that the authentication provider will only attempt to communicate with your application via HTTPS.
Any use of the UrlHelper.Action method specifying a protocol (HTTP) in your application for constructing URLs will need to be updated to HTTPS for any URL references that are now secured via SSL. For more information on the UrlHelper.Action method, see the reference on the UrlHelper.Actionmethod at the end of the chapter.
Protecting Connection Strings
If you change data sources for the application, you will likely end up changing the connection string in the web.config. As a good practice, you should protect connection strings in the web.config from disclosure. For more information on protecting connection strings, see the reference on Protecting Connection Information (ADO.NET) at the end of the chapter.
Deploying to a Shared Environment
In situations where you are deploying your web application to a server that is being shared by multiple parties, you may want to protect your application from others that are hosted on the server. In addition to protecting sensitive information in the web.config file, ensure that the application pools on the server are configured to run per web application and that the temporary ASP.NET files cached on the server are in a location that is not shared with the other web applications on the server. For more information, see "How To: Secure an ASP.NET Application on a Shared Server" on MSDN®.
Summary
This chapter provided an overview of security threats that impact Mileage Stats: unauthorized access, malicious input (content injection and cross-site scripting), eavesdropping, message tampering, message replay, and cross-site request forgery and how they are mitigated through various security features. Also, a few ideas were provided on how to extend or change security for Mileage Stats to accommodate different deployment environments and security requirements.
Further Reading
"ASP.NET Web Application Security" on MSDN:
http://msdn.microsoft.com/en-us/library/330a99hc.aspx
"How to set up SSL on IIS 7:"
http://learn.iis.net/page.aspx/144/how-to-set-up-ssl-on-iis-7/
"UrlHelper.Action Method" on MSDN:
http://msdn.microsoft.com/en-us/library/dd505232.aspx
"Understanding the Forms Authentication Ticket and Cookie" on Microsoft Support:
http://support.microsoft.com/kb/910443
"Authenticating Users with Forms Authentication" on ASP.NET:
http://www.asp.net/mvc/tutorials/authenticating-users-with-forms-authentication-cs
Protecting Connection Information (ADO.NET) on MSDN:
http://msdn.microsoft.com/en-us/library/89211k9b(v=VS.100).aspx
"How To: Secure an ASP.NET Application on a Shared Server" on MSDN:
http://msdn.microsoft.com/en-us/library/ms228096.aspx
"A Guide to Claims–based Identity and Access Control" on MSDN:
http://msdn.microsoft.com/en-us/library/ff423674.aspx
"OWASP Top 10 Project" on OWASP.org:
https://www.owasp.org/index.php/Category:OWASP_Top_Ten_Project
"JSON Hijacking" on Phil Haack's blog:
http://haacked.com/archive/2009/06/25/json-hijacking.aspx
"Best Practices for ASP.NET MVC" on the ASP.NET and Web Tools Developer Content Team's blog: http://blogs.msdn.com/b/aspnetue/archive/2010/09/17/second_2d00_post.aspx
"Prevent Cross-Site Request Forgery (CSRF) using ASP.NET MVC's AntiForgeryToken() helper" on Steve Sanderson's blog:
http://blog.stevensanderson.com/2008/09/01/prevent-cross-site-request-forgery-csrf-using-aspnet-mvcs-antiforgerytoken-helper/
To report documentation errors or provide feedback on this documentation, please send email to pagdoc@microsoft.com
Copyright © 2011 by Microsoft Corporation. All rights reserved.