Unit Testing Web Applications
From Project Silk
| Silk 1.0 - June 2011 |
| Unit Testing Web Applications |
|
|
Introduction
Unit testing, sometimes referred to as developer testing, focuses on testing small pieces of code a developer is writing, such as a class. These tests are critical for developers to ensure the pieces they build work as expected and should operate correctly when put together with other parts of the application. This helps support management of the application over time by giving you the confidence that changes you make don't inadvertently affect other parts of the system.
This chapter shows you how to get started unit testing JavaScript as well as server-side code, but does not cover all aspect of unit testing. References to more detailed discussions about unit testing can be found at the end of this chapter.
This chapter does not cover other important aspects of testing, such as performance, stress, security, automation, deployment, localization, and globalization. Nor does it discuss other important aspects to consider when testing the client-side such as cross-browser compatibility or usability. However, these areas are important for you to consider when testing your web application.
What you will learn in this chapter
In this chapter you will discover:
- How to get started unit testing your JavaScript and ASP.NET MVC code.
- The arrange-act-assert unit test structure.
- Techniques to isolate your tests and components.
- What to think about when testing your jQuery UI widgets.
The technologies discussed in this chapter are QUnit to test your JavaScript and jQuery client-side code and xUnit and Moq to test your server-side, ASP.NET MVC code.
JavaScript Unit Testing
Testing the client-side portion of a web application offers different challenges for unit, functional, and performance testing than that of server-side testing. In addition to testing the structural layout of a page and basic application functionality, you may want to verify that animations properly execute, that a page with a large amount of JavaScript has no memory leaks, and that the application maintains its functional and performance expectations across multiple browsers.
As a developer, you will use JavaScript to handle user interface (UI) logic in your application to dynamically build the structure, enable or disable portions of your UI, or load data in the background. Portions of these pieces you build may rely on libraries you adopt, such as jQuery, or those that you build yourself. You want to be sure that each of these pieces—on their own—operate as you expect so that, when put into the overall application, work as you want.
Unit testing is a way to verify that individual pieces work as you expect them to and provides a way for you to verify that they continue to work as libraries or tools evolve. For example, you may build a jQuery UI widget to manage a piece of your UI. When the next version of jQuery comes out you can quickly and easily verify that your widget is still working by executing the unit tests using the new jQuery libraries.
While unit testing isn't hard, there is a learning curve for those unfamiliar with it. One common objection to adopting unit testing is the perceived extra time it takes to write unit tests. While it is true that it will take longer to build something with unit tests than without (after all, there is more code in the form of unit tests), what is often not reflected is the time it will save later in tracking down bugs or verifying that things still work after changes to the code or by upgrading to new versions of a library. For the uninitiated, it can also be difficult to determine what should be tested or how to approach testing for a particular behavior. Unit testing can be a complicated topic. This section seeks to provide you with the basics to get started. It will give you an idea of what you want to test and provide some approaches to solving common challenges in unit testing JavaScript in your application.
Getting Started With Unit Testing
The Project Silk team decided to use QUnit for unit testing their JavaScript components since they heavily rely on jQuery and the jQuery UI widget framework, which also use QUnit . The QUnit unit testing framework can be located on the jQuery website at http://docs.jquery.com/QUnit. The site provides examples, documentation, and links to the download.
Setting up QUnit typically involves creating an HTML page with specific QUnit elements with certain class attributes specified, and including the qunit.js and qunit.css files. In Mileage Stats, these were added to the tests folder under the Scripts folder.
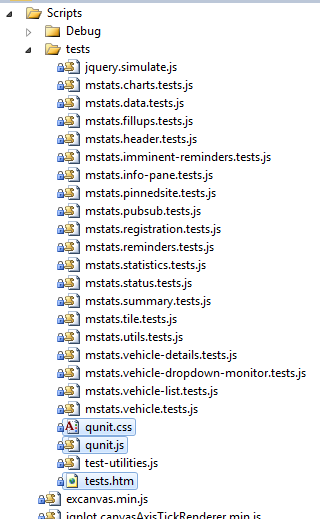
Once this is in place you will create a test JavaScript file for each set of tests you want to run. This set is typically focused around a JavaScript object. For example, in Mileage Stats there is a JavaScript test file for each of the jQuery UI widgets that the application implements.
Each of these JavaScript test files and the JavaScript file of the item being tested are referenced from test.htm file so the QUnit framework can locate and execute the tests.
| HTML |
|
|---|---|
<!-- contained in test.htm --> <!-- Code under test --> <scriptsrc="../Debug/mstats.utils.js"></script> <scriptsrc="../Debug/mstats.events.js"></script> <scriptsrc="../Debug/mstats.pubsub.js"></script> ... <!-- Unit tests --> <scriptsrc="mstats.utils.tests.js"></script> <scriptsrc="mstats.pubsub.tests.js"></script> <scriptsrc="mstats.data.tests.js"></script> ... | |
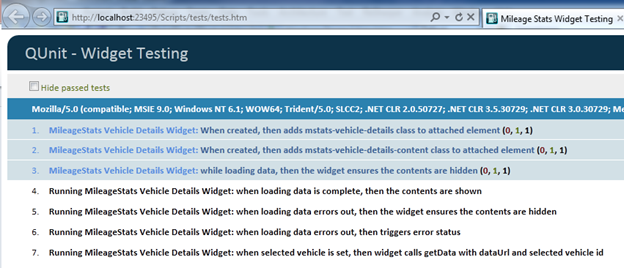
These unit tests can be run by viewing the test HTML file in a browser. From Visual Studio, you can right click the test HTML file and select View in Browser. For the Mileage Stats tests the output would look like this while executing the tests.
Creating Unit Tests
There are typically multiple unit tests in one file and they are often grouped around a particular topic or type of test. Using QUnit, the module function is used to denote a group of tests.
| JavaScript |
|
|---|---|
module('Test Group');
test('Test one', function () {
  // Test logic goes here
});

test('Test two', function () {
// Test logic goes here}); | |
Let's look at the structure of a typical test. This is a test from the mstats.data.test.js to test a data caching component within the solution.
| JavaScript |
|
|---|---|
// contained in mstats.data.test.js
test('When data is saved, then it can be retrieved',function() {
expect(1);
  // Arrange
varvalue ='some-data';

  // Act
mstats.dataStore.set(' /some/url', value);

  // Assert
  equal(
mstats.dataStore.get(' /some/url'),
value,
'mstats.datastoresaved and returned'+ value);
}); | |
| The test, expect, equal, start and stop methods are specific to qUnit. |
The basic structure of most unit tests follow an arrange-act-assert pattern, where the setup for the test is clearly grouped together, the action that should be tested is executed, followed by the verification of the desired results.
In the above example, the 'act' ensures the value can be set in the store and 'assert' verifies that the value was appropriately set. The QUnit framework provides a number of functions to help with assertions. The equal assertion is shown in the example, but ok (which just performs a Boolean check) is also typically used.
You'll see we execute a single assertion in this test and keep the number of assertions small, which typically results in smaller, more focused unit tests. Writing unit tests in this manner encourages you to write code that is also small and focused. This tends to lead to code that is more composable because then it will have a single responsibility. They should generally take one action and make one assertion. However, there are cases where a group of similar assertions will be made, such as when verifying the property values on a deserialized JSON object.
The QUnit framework provides a mechanism to ensure that the proper number of expected assertions were run using the expect function. At the beginning of the test you will see that expect(1) was called to let QUnit know how many assertions should be run. If QUnit does not encounter that number of assertions, then it will produce an error in its output when the tests are run.
What to Test
Now that you know how to write a unit test, perhaps the more important question is what should be tested? Generally in a unit test you are trying to verify the functionality of a relatively small component, this could be a JavaScript object or something like a jQuery UI widget. Each test verifies independent pieces such as verifying a calculation happened correctly or that the proper DOM modification occurred.
When testing UI widgets, it can be unclear what should be tested. The basic rule of thumb is to test anything a designer would not change. Logic that drives the UI might be tested, such as the right navigation was invoked, an element had the proper class attribute applied (or removed), or that the right event was raised. But, you would not test that a specific font value was set or the specific background color of an element.
Isolating Your Tests
Often your object under test will rely on other objects, functions, or libraries. You may have an object that makes Ajax calls to retrieve data. If you attempt to make Ajax calls when running the unit tests you might get unpredictable results because the server responding to the calls may be unavailable when you run your tests. Generally, you want to isolate your component from these types of problems.
You will also want to isolate your component from other objects you build within your system when testing. In Mileage Stats, many jQuery UI widgets rely on a publish-subscribe object for communication. During the testing of objects with dependencies, you do not want to invoke the actual dependencies. If you did, you would be testing more than one thing at a time. Instead, it is important to test that the component attempts to invoke a dependency. The typical strategy for isolating your component under test in these scenarios is to supply an alternative component or function that the component calls instead of the real component during tests. These alternatives may also be referred to fakes, doubles, stubs or mocks. As it turns out, the ability to isolate your component in this manner also helps the overall design of your application by tending to create smaller, more focused components.
With a substitute object employed, you can then verify that the correct calls were made with the right values. For example, when testing that the Mileage Stats data cache component makes an Ajax call with the appropriate URL an alternate jQuery Ajax function is supplied for testing. In this alternate, we verify that the expected URL is invoked by the component.
| JavaScript |
|
|---|---|
// contained in mstats.data.tests.jstest('whensendRequestis called, then the url from options is used',function() {
expect(1);
  // Arrange
$.ajax=function(options) {
    // Assert
equal(options.url,'/url','Urlwas properly set');
};

  // Act
mstats.dataManager.sendRequest({
url:'/url'
});
}); | |
Note also that this somewhat changes the typical arrange-act-assert order of the test structure because the assertion is in the supplied Ajax function. This is why it is important to use the expect function at the beginning of your tests to help ensure that all the expected assertions are made.
When providing these alternative functions or components, it is also a good idea to capture and restore the original values to avoid interfering with any other test that may have relied on these values. In QUnit this can be done when defining the test module where the setup and teardown functions can be supplied.
| JavaScript |
|
|---|---|
// contained in mstats.data.tests.jsmodule(
'MileageStatsDataManagersendRequestTests',
{
setup:function() {
this.savedAjax= $.ajax;
...
},
teardown:function() {
$.ajax=this.savedAjax;
...
}
}
); | |
jQuery UI Widget Testing
When unit testing jQuery UI widgets there are some additional considerations. Since widgets are attached to a DOM element, you will need to create these elements either in the test or, if they are more complicated, in the setup for a module. In Mileage Stats, since many of the widgets interact with a section of the DOM, some of that structure needs to be created during test setup. For example, the header widget test creates the structure over the DOM it manipulates in the setup for the test.
| JavaScript |
|
|---|---|
// contained in mstats.header.tests.jsmodule('Header Widget Tests', {
setup:function() {
$('#qunit-fixture').append(
'<div class="header" id="header">'+
'<div><div><h1>Dashboard</h1>'+
'<div id="notification"></div>'+
'<div class="nav">'+
'<span id="welcome">Welcome <b>Sample User</b></span>'+
'[ <a id="dashboard-link" href="/Dashboard">Dashboard</a>'+
'| <a id="charts-link" href="/Chart/List">Charts</a>'+
'| <a id="profile-link" href="/Profile/Edit">Profile</a>'+
'| <a id="login-link" href="/Auth/SignOut">Sign Out</a> ]'+
'</div>'+
'</div></div>'+
'</div>'
);
}
}); | |
In QUnit, you add these elements to the element with the ID of 'qunit-fixture'. You should only add the minimal amount of structure needed to appropriately simulate your test needs as this will make the structural dependencies of the test clearer.
When testing jQuery UI widgets you will also often need to supply alternate implementation on dependent functions or objects. Since you don't control the creation of the jQuery UI widgets directly, you will typically do this as part of the options object passed into the widget (see the section jQuery UI widgets for more details about the use of an option object). For example, when testing the Mileage Stats vehicle-details widget an alternative implementation for the Ajax method and the event publisher are supplied as part of the options.
| JavaScript |
|
|---|---|
// contained in mstats.vehicle-details.tests.jstest('when loading data errors out, then triggers error status',function() {
expect(3);
vareventType='loadError',
details = $('#details-pane').vehicleDetails({
templateId:'#testTemplate',
getData:function(options) {options.error({}); },
eventPublisher:function(event, status) {
if(status.type===eventType) {
ok(status,'status object passed to publisher');
equal(status.type, eventType,'status is of type :'+ eventType);
equal(status.origin,'vehicleDetails','status has correct origin');
}
}
});

// force a data refresh
details.vehicleDetails('option','selectedVehicleId', 1);
}); | |
Server-Side Unit Testing
Unit testing code on the server typically involves many more interactive pieces than what you encounter when testing client-side JavaScript. In an ASP.NET MVC application, controllers will interact with services or repositories to handle each request. These interactions and expectations can be tested using unit tests as each piece is built to instill confidence that the system will continue to work as new features are added or new versions of dependent libraries are supplied.
This section is intended to provide you with enough information to get started unit testing your server side application. Since each application is different, testing all scenarios is out of scope for this chapter. To find out more about unit testing your applications, see the "Further Reading" section.
Getting Started Unit Testing
There are a number of unit testing frameworks to choose from when unit testing server-side .NET components. Most unit tests frameworks are similar and any one of them can be a reasonable choice. Microsoft offers two technologies that can be used for writing unit tests: Microsoft Test and xUnit. Microsoft Test is supplied with certain versions of Visual Studio and xUnit.net is a Microsoft developed, open-sourced unit testing framework available on Codeplex or NuGet.
Regardless of your unit test framework choice, unit tests are placed in a separate assembly that the unit test framework can discover and use to execute the tests. A typical Visual Studio solution organization has the unit test projects included in the solution with the projects under test. For example, the Mileage Stats solution has its test projects in a Unit Tests solution folder.
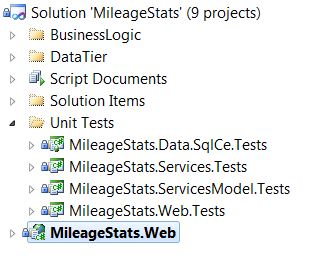
There is one unit test project for the Services, ServicesModel, SqlCe, and Web. Some projects don't have a corresponding unit tests project primarily because these projects contain only shared interfaces and data transfer classes that do not have significant logic to test.
The team choose xUnit as the unit testing framework for the Mileage Stats project. While you can accomplish unit testing with either Microsoft Test or xUnit, the team felt that since xUnit was built specifically for developer unit testing that it would better fit their needs. The remainder of this section discusses unit testing using examples in xUnit, but you can readily apply the same approaches with Microsoft Test, although some of the exact mechanics may be different.
To create a new unit test project, you add a C# or Visual Basic Class Library project and reference the xUnit assemblies. In the test project, there will be a class to contain all the related tests for a particular component. For example, the MileageStats.Web.Tests project contains a test class for each controller in the Web project. They generally are named the same as the controller name with the term 'Fixture' appended.
To write a test, create a method with the attribute Fact specified. The xUnit.net framework searches for these attributes and executes these methods. Each test should follow the arrange-act-assert pattern. In this pattern all the setup for the test (e.g. arrangement) is done first, then the action to be tested is executed (e.g. act), and then the validation is done (e.g. assert).
| C# |
|
|---|---|
//contained in ReminderFixture.cs[Fact]
publicvoidWhenReminderIsNotOverdue_ThenIsOverdueReturnsFalse()
{
// Arrange
varreminder =newReminderFormModel()
{
Title ="future reminder",
DueDate=DateTime.UtcNow.AddDays(2),
DueDistance= 10000
};

reminder.UpdateLastVehicleOdometer(10);

// Act
boolisOverdue=reminder.IsOverdue;

// Assert
Assert.False(isOverdue);
} | |
Generally tests should be small and focused, with only one or two asserts. At times, there may be more asserts in a single test if they are verifying in a logical group.
In addition to Assert.False, xUnit.net supplies a number of other built-in asserts available on the Assert static class.
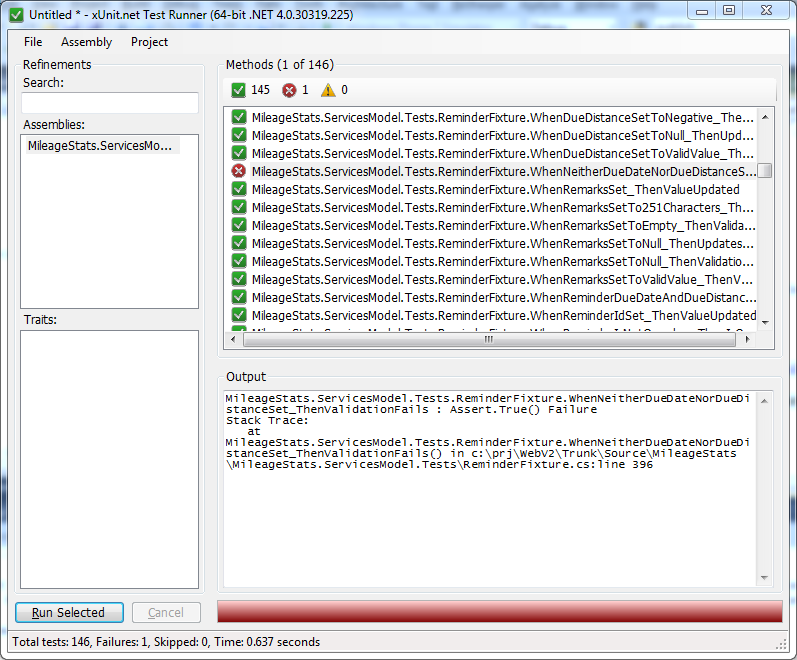
Once the tests have been built you can execute them using the xUnit.net test runner to see that they pass. The test runner can be found where you unpackaged the xUnit.net contents retrieved from Codeplex. After you add the test assembly into the runner you can run all the tests to see if they succeed.
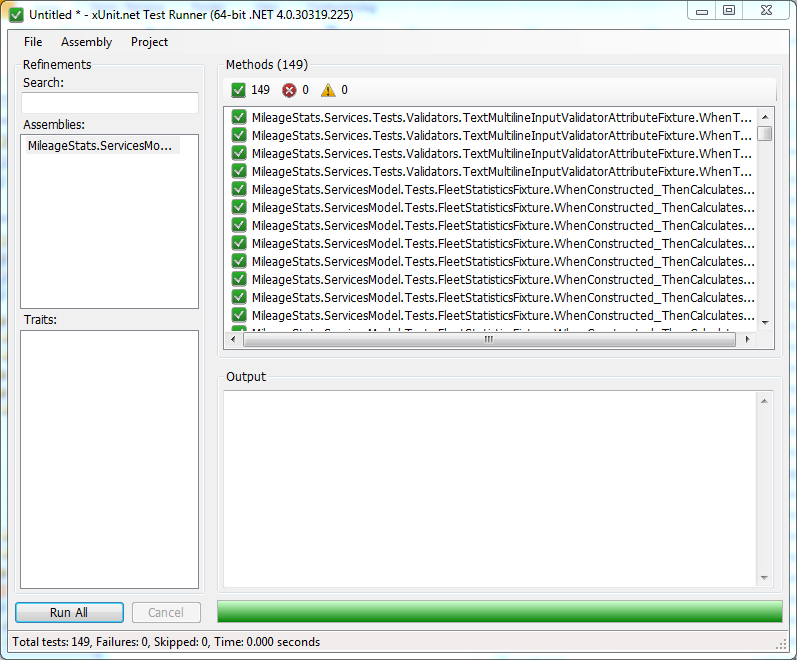
If there is a failing test it will show up in the console.
Alternatively, you can run tests by using TestDriven.Net or Resharper which would run the tests from within Visual Studio. For more details on setting this up, see http://xunit.codeplex.com.
What to Test
On the server side, you should create unit tests for any classes and components that contain logic or must interact with other components. You should not write unit tests for generated code or code you don't own. The team wrote unit tests for classes in each of the major layers.
Repository Layer. The repository layer provides the basic persistence for information throughout the system. In Mileage Stats, this relies heavily on Entity Framework Code-First and SQL Server Compact Edition. Much of the tests written against this layer verifies that the persistence and retrieval implementations for the various repositories produce the correct results. These tests, since they are writing to an actual database, cannot strictly be considered unit tests, but are useful in verifying that the persistence mechanism for all the models occurs as expected. Often, these are referred to as integration tests.
These tests were also useful because the Entity Framework Code-First library was adopted before actual release, so these tests helped demonstrate that the expectations around Entity Framework were maintained between releases.
Business Logic Layer. The business services layer is invoked by the controllers in the Web Layer in order to execute business rules and store data in the repository. Unit tests for the business services layer focus on verifying the business rules and its interaction with the repository layer. The tests do not actually store data in the repository but use a fake repository and verify that the business services layer uses it correctly. The models in this layer are what the web application retrieves from and supplies to the business services layer. These models often contain validation logic that are verified in unit tests.
Web Layer. The actual controllers that respond to requests have unit tests to verify that they interact with the services and models appropriately and return correctly built View Models for the Views or jQuery template.
Isolating Your Components
It is common for the classes you are testing to rely on other classes. For example, a class may rely on a repository to persist a model. During testing you want to isolate your class' interaction with these other objects to ensure that only the behavior of the class in question is tested. Additionally, it can sometimes be painful to setup these other classes appropriately. For example, if the class calls a web service it would be difficult to expect that the web service be up when you want to run your unit test.
Instead of trying to create the actual context for the class under test we supply it with alternative implementations of the object it depends on. These alternatives may also be called fakes, doubles, stubs or mocks. Using these alternative implementations has the side-effect of also helping separate the responsibilities of our classes.
To provide this separation, instead of creating a class that depends on a specific technology we provide an abstraction for the class to depend on. This allows us to provide different implementations of the dependency at different times, such as at unit test time. Often this abstraction could be an interface definition but it could also be a base or abstract class.
For example, suppose we had a class to test that needed to store values somewhere. Instead of tying the class directly to a specific store implementation, it can depend on an IStore abstraction.
| C# |
|
|---|---|
publicinterfaceIStore
{
voidPersist(stringitem);
}

publicclassClassToTest
{
privateIStorestore;

publicClassToTest(IStorestore)
{
this.store= store;
}

publicvoidSave(stringvalue)
{
...
store.Persist(value);
...
}
} | |
When we write a test for this class that depends on IStore, we can then provide an alternative implementation.
| C# |
|
|---|---|
[Fact]
public voidWhenSaving_ThenSendsValueToStore()
{
varmockStore= newStoreMock();
varclassToTest= newClassToTest(mockStore);

classToTest.Save("Test");

Assert.Equal(mockStore.ValueSaved, "Test");
}

private classStoreMock:IStore
{
public stringValueSaved{ get; set; }
public void Persist(string item)
{
ValueSaved= item;
}
} | |
The StoreMock captures the saved item to verify that ClassToTest sends the correct value to the store. Instead of making these mocks by hand, as shown above, the team relied on Moq—a mocking framework—when writing Mileage Stats tests. This allows us to supply mock objects without requiring us to create mock classes by hand. The same test above would look like this using Moq.
| C# |
|
|---|---|
[Fact]
publicvoidWhenSaving_ThenSendsValueToStore()
{
varmockStore=newMock<IStore>();
varclassToTest=newClassToTest(mockStore.Object);

classToTest.Save("Test");

mockStore.Verify(s =>s.Persist("Test"));
} | |
Moq dynamically builds the objects needed for testing and in the case of the Verify method, can automatically verify that methods or properties were called with the correct values. See the Moq Codeplex site for more information about using Moq at http://moq.codeplex.com.
There are times when you don't control the class that you want to be able to mock. For instance, if you use a static class built into the .NET Framework library like FormsAuthentication. In these cases, you will often create an interface for just the functionality you use and provide a default implementation for run-time and a mock implementation at test-time. This was the approach employed with Mileage Stats when using the DotNetOpenAuth library. This library helps with implementing the various authentication protocols used in Mileage Stats. To isolate the components and make them more testable, the IOpenIdRelyingParty interface was created.
| C# |
|
|---|---|
// IOpenIdRelyingParty.cs
publicinterfaceIOpenIdRelyingParty
{
ActionResultRedirectToProvider(
stringproviderUrl,
stringreturnUrl,
FetchRequestfetch);
IAuthenticationResponseGetResponse();
} | |
Mileage Stats has a default implementation that uses the real DotNetOpenAuth library at run-time and a mock implementation when testing the AuthController.
At run-time, all these pieces are connected using a technique known as dependency injection. See the "Dependency Injection" section in Chapter X to better understand how this works.
Testing your ASP.NET MVC Controllers
ASP.NET MVC was designed to support the testability of the controllers, filters, and actions that developers typically write when developing an MVC application. Since each controller is responsible for handling a request and MVC automatically maps input from the query string or from form data to the data types on your controller's methods, you can easily write tests for your controllers and simply supply them with the necessary inputs. For instance, the ReminderController's Add method takes an integer value for the vehicle identifier and Reminder object.
| C# |
|
|---|---|
// contained in ReminderController.cs
publicActionResultAdd(intvehicleId,ReminderFormModelreminder)
{
...
returnView(viewModel);
} | |
In a unit test, it is very simple to just provide these values for testing. The example below demonstrates supplying the reminder and vehicle ID directly in the test.
| C# |
|
|---|---|
// contained in ReminderControllerFixture.cs[Fact]
publicvoidWhenAddReminderWithValidReminder_ThenReturnsToReminderDetailsView()
{
  ...
varresult =(RedirectToRouteResult)controller.Add(vehicle.VehicleId,formModel)
;
  Assert.NotNull(result);
Assert.Equal("Details",result.RouteValues["action"]);
Assert.Equal("Reminder",result.RouteValues["controller"]);
} | |
While many unit tests for controllers can use this approach, there are still cases where the controllers require access to the HttpContext. Usually providing alternate implementations of HttpContext is very difficult, thus making certain scenarios very hard to test. But since the MVC base controller class Controller relies on HttpContextBase instead of HttpContext, it can much more easily be substituted. Mileage Stats uses this on many of its controller tests to ensure the User property is set appropriately on HttpContextBase.
To do this, the Mileage Stats uses an MvcMockHelpers class that wraps the building of a Moq object that substitute HttpContext information. This controller context is then set on the controller under test by calling the static SetFakeControllerContext method in the MvcMockHelpers class. The RemindersControllerFixture sets this when it builds a testable controller.
| C# |
|
|---|---|
// contained in RemindersControllerFixture.cs
privateReminderControllerGetTestableReminderController()
{
varreminderController =newReminderController(this.mockUserServices.Object,
this.mockBusinessServices.Object);
reminderController.SetFakeControllerContext();
reminderController.SetUserIdentity(
newMileageStatsIdentity(this.DefaultUser.AuthorizationId,
this.DefaultUser.DisplayName,
this.DefaultUser.UserId));
returnreminderController;
} | |
The fake context creates a series of Moq objects that the controller will interact with under test. If you want to adjust what they're doing you can recover the mock and change its behavior. The static SetUserIdentity above does this for a controller to set an identity context for the test into the HttpContext.
| C# |
|
|---|---|
// contained in ControllerMockHelpers
publicstaticvoidSetUserIdentity(thisControllercontroller,IIdentityidentity)
{
Mock.Get(controller.HttpContext)
.Setup(x =>x.User)
.Returns(newGenericPrincipal(identity,null));
} | |
The types of tests you typically write around your controller include:
- View Models. You will want to test that the controller provides the correct model data for a specific view.
- Navigation. You will want to test that the controller will provide the correct redirection when it is finished processing the request or when there is an error processing the request.
- Interaction. You will want to test that the controller makes the appropriate calls to your repository or services layers (which will be mocked in the tests). You will also want to test that your controller appropriately handles the situation when the model data supplied to a controller is in an invalid state.
- JSON Endpoints. If you have JSON data endpoints you want to make sure these return appropriate JSON results for the call.
Summary
You should make a conscious decision about whether or not you are going to unit test your code. Unit testing is not hard but it does require an investment of time to learn and apply. The time spent initially writing unit tests will save time over the life of your project and deliver better quality code. There are frameworks that help you write unit tests available for most languages and platforms. Visual Studio includes unit test support for C# and Visual Basic .NET, among other languages, and you can readily find them for languages such as JavaScript.
Further Reading
Meszaros, Gerard. xUnit Test Patterns: Refactoring Test Code. Addison-Wesley, 2007.
Cem Kaner, Jack Falk, and Hung Q. Nguyen. Testing Computer Software, 2nd Edition. Wiley, 1999.
patterns &practices Acceptance Test Engineering Guidance on CodePlex:
http://testingguidance.codeplex.com/
Performance Testing Guidance for Web on MSDN:
http://msdn.microsoft.com/en-us/library/bb924375.aspx
Guidance for Build, Deploy and Test Workflows on MSDN:
http://msdn.microsoft.com/en-us/library/ff972305.aspx
QUnit unit testing framework on the jQuery website:
http://docs.jquery.com/QUnit
xUnit.net on CodePlex:
http://xunit.codeplex.com.
Moq on CodePlex:
http://moq.codeplex.com
"Testing the User Interface with Automated UI Tests" on MSDN:
http://msdn.microsoft.com/en-us/library/dd286726.aspx
"How to: Create a Coded UI Test" on MSDN:
http://msdn.microsoft.com/en-us/library/dd286681.aspx
Resharper:
http://www.jetbrains.com/resharper/
TestDriven.NET:
http://testdriven.net
To report documentation errors or provide feedback on this documentation, please send email to pagdoc@microsoft.com
Copyright © 2011 by Microsoft Corporation. All rights reserved.