Troubleshooting

RecoverMyFiles

Recover My Files Data Recovery Software | English V4
___________________________________________________

FAQ

+ Will Recover My Files run on an Apple Macintosh?

No. Recovery My Files requires Windows to run.

Coming Soon:

Recover My Files will soon support the recovery of Apple Macintosh HPFS file systems.

This means that it is possible to connect a Macintosh formatted drive to a Windows computer and scan it to recover the HPFS Filesystem.

AAAAA

 
+ What types of Filesystem can Recover My Files recover?

Recover My Files V4 supports recovery from a wide range of Filesystems:

  • FAT16 - an early version of the FAT Filesystem, now rarely used

  • FAT32 - common for external storage media and digital camera equipment

  • exFAT - (Extended File Allocation Table), a proprietary file system suited especially for flash drives

  • GPT -    GUID Partition Table, a standard for the layout of the partition table on a physical hard disk

  • NTFS -  Standard files system for Windows Vista, Windows 7

  • CDFS -  CD/DVD file systems (Coming Soon)

  • MAC -   HFS (Coming Soon)

  • EXT2 -  Linux (Coming Soon)

  • RAID -  RAID JBOD, 0, 1, 5, hardware and software


+ What is best methodology to use to get my files back?

Quick Start Tips

  • Don't panic, most deleted or missing data can be recovered;
  • Minimize the use of your computer until you have had the opportunity to try data recovery software;
  • Avoid writing any new data to the problem drive (or you may overwrite and destroy files that could otherwise have been recovered).
Try Before You Buy

Run Recover My Files in evaluation mode. If you can see your files (view the photos and read the documents) in the search results screen, then purchase an activation key to save them (you do not need to run a second search).
  
What is the best way to run Recover My Files?
  
Ensure that you install and run Recover My Files with full administrator rights. This is needed for low level disk access to recover your files.

A good methodology, if possible, is to connect the problem drive to another computer as the secondary drive. This enables you to

  • install Recover My Fils on the C: drive of the 'good' computer, and
  • use it to scan the secondary 'problem' drive to recover your files.

This methodology make it far less likely that Windows, or you, will write new data to the drive.

Of course this methodology is not always practical, as you may well have lost your files from your current C: drive and have no alternative that to continue to use Windows on this drive. Recover My Files is a small program (approximately 10mb), so installation of the software onto the problem drive, whilst not recommended, is a small risk.

If you see your files - Save Them!

It may sound silly, but when attempting to recover data, if you get to the position where you can see your missing files in the Recover My Files preview window - save them! Don't mess about trying lots of different options or ideas, or put off the saving to another day. Once the files are recovered and you have a nice secure copy of these files on another drive, then you can experiment all you want.


Troubleshooting

+ General:            What Filesystems can be recovered? (e.g. Windows, Mac, Linux)

Recover My Files V4 supports recovery from a wide range of Filesystems:

  • FAT16 - an early version of the FAT Filesystem, now rarely used

  • FAT32 - common for external storage media and digital camera equipment

  • exFAT - (Extended File Allocation Table), a proprietary file system suited especially for flash drives

  • GPT -    GUID Partition Table, a standard for the layout of the partition table on a physical hard disk

  • NTFS -  Standard files system for Windows Vista, Windows 7

  • CDFS -  CD/DVD file systems (Coming Soon)

  • MAC -   HFS (Coming Soon)

  • EXT2 -  Linux (Coming Soon)

  • RAID -  RAID JBOD, 0, 1, 5, hardware and software


+ Activation:         Lost Activation Key

If you have lost your Recover My Files activation key, log into your www.getdata.com customer account here: https://secure.getdata.com/my/ (or using the 'Member Login' link in the footer of any GetData web site such as www.recovermyfiles.com) where you can locate a record of your purchase, including your activation details.

Login: [the email address used in your purchase]
Password: [if you do not know your password, use the "send me my password" link]


+ Activation:         Max Activations Reached
Maximum Activations Reached

A single Standard License of Recover My Files can be used to activate the software on two computer systems owned by the purchaser, e.g. a desktop and a laptop computer.

Recover My Files is "hardware locked" to a computer onto which it is installed. Each time the license is used on a new computer (with a different hardware ID) it counts as an additional activation. When the number of available activations is used, the "Max Activations Reached" message is displayed. This is an anti-piracy measure designed to stop a license of the software being unlawfully activated on multiple computers.

You may also receive this message if:

a) you have changed or added new hardware to your existing PC;

b) you have upgraded your computer and reinstalled Recover My Files software.

In this instance, please contact technical support to request additional software activations.


+ Activation:         Upgrade from Recover My Files version 3 to version 4

Upgrade from Recover My Files v3 to Recover My Files v4

A discounted cost applies for existing Recover My Files version 3 customers to upgrade to Recover My Files version 4. Existing version 3 customers:

  • log into your GetData customer account here: https://secure.getdata.com/my/ (or using the 'Member Login' link in the footer of any GetData web site such as www.recovermyfiles.com).

    Login: [the email address used in your purchase]
    Password: [if you do not know your password, use the "send me my password" link]

  • once logged in, locate a record of your Recover My Files version 3 purchase and click on the version 4 links;

  • you will see the discounted upgrade price in the shopping cart;

  • checkout and your Recover My Files version 4 key will be displayed on a web page and also sent to you by email.


+ Installation:        Am I logged in as local Administrator?

Windows XP:

To check if you are currently logged on as local administrator, right click on the START button. If you see "Open All Users" rather than just "Open," the account is in the local Administrators group.

Microsoft Windows Vista

  1. Click on the Start button.
  2. Select Control Panel.
  3. Make sure your Control Panel window is in Classic View, by insuring that "Classic View" is selected, on the left side of the window.
  4. In the Control Panel window, double click on User Accounts.
  5. You will see information about your account in the window, like this:
  6. On the right of the User Accounts window, you should see your account name, account icon and a description listed.
  7. If the word "Administrator" is in your account's description, then you are an administrator. If you see "Standard user," then you are not an administrator and will need to log in as a different user.


+ Installation:        Log in as Administrator on Windows XP

Find Out Which Windows Operating System Your Computer Is Using

   1. Click Start, and then click Run.

   2. In the box, type winver, and then click OK.

How to login as Administrator in Windows XP?

The built-in Administrator account is hidden from Welcome Screen when a user account with Administrator privileges exists and enabled.

WINDOWS XP HOME EDITION: You can login as built-in Administrator in Safe Mode only.

WINDOWS XP PROFESSIONAL: Press CTRL + ALT + DEL twice at the Welcome Screen and input your Administrator password in the classic logon window that appears.

 
+ Installation:        What version number do I have installed?

What version number do I have installed?

To find this information, at the top of the main program screen in text menu items "File | Recover | Help", click on "Help > About". This will open the program About Box which contains the information.


+ Drive Selection:   The drive I wish to search is not listed

Check connections, is the drive alive?

Ensure the drive you are wanting to search is properly connected to your computer. Check all cables etc. Can you hear the drive spinning? If it is silent, or making and unusual noise, then it is likely that it is a physical hardware problem and you will need to contact a hardware data recovery service.  

Does your computer know that a drive is connected? To find out, right click on

My Computer > Manage" > Disk Management

and you should see a "Disk X" that is the size of your problem drive. (Note: In the Windows Disk Management screen, "Disk0" is usually the physical drive on which your C:\ partition resides).

Is the file system damaged?  

It is possible that your file system is damaged to the extent where you can no longer see your drive letter. Click the "Back" button to return to the search selection window and choose the "Recover Drive" option. Do you see the "Disk" listed (you should be able to identify it by it's displayed size). If the Disk is listed, continue with the Drive Recovery option.

Are you connecting directly to a digital camera?  

Some digital cameras have a proprietary connection to your computer which Recover My Files cannot recognize as a drive letter.   In this case you will need to use a digital camera card reader, an inexpensive device into which your digital camera memory card is inserted and then connected to your PC (usually via a USB connection).

Are you trying to connect to an iPod Touch, iPhone or similar device?  

Some of these products have proprietary protection which prevents software from gaining access to the drive letters.


+ Drive Selection:    Learn more about the information displayed in the drive selection window

The drive selection window displays the following information:

·        logical drive letter, e.g. "C:"

·        the drive label (if no label has been give it will display "{no label}"

·        the size of the drive, eg. 453.99 GB (note that the actual size of the drive is usually smaller than what the drive is labelled. Drive manufactures usually round up the drive capacity, so a 453.99 GB drive may be marketed as a 500GB).

·        the format of the drive, e.g.

§        NTFS

§        FAT

·        describes the way in which the drive is connected to the computer

§        SCSI - Small Computer System Interface, is a set of standards for physically connecting and transferring data between computers and storage devices

§        ATA -   an interface standard for the connection of storage devices such as hard disk and CD-ROM in computers. Includes Parallel ATA (PATA) and Serial ATA (SATA)

§        1394 - The IEEE 1394 interface (commonly referred to as FireWire) is a standard for high-speed communications used commonly for digital audio of multimedia drives

§        SSA - Serial Storage Architecture is a serial transport protocol used to attach drives to servers.

§        Fibre - Optic Fibre connection

§        USB - USB connection

§        RAID Types

o       JBoD

o       RAID 0

o       RAID 5

·        describes the means by which the drive is being accessed

§        S - SCSI Pass Through Interface

§        W - Windows

§        F - File

§        T - TCPIP

§        M - Mixture of the above types

Options in the drive selection window include:

  This button is used in for RAID recovery. Learn more here.

   This button is used to add image files to the drive selection list, including DD, EnCase, FTK, SafeBack, AFF (Recover My Files Professional only).

  This button refreshes the list of available drives to search.


+ File Selection:      The file type I am searching for is not in the list

Files Recovery - File type not  in list

Help me please.
 

Drive Recovery - File type not in list

A Drive Recovery is targeted at the recovery of full Filesystem, with all files and folders. Selected files are used by Recover My Files as an aid to locating the Filesystem records.

If a specific file that you wish to recover is not in the list, it is of no consequence if you can select other files from the list that were also present on the problem drive.


Adding a File Type to Recover My Files

Adding a Lost File file type to Recover My Files requires a full understanding of the file structure. Some file structures are publicly documented, most are not. Depending on the file type, it can be a complex and time consuming task.

To request a file type to be added, contact technical support and provide as much information about the file type as possible, including the author web site and the version number of the program used to create the files (if applicable). Also send 3 sample files from your system. GetData will then advise if it is possible to add the file type and how long it will take.


+ Search Progress:  The search is very slow - how do I speed it up?
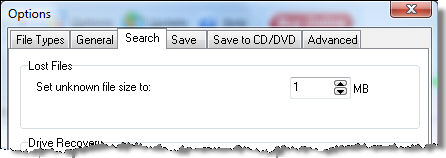
Search speed

In most data recovery situations, you should be able to recover your files within a maximum of 3-4 hours.

There are many factors which can influence the speed of the Recover My Files search. This will include things which you cannot control, such as the size of the hard drive being searched (a 1 terabit drive will take longer than a 250 gigabyte) and the processing speed of your computer. However, however there are also a number of techniques that can be used to obtain maximum recovery in the shortest period of time.

To maintain search speed in "Recover Files" mode:

"Search for deleted files. (Recommended)"

This is recommended option because it is a fast search (less than 1 hour) and may locate your deleted files quickly;

"Search for deleted files, then search for selected Lost File types"

The primary reason that this search will run slow is because more than ten Lost File types have been selected. Select only the important file types first - do NOT select everything.

Whilst the Lost Files search is in progress, monitor the search results screen by clicking between the Folder and File view tabs. If the required files are found and previewed, it is possible to stop the search, save the important files and then resume the search from the same location.

To do this:

  1. Before you stop the search, write down the block number that the search is up to;

  2. Press the stop button;

  3. Click on the OPTIONS button and in the ADVANCED tab place a tick in the box for "prompt for start sector" and "start with Lost File scan";

  4. Click on OK to save these options, then "Start Recovery" > "Drive Recovery" and enter the starting block number.

To maintain search speed in "Recover Drive" mode:

"Automatic Drive Recovery. (Recommended)"

The automatic drive recover is pre-configured to find your files in the shortest period of time.

"Drive Recovery using selected file types"

Only use the selected file type method when your problem drive did not have any of the following file types on it: Avi, EXE, iTunses, Jpeg, Microsoft Excel and Word and Zip. When adding additional file types, only add those types essential to the recovery.

In either of these searches, it is not usually necessary to let the search run to the end of the drive:

  • Monitor Folder and File Type views in the search results screen to see if your files have been located;

  • Monitor the number of Filesystem records found is displayed in the progress bar

When the number of "Filesystem Records" found reaches a high number, stops increasing, and remains constant, it means the Filesystem records located have been read (on your average home PC you should reach this point within 2 hours of searching).  The average home PC has between 50,000 and 150,000 Filesystem records. Each one represents a file with its full file and folder name.

When you get this point, click the STOP button (note down the 'block' number that the search is up to in case you wish to recommence the search at a later time) and examine the "Virtual Partition" in Folder view of the results screen.


+ Search Results:    Lost Files are all the same size (e.g. 1024kb)

Searching for Lost Files

Recover My Files has the capability to perform a sequential search of the disk to identify "Lost Files" by their internal file structure, (i.e. their header, content and footer). This is often referred to as a "file header search" or "data carving".

Shown below is the content of a JPEG picture, the way a computer sees it. A JPEG can be identified by the "y0ya..JFIF" header, and contains further information about the camera used to create the image:

Once the header of a file is identified, Recover My Files will travel a pre-defined distance down the drive to analyze the file structure and locate the end of the file.

If the file end is not found, but sufficient information is found within the file to suggest it will at minimum be partially recovered, it is assigned a default file size according to that file type. The global default size of lost files can be set in the OPTIONS > SEARCH window:


Limitations of a Lost File search are:

  • it is a sequential search of the drive and does not track the fragmentation of files;

  • Lost Files do not have a file name (as file names are held only in the file system records and not with the file data) and are called "LostFile_FileType_X".

 
+ Search Results:    The recovered file does not contain valid data

Does the saved file contain data?

How do I tell?

Open the file and view the raw data inside the file. You can do this by:

  • using a hex editor;

  • using a file viewing tool such as Explorer View for Windows Explorer, www.explorerview.com and examine the file in HEX mode;

  • renaming the extension of the file to .txt and opening the file with Windows Notepad.

No, the file does not contain any data

In some instances a storage device may have powered down (or gone flat) during the save process. This may cause Recover My Files to save blank files, as the data can no longer be read.

If the saved file is blank, you need to change your drive power settings in the control panel:

Control Panel > Power Options > and make sure that the hard drives are not set to power down after a specific period of time (in XP the setting should be "Never").

After you run the search and before you save the files, check that the drive is running by:

    1. Clicking on a JPEG or DOC file in the Recover My Files search results screen - these file types should preview in the bottom windows of the search results screen;

    2. Open Windows Explorer and click on the drive letter of the problem drive (if you have one). Windows will then probe the drive and you should hear the drive spinning up or the drive light flash.

    3. Once the drive is awake, save the files again with Recover My Files and they will save properly. I suggest you first save a small number of files and then open them to test that they have saved correctly.

Yes, the file does contain data but it will not open

If the save file contains data, but does not open, it is corrupt. Try an alternate method to open the file. E.g.

Explorer View:

Explorer View for Windows Explorer is a file viewing program that can view over 300 file types. In many situations it can read corrupt files that will onto open in their creating application.

Photos:

Irfanview (www.irfanview.com) is a free graphics viewer which is good at opening corrupt image files;

Word Files:

Word Repair is a free Microsoft Word repair utility that can extract text from damaged .doc files

PST Files:

Recover My Email (www.recover-my-email.com) is a tool for reading corrupt Microsoft Outlook .PST files


What causes corrupt files?

Files with their original file name

When a file has been found with its original file name, it has been found by locating a File System record for that file which points to the location of the file data on the disk. In a successful recovery, it should be possible to click on the file found in the results window and preview its content, or save the file and open it normally. If the recovered file does not contain valid data, the possible reasons are:

  1. The file system record is pointing to the correct location on the disk, but that section of the disk has been over-written with new data and no longer contains the correct data for this file. In this case, nothing can be done as the original file has been overwritten and destroyed; or

  2. The file system record is corrupt and no longer points to the correct location on the disk. In this case, the additional search for the Lost Files types will attempt to locate the file by its file structure. If the "Search for deleted files, then search for "Lost File" types" option does not locate the file, run a "Lost File" search over the entire drive, by clicking Options > Advanced > and select Start with a Lost File scan and Scan for lost files across the whole device (and not only in the free space). Ensure that you examine all search results start with the name "Lostfile...".

LostFiles

Lost files are located by searching for the header, structure and footer of the file data. Recover My Files performs a series of tests on each Lost File type, to determine the possibility of recovery. Partially corrupt files will be returned as there is the possibility that the files can be accessed using the methods described above.


Contact technical support.