Recover My Files Data Recovery Software | English
V4
___________________________________________________
RAID 5 Recovery
A RAID 5 uses block - level striping with parity data distributed across all member disks. Distributed parity means that if a single drive fails the array is not destroyed. Upon a drive failure, any subsequent drive reads can be calculated from the distributed parity of the functioning drives. A single drive failure in the set will result in reduced performance of the entire set until the failed drive has been replaced and rebuilt.
To Recover the RAID:
Ensure the problem RAID drives are properly connected to your computer. Ensure that you can hear the drives spinning and that there are no signs (or sounds) of a physically failed drive;
Run Recover My Files v4, select the "Recover Drive" path and click Next;
In the Drive Selection window, click on the
 button.
This opens the RAID configuration window. Click here
for a summary of functions in this window.;
button.
This opens the RAID configuration window. Click here
for a summary of functions in this window.; Adds a drive to the list.
 Adds
an image (DD, RAW, EnCase etc.) to the list of drives.
Adds
an image (DD, RAW, EnCase etc.) to the list of drives. Replaces
a physically missing drive with a blank virtual drive.
Replaces
a physically missing drive with a blank virtual drive. Removes
a drive or image from the list.
Removes
a drive or image from the list. Software
RAID only: Tests to see if the current disk order is valid.
Software
RAID only: Tests to see if the current disk order is valid. Software
RAID only: Edit the settings of a software RAID.
Software
RAID only: Edit the settings of a software RAID. Hardware
RAID only: Attempts to determine the order and type of
RAID.
Hardware
RAID only: Attempts to determine the order and type of
RAID. Hardware
RAID only: Tests the order of a hardware RAID.
Hardware
RAID only: Tests the order of a hardware RAID. Used
to change the disk order of RAID drives.
Used
to change the disk order of RAID drives.In the Add Raid window, select the type of RAID you are trying to recover and click the
button to add the RAID
drives (Note: if you have taken image copies of the drive [DD, RAW,
EnCase etc] use the "Add Image..." button);
-
Set the "Type" of RAID to "software".
Press the
 to test to see if it is
a valid software RAID.
to test to see if it is
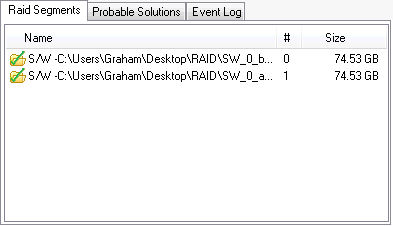
a valid software RAID.A valid software RAID will show with green ticks on the added drives (or image files):
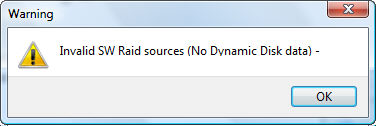
If it is not a valid software RAID, you will receive the message below. In this case follow the hardware RAID instructions:
-
I have a software RAID (where computer software alone is responsible for managing the RAID disks).
Set the "Type" of RAID to "software".
Press the
to test
to see if it is a valid software RAID.A valid software RAID will show with green ticks on the added drives (or image files):
If it is not a valid software RAID, you will receive the message below. In this case follow the hardware RAID instructions:
-
I have a hardware RAID (where a physical device, e.g. a RAID card plugged into my computer) is responsible for managing the RAID disks.
If you know the parameters of your hardware RAID drive:
Set the RAID type to "hardware";
Add the drives (or image files) in the correct sequence;
Enter the Stripe Size and Offset Sectors;
Click OK to add the RAID drive and then proceed with the search.
If you do NOT know the parameters of your hardware RAID drive:
Recover My Files will attempt to identify the way in which the RAID was configured. To do this:Set the RAID type to "hardware";
Add the drives (or image files)in the correct sequence, or, if the correct sequence is unknown, add them in the order that is believe to be most correct;
Click on the "Find Layout" button to find a suggested configuration. A suggested configuration is indicated by a green tick next to each added drive.
Important:
A suggested configuration is based on the information available from the drives. However, due to the complexity of a RAID structure, there may be more than one configuration that returns this results. A suggested configuration should be tested by continuing with the recovery to successfully locate missing files.
File Layout did not return a suggested configuration, or,
The suggested configuration did not result in a successful recoveryIf the Find Layout button did not return green ticks for each added drive, or the continued recovery from a suggested configuration did not work, try the following:
click on the "Probable Solutions" tab to view suggested configurations for the RAID;
change the "stipe size", RAID Options and drive sequence as suggested;
click the "Test Layout" button to test the modified configuration;
re-try the recovery.
Once added, select and search the RAID drive
Once the RAID has been added to the list of available drives, select the RAID as the drive to search and click Next:
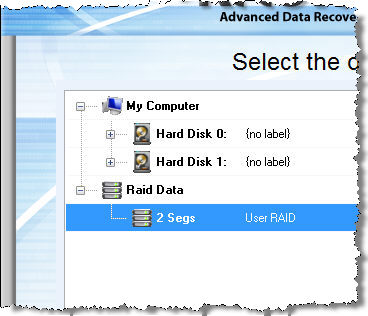
The RAID drive can now be search like any other drive on your system. In most cases, because of the initial problem with the RAID, it will be best to run the Recover Drive mode. However, it is also possible to search the drive in Recover Files mode.