Recover My Files Data Recovery Software | English
V4
___________________________________________________
Saving
Saving Recovered Files
This section relates to the saving of your recovered files (for information on how to save search results so that they can be reloaded into Recover My Files at a later time, click here).
Program Activation
In order to save files, you must activate the program with a product activation key.
Note: To save files from a RAID recovery, your need to purchase a "Recover My Files Professional" or "Data Recovery Technician" license. For more information, learn about license types and program activation here.
How do I select Files to be saved?
-
To select a file to be saved; in the search results window place a tick in the box next to the file;
-
To select a folder to be saved; in the search results window place a tick in the box next to the folder to be saved. All files in that folder will automatically be ticked (selected).
-
To select a group of files and folders to be saved: Hold down the SHIFT key (for groups) or CTRL key (for individual selections), use your mouse to select the files that you require and then press the SPACE BAR key to turn the selection tick on or off.
What files should I save?
Recover My Files is designed to get back your created photos, documents, music etc. Select and save the files that are most important to you. Remember;
There is no point saving gigabytes of Windows System files that will be worthless to you and it will just slow the saving process down;
Rather than trying to recover and save software programs, it is better to reinstall software programs from the original disks or installation files to be sure the integrity of their registry settings etc.
How much space will I need to save the files?
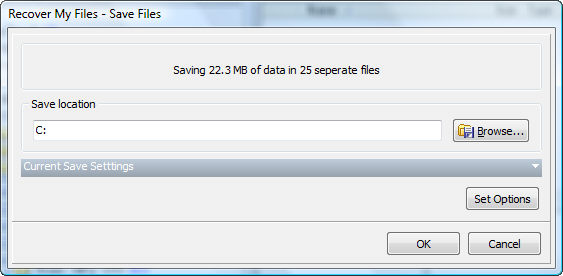
In the bottom boarder of the Recover My Files search results window you will see the number of files selected, and the total size of the files selected, e.g. "Selected items 25 (22.3mb)".
During the saving process, as each file is saved, the selection tick is removed from the file and correspondingly the number of "Selected items" and the total size of selected files is reduced.
If the media that you are saving to runs out of space, simply connect new media and restart the save process.
 TIP: It is prudent to save files in manageable volumes. For example, instead of trying to save 2 terra byte of data in one go, Windows may find it less intensive if you were to break it up into 4 x 500 segments.
The "Save Files" button
The Save Files button has three options:
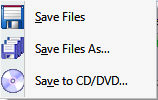
"Save Files"
Press the "Save Files" button and the selected files will be automatically saved to your chosen location. The saved files will have exactly the same file and folder structure that appears in the search results screen.
"Save Files As..."
The "Save Files As..." button prompts you to give each file a new name as it is saved. If you have selected many files this can be very time consuming. It is recommended that you only use "Save As" if you are saving a small number of files and wish to change the file names during the save process.
"Save to a CD/DVD"
Recover My Files has the capability to save files directly to a CD or DVD. Importantly, the is a secure process which does not write new data to the disk. Learn more about saving files to a CD or DVD here.
Where do I save files?
Recover My Files is designed specifically so that it does not alter the content of the drive being searched. This avoids new data overwriting and permanently destroying deleted or missing files that could have other wise been recovered. For this reason:
You must save files found with Recover My Files to a drive other than the one from which the files are being recovered.
Your primary options are:
-
Save to another drive;
This can be another drive letter on you hard drive (e.g.: Drive "D:\"), another separate hard drive connected inside to your computer or an external hard drive connected by USB, Fire Wire, or other method. -
Save to a CD or DVD;
Search results can be written directly to a CD or DVD. Learn more about saving files to a CD or DVD here. -
Save to a Network Drive;
In order to save files to a network drive, the remote location must be shared as a drive letter on the computer which is running Recover My Files. Then, when the "Browse" button is selected in the Recover My Files "Save Files" window (shown below) it is possible to navigate to and select this remote drive letter.
File Saving Options
Select the "Save Location" by either typing the destination path, e.g. "C:\recovery\" or using the "Browse..." button to select the desired destination.
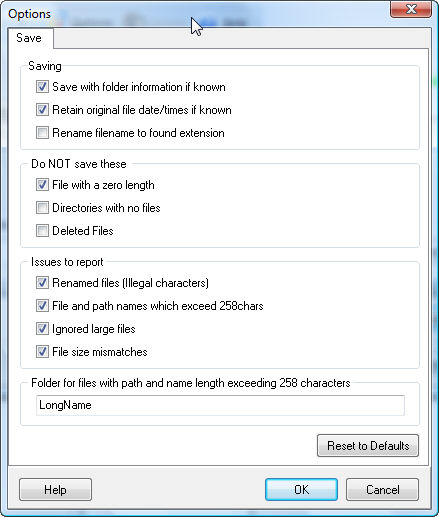
Current "Save Settings" can be view by selecting the drop down arrow and save settings can be changed by selecting "Set Options" button:
What will the files look like when they are saved?
If you are saving files from "Folder" view of the Recover My Files search results screen, the files that are saved will have same file names and folder structure that you see in this screen.
If you are saving files from "File Type" view, the files that are saved will have same file names and folder structure that you see in the "File Type" view.
What happens after I save the files?
As a file is saved, the tick is removed from the selection box.
The results stay in the search window. In Recover My Files version 4, the results only disappear if you start a new search or close the program. You can only reload the existing search results if you have previously save them - learn how here.
 Always go to the drive where the files were saved and open them to test if they have been saved correctly.
Never write new data to the problem drive until you are sure that you have recovered all data that you need. Writing new data to the drive will change its content and may overwrite and destroy deleted or missing files so that a new search will Recover My Files will no longer find them.