Recover My Files Data Recovery Software | English
V4
___________________________________________________
The "Recover Files" search
+ Before you begin - Read Quick Start Tips Here
Quick Start Tips
Run Recover My Files in evaluation mode. If you can see your files (view the photos and read the documents) in the search results screen, then purchase an activation key to save them (you do not need to run a second search). What is the best way to run Recover My Files? Ensure that you install and run Recover My Files with full administrator rights. This is needed for low level disk access to recover your files. A good methodology, if possible, is to connect the problem drive to another computer as the secondary drive. This enables you to
This methodology make it far less likely that Windows, or you, will write new data to the drive. Of course this methodology is not always practical, as you may well have lost your files from your current C: drive and have no alternative that to continue to use Windows on this drive. Recover My Files is a small program (approximately 10mb), so installation of the software onto the problem drive, whilst not recommended, is a small risk. If you see your files - Save Them! It may sound silly, but when attempting to recover data, if you get to the position where you can see your missing files in the Recover My Files preview window - save them! Don't mess about trying lots of different options or ideas, or put off the saving to another day. Once the files are recovered and you have a nice secure copy of these files on another drive, then you can experiment all you want.
|
Running the "Recover Files" search
When the "Start Recovery" button is selected in the Recover My Files v4 program tool bar, two search options are displayed. The first is "Recover Files".
The "Recover Files" options is best used when you hard drive is running correctly, but:
-
individual files have been deleted and emptied from the Windows Recycle Bin;
-
files have been deleted and bypassed the Windows Recycle Bin;
-
files have been deleted by a virus, trojan or worm;
-
a file of the same name has saved over another important file;
-
files have been lost by some other unknown cause.
To search for deleted or lost files, click the "Recover Files" button then "Next" to proceed. (NB: If your data loss problem relates to loss of data from the entire drive, select instead try the "Drive Recovery" option).
Selecting the Drive to Search
In the "Recover Files" mode, Recover My Files will display the "logical drives", i.e. the drive letters. If you do not see the drive letter that you need to scan, click the "Back" button, select the Drive Recovery option, and scan the physical Hard Disk.
It is possible to search only one drive letter at a time. Select the drive to search by clicking it with your mouse, then click the "Next" button to proceed:
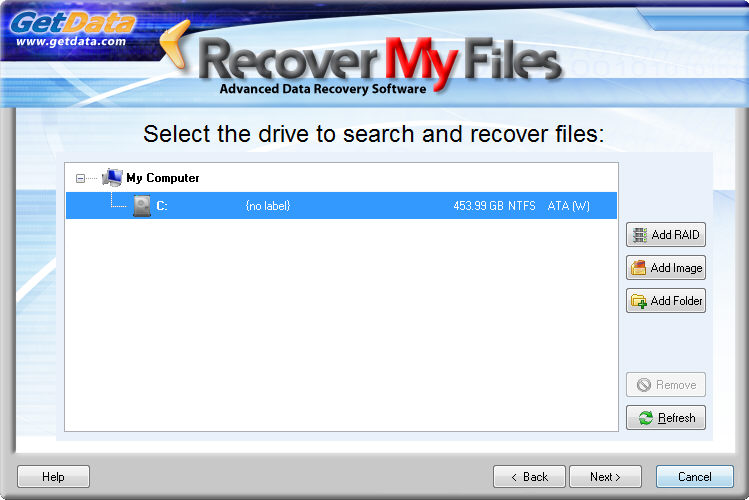
Drive Selection:
+ Drive Selection: Learn more about the information displayed in the drive selection window.
The drive selection window displays the following information: · logical drive letter, e.g. "C:" · the drive label (if no label has been give it will display "{no label}" · the size of the drive, eg. 453.99 GB (note that the actual size of the drive is usually smaller than what the drive is labelled. Drive manufactures usually round up the drive capacity, so a 453.99 GB drive may be marketed as a 500GB). · the format of the drive, e.g. § NTFS § FAT · describes the way in which the drive is connected to the computer § SCSI - Small Computer System Interface, is a set of standards for physically connecting and transferring data between computers and storage devices § ATA - an interface standard for the connection of storage devices such as hard disk and CD-ROM in computers. Includes Parallel ATA (PATA) and Serial ATA (SATA) § 1394 - The IEEE 1394 interface (commonly referred to as FireWire) is a standard for high-speed communications used commonly for digital audio of multimedia drives § SSA - Serial Storage Architecture is a serial transport protocol used to attach drives to servers. § Fibre - Optic Fibre connection § USB - USB connection § RAID Types o JBoD o RAID 0 o RAID 5 · describes the means by which the drive is being accessed § S - SCSI Pass Through Interface § W - Windows § F - File § T - TCPIP § M - Mixture of the above types Options in the drive selection window include:
|
 This button is used in for RAID recovery.
  This button is used to add image files to the
drive selection list, including DD, EnCase, FTK, SafeBack, AFF
(Recover My Files Professional only).
This button is used to add image files to the
drive selection list, including DD, EnCase, FTK, SafeBack, AFF
(Recover My Files Professional only). This button refreshes the list of available drives
to search.
This button refreshes the list of available drives
to search.+ Drive Selection: The drive I wish to search is not listed.
Check connections, is the drive alive? Ensure the drive you are wanting to search is properly connected to your computer. Check all cables etc. Can you hear the drive spinning? If it is silent, or making and unusual noise, then it is likely that it is a physical hardware problem and you will need to contact a hardware data recovery service. Does your computer know that a drive is connected? To find out, right click on My Computer > Manage" > Disk Management and you should see a "Disk X" that is the size of your problem drive. (Note: In the Windows Disk Management screen, "Disk0" is usually the physical drive on which your C:\ partition resides). Is the file system damaged? It is possible that your file system is damaged to the extent where you can no longer see your drive letter. Click the "Back" button to return to the search selection window and choose the "Recover Drive" option. Do you see the "Disk" listed (you should be able to identify it by it's displayed size). If the Disk is listed, continue with the Drive Recovery option. Are you connecting directly to a digital camera? Some digital cameras have a proprietary connection to your computer which Recover My Files cannot recognize as a drive letter. In this case you will need to use a digital camera card reader, an inexpensive device into which your digital camera memory card is inserted and then connected to your PC (usually via a USB connection). Are you trying to connect to an iPod Touch, iPhone or similar device? Some of these products have proprietary protection which prevents software from gaining access to the drive letters. |
File Recovery Options
The next wizard window presents the following two search options:
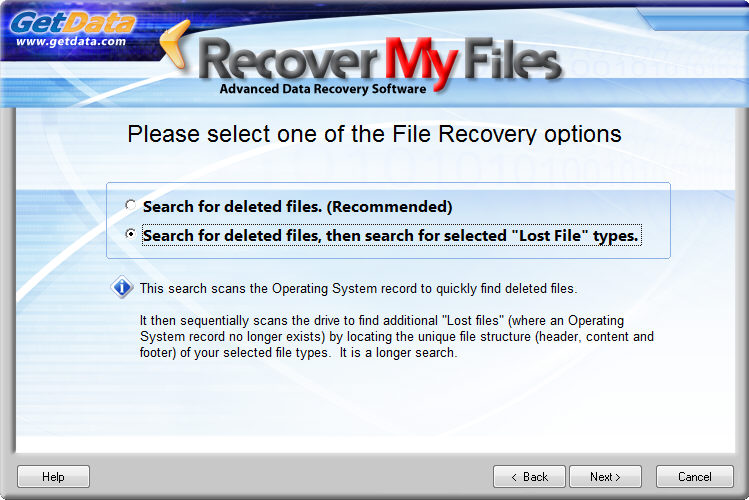
Search for Deleted Files (Recommended)
A Deleted File is a file that has been emptied from the Recycle Bin and marked as deleted by the File System, but which retains sufficient information held in the File System to be recovered.
This search is "Recommended" because:
-
It will rapidly scan the File System for deleted files (the search will take less that 1 hour on a standard home PC);
-
If files were recently deleted, there is a high probability of success;
-
Files located will have their original file names and folder structure intact.
Learn more about finding Deleted Files here.
Searching for Deleted Files On a computer storage device, the term 'Filesystem' is used to describe the schema by which electronic files are stored. The most common File Systems are;
A common characteristic of a File System is that they use a table on the drive to track every file on the disk, including user deleted files. Each record in the table holds all information about a file, including its size, time and date stamps, permissions, etc., (required for file and folder name recovery), and tells the computer which storage sectors on the drive hold the file data. Eventually deleted file entries in the File System will be reused as new data is written to the computer. For this reason, the sooner a search is for deleted files is conducted after a deletion, the greater the chance of a recovery using this technique. When a file has been found with its original file name, it has been found by locating a File System record for that file which points to the location of the file data on the disk. In a successful recovery, it should be possible to click on the file found in the results window and preview its content, or save the file and open it normally. If the recovered file does not contain valid data, the possible reasons are:
|
The steps in the scan as shown in the progress window are:
-
"Reading Record" - the File System is read;
-
"Building Directory Structure" - file system records for deleted files are identified and the folder system is created;
-
"Adding Search Results" - The results are added to the search results screen. Learn more about File Recovery search results here.
Search for Deleted Files, then search for selected Lost File Types
This search first runs the search for Deleted Files, as described above. It then sequentially scans the remaining area of the disk for "Lost Files".
Following a file deletion, subsequent activity on the computer may lead to File System records for these files being destroyed. A "Lost File" is a file that has been deleted which no longer has a File System record (e.g. and entry in the Microsoft FAT or MFT), but the content of the file remains on the disk and can be recovered.
Lost files are located using a technique referred to as "data carving", by searching to find the unique header, structure and footer of the file type. Learn more about searching for Lost Files here.
Searching for Lost Files Recover My Files has the capability to perform a sequential search of the disk to identify "Lost Files" by their internal file structure, (i.e. their header, content and footer). This is often referred to as a "file header search" or "data carving". Shown below is the content of a JPEG picture, the way a computer sees it. A JPEG can be identified by the "y0ya..JFIF" header, and contains further information about the camera used to create the image:
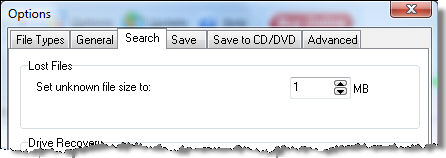
Once the header of a file is identified, Recover My Files will travel a pre-defined distance down the drive to analyze the file structure and locate the end of the file. If the file end is not found, but sufficient information is found within the file to suggest it will at minimum be partially recovered, it is assigned a default file size according to that file type. The global default size of lost files can be set in the OPTIONS > SEARCH window:
Limitations of a Lost File search are:
|
It is suggested that this search be run when:
-
The recommended "Search for deleted files" option did not find your files;
-
When you wish to be certain that all possible data on the drive can be located and recovered.
Important: The more file types that are selected, the more resource intensive is these search and the longer the search will take. It is suggested that you do not perform a Lost File search for more than 10 files at any one time.
This is a sequential search of the drive and is indicated in the progress window by "Scanning block xxxxx of xxxxx for lost files":

A sequential search of a large hard drive, e.g. 1TB or more containing many files may take up to 24 hours.
Before you stop the search, write down the block number that the search is up to, e.g. "3,867,514 of 78,126,048";
Press the stop button;
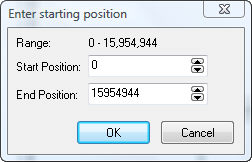
Click the OPTIONS button in the main program screen, go to the ADVANCED tab and place a tick in the box for "prompt for start sector" and "Start with Lost File Scan".
Click OK to save these options, then press "Start Recovery" > "Drive Recovery" and enter the starting location
Recover Files Search Results
Learn about the Recover Files search results screen here.