Oska Keyboard Editor
From Oska
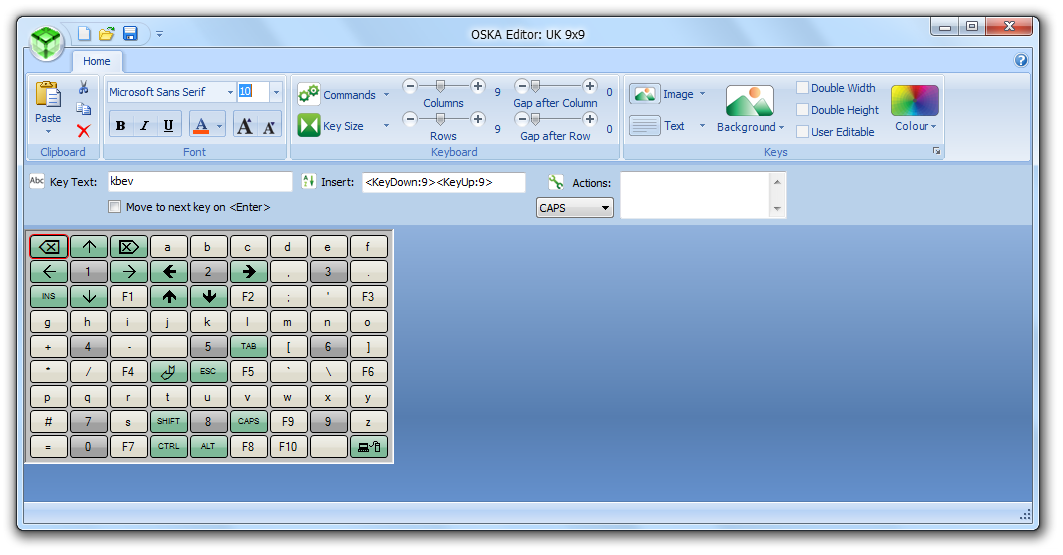
Oska Keyboard Editor
The Oska Keyboard Editor allows you to create your own keyboard.
You work on keyboard files, which are .xml files found in a Keyboards folder. There can be many keyboard files in the folder, and they can link to each other, but each will have the same input settings, as defined in the Settings Editor. So you edit the keyboard content using the Oska Keyboard Editor, but not how it is used.
How to work with Oska Editor
You do not run "Oska Player.exe" to run the Oska keyboard. You must run the launcher, "Start Keyboard.exe" - it has a blue icon. This allows the launcher to configure the machine correctly for the player.
The Oska Editor must be run as administrator for you to be able to edit and save keyboards. If you are creating a new keyboard the first thing you should do is use 'Save As' to create a new file for your keyboard to avoid overwriting the default keyboard.
When you are done you have a keyboard ready for deployment or use. You can use it as it is, or set it up to work with the Vista Ease of Access centre and be deployed to another machine. Contact Claro Software for more information.
Editing a keyboard
The Clipboard group of the ribbon works on the currently-selected button for cut, copy and paste. You can also copy a style (colour, font name, font size, bold) to another button or every button. Use the Font group to change font, colour and other attributes. Copy the button. Clicking on the Paste dropdown will give you two options. Select another button and select "Apply style to key" to apply the style to that new button. Or click "Apply style to keyboard" to apply the copied style to every button.
The Keyboard group of the ribbon lets you configure the whole keyboard.
- Commands lets you change the case of all keys on the keyboard.
- The Columns and Rows sliders determine the dimensions of the keyboard.
- Gap after Column and Gap after Row put in a space between sections of the keyboard, so you can visually indicate different functions - for example, having a "alphabet" section separate from a "shortcut buttons for programs" section.
- Key Size determines the key proportions. Select Narrow or Wide or Tall or select User defined size and choose a specific width/height for all the keys.
The Keys group of the ribbon lets you configure the currently-selected button.
- Image lets you select a picture for the button. You can select an image file to use, remove it, and set where the picture is positioned on the button.
- Select Text/image to choose whether the image should appear above/below/left/right of the text, or if the text should appear on top of the image in the centre of the key.
- By default an image appears at its original size. You can make the image fit the key by selecting Image size and Fit to key or have it slightly smaller than the key by selecting 3/4 size. You have to remove and re-add the image to make it its original size again.
- Text lets you set where the text is positioned on the button. So you use Image and Text in combination to lay out the image (if any) and text (if any) as you like it - text under image, below it, left or right or so on.
- Background lets you select an image to use as the background of a button. It is scaled automatically to fit the button size.
- Double Width and Double Height make a button larger, covering up buttons to the right or below it. This is useful if you want to have a differently-sized button, like the space bar on a conventional button.
- User Editable means that the user can right-click on a button and edit how it operates while the keyboard is being used. They can apply any of the Actions and the button text. See User-definable Keys.
- Colour sets the current button colour. You can make it Silver or Invisible by clicking on the Colour dropdown. You can also click on the dialog box launcher for the Keys group to individually change border, glow and highlight colours for a button.
Each button has a number of properties that control how it works. These are set in the toolbar below the ribbon. Click on a button and edit its properties. Several of the properties have a format like "<Something:xxx>" - replace the "xxx" part with the value you want to use.
- Key Text sets the text actually shown on the button, like "A" or "Open Email" or "Hello". This isn't necessarily the text entered when the button is pressed. It can be blank (for example, you want a button with only a picture)
- Insert sets what text is sent to Windows when the button is pressed.
- For a button on a keyboard that works just like a normal keyboard this will be the same as the Key Text, so for example the button with Key Text "a" will Insert "a" when pressed. But it can be any string or character in any case - just type it into the Insert box.
- You can make a button send many other keys from the normal set of alphabetical characters. Right-click in the Insert box to see the options. Most are exactly what they state.
- To enter a key combination like "Control + P" enter Control/Shift/Alt and then the key you want. Control will give you a "^" character, Shift a "+" and Alt a "%", so "Control + P" will be "^P"
- "+{F10}" gives you the right-click context menu key.
- Low-level keyboard gives you a Windows KeyDown or KeyUp Insert. Replace the "xxx" with the Unicode character code, in decimal, you want to send.
- You can send a Windows Key keypress with "<KeyDown:91><KeyUp:91>".
- You can send a Windows Key combination too, for example, Windows Key + E is "<KeyDown:91><KeyDown:69>".
- Nudge sends a keypress repeatedly, so "<_0>{PGDN}" sends "Page Down" every two seconds. This is useful to let you start a document automatically scrolling through its contents, for example. Press any other button to stop nudging.
- Pause does not do anything.
- Actions sets what the button does, in addition to or instead of sending some characters to Windows. Right-click to see what actions can be performed and add them to the button.
- Sounds lets you play/stop playing audio files in WAV format that are located in the same folder as the keyboard executable, or use the system SAPI5 voice to speak some text.
- Goto Grid lets you link keyboards together, so a button can load a different keyboard .xml file or go back to the previous keyboard file loaded.
- Control lets you control external programs.
- Increase volume and Decrease volume change the system volume.
- Faster and Slower change the speed or responsiveness of the current Oska input method. So if you have set your keyboard to use one-switch scanning then the speed of the change of the selection increases or decreases.
- Run program starts a program or opens a file. The program/file must be in the same folder as the keyboard executable or set up to run in the Windows Run dialog, like notepad.exe, or you must provide the full path to the file (e.g. "C:\Users\Example\Help.doc"). You cannot provide arguments to an executable. You can launch a web page by entering the full URL, starting with "http", and the system web browser will be launched and the page loaded. You can launch another file by entering the path and it will be opened by the normal handler.
- Mouse Control lets you move and click the mouse. It also lets you control whether the mouse is linked to the full computer screen (as standard systems) or to the Oska keyboard (so however you move the mouse you stay on the keyboard). "Toggle keyboard/screen" switches, "Map to screen" frees the mouse to move anywhere, and "Map to keyboard" restricts the mouse pointer to the keyboard.
- Keyboard Position lets you move the keyboard around the screen. This is useful if the keyboard is covering something on the screen that needs to be access.
- The modifier dropdown lets you set a button that sends Control, Shift, Alt to the next button pressed, or does the CAPSLOCK toggle.
- The Move to next key on <Enter> option does not affect your Oska keyboard. It's a shortcut for when you are editing: type the Key Text and press Enter and the next button on the keyboard will be selected.
How to do Shift and capital letters
By default a shift keypress will make the next button pressed be uppercase. So "a" will become "A" without you having to do anything.
However, you may want to add key combinations like "Shift+5" producing "%" (as on a standard UK keyboard, for example). What this means is that "5" maps to "%" - mapping is triggered by the shift keypress.
You have to edit these mappings by hand. Your keyboard .xml file will have a .map file with the same filename (e.g. UK.map for UK.xml) in the Keyboards folder. Open that and you'll see two sections called "Shift" and "ShiftD". Characters in "Shift" are replaced by characters in "ShiftD" - the third character in "Shift" is replaced by the third character in "ShiftD", for example.
<Shift>`1234567890-=[]#;',./\</Shift>
<ShiftD>¬!"£$%^&*()_+{}€:@<>?|</ShiftD>
This is an XML file, so you must replace some characters with special sequences. "&" must be entered as "&", and "<" must be entered as "&<". Although this makes the strings not match up, when the program reads the .map file it will turn the five characters of & into one & character, so it still works. You can also add other characters with &#CODE;, where CODE is the (decimal) Unicode value for the character.
Deploying an Oska Keyboard
For many users, simply starting the keyboard for them by running "Start Keyboard.exe" will work just fine.
For advanced users you may want the keyboard to start up with the machine. For Windows XP you can create a shortcut in the Startup folder to the "Start Keyboard.exe" program (not "Oska Keyboard.exe"). For Windows Vista or 7 you can, assuming you are an administrator, replace the main .kst and .xml files in the Program Files, Claro Software, Oska folder. This will then work with the Ease of Access Center so you can have the keyboard start with the machine and even on the Secure Desktop (User Account Control.)
Key Value
This program can be found in the Oska program folder. It lets you see the numeric value of keys you press. You can use it for the <KeyDown> and <KeyUp> values in the Editor.