Oska Settings Editor
From Oska
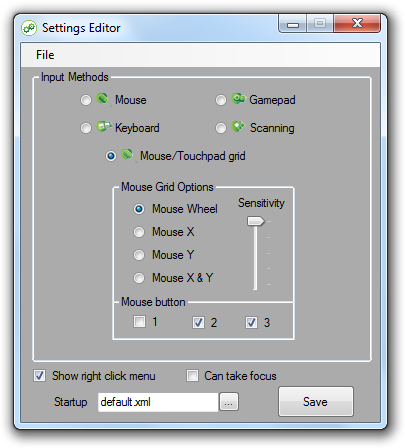
Oska Settings Editor
The Settings Editor determines how a keyboard accepts input - mouse click, scanning, joystick, etc. It also determines which keyboard is shown when Oska starts and how it can be used.
Oska settings are stored in .kst files, which are located in the parent folder containing the Keyboards folder with the keyboard .xml files. Use the File menu to select a .kst file to change. By default the .kst file in the Settings Editor folder is loaded, so usually you can simply start Settings Editor, make your changes, click the Save button, then close Settings Editor. Settings Editor must be run as an administrator if your keyboard is in Program Files or otherwise in a folder that a normal user cannot edit. The settings you choose in Settings Editor apply to every Oska keyboard in the Keyboards folder. You cannot have different settings for different keyboards in the Keyboards folder.
There are three other options apart from the choice of input method:
- Show right click menu
- If this is enabled then you can right-click on a running Oska keyboard to bring up a context menu with an Open option. This lets you manually load another different .xml keyboard file. This is useful if you are developing Oska keyboards or you are using Oska to provide helpful shortcut keyboards, for example.
- Can take focus
- By default Oska does not work like a normal window. Clicking or otherwise interacting with it does not change your current working window. If this is enabled then you will be able to Alt+Tab to the Oska keyboard or click on it or select it in the Windows taskbar. This is useful if you are using Oska as a kiosk application or a program launcher or a helpful toolbar, for example.
- Startup
- This sets the keyboard .xml file that will be loaded from the Keyboards folder when Oska starts. Settings Editor will remember a different keyboard for each input method option, so you only have to change input method to get a new keyboard (or you can set them all to be the same.)
There are five input method options in the Settings Editor, plus the ability to toggle whether input goes to the keyboard or to Windows.
1 Mouse
Point and Click
You move the mouse cursor to a button and click on it to press it. Suitable for use with One Switch Mouse or for a touch screen.
Point and Hover
You move the mouse cursor over a button. After a few seconds the button is pressed for you. You don’t have to keep the mouse cursor completely still, just keep it over the button – this is useful if you have problems stopping movement. To do two letters in sequence, like “tt”, hover over the button, wait for it to be pressed, then move away to another button and back and it will be pressed again.
You can change how long you need to hover over a button with the combo box to the right. This shows the seconds delay until the button is pressed. Increase it if you find buttons are pressed when you don’t want them to be and decrease it if you want the buttons to be pressed faster.
2 Keyboard
Cursor keys + Enter
You move around the keyboard using the cursor keys. When you press the Enter or Return key the selected button is pressed.
While this is operating you cannot use the cursor keys or enter normally in Windows if you choose this option because the Oska keyboard is using them – you will have to use cursor key buttons (up/down/left/right) and the enter key on the Oska keyboard.
Numeric Keypad
You must use a keyboard that is nine buttons wide and nine buttons tall or a keyboard that is three buttons wide and three buttons tall.
- For a three-by-three keyboard (9 keys), the nine keys on the numeric keypad press the corresponding button on the Oska keyboard. So “7” on the keypad presses the top-left button and “3” on the keyboard presses the bottom-right button. One press on the keypad means one button press on the keyboard.
- For a nine-by-nine keyboard (81 keys), a key on the numeric keypad first selects the 9 key subsection (top-left, bottom-right) and then a second key presses the button in that subsection just like for a three-by-three keyboard. So you need to press the keypad twice to press a button on the keyboard, but you can have nine times as many keys.
3 Gamepad
Map to keyboard
You move the joystick around and it maps directly to the keyboard: the top-right-most position of the keyboard will select the top-right-most button on the keyboard. Press the gamepad “fire” button to press the button.
This will require fine control for a keyboard with many keys, so may be more useful for a keyboard with fewer keys.
Map to grid
- Choosing “5” means you move around the keyboard using the joystick just like using the cursor keys, and press the gamepad “fire” button to press the currently-selected button. You can use this with any keyboard.
- Choosing “9” or “8” means you select the section of the keyboard and the button to press with one or more moves of the joystick and/or the gamepad “fire” button. You must use a nine-by-nine keyboard, not a standard QWERTY layout.
- “9” means you use the joystick and the fire button to press one of 81 keys on the keyboard. You start in the centre three-by-three block. Move the joystick to select a different block or leave it centred and press the fire button to select the centre block. You are now in the three-by-three block and you again move the joystick to select one of the eight non-central buttons or press fire to press the centre button.
- “8” means you use only the joystick to press one of 64 buttons on the keyboard. First, you move the joystick from the centre to select which of the eight blocks of eight buttons to use. Second, you move the joystick to press one of the eight keys in that block. So you move the joystick twice to select any key, but you need only to move the joystick – not click the gamepad “fire” button as well.
4 Scanning
You press a key by using one or two switch input devices to select a number of keys or one key. Select “1” or “2” from the right to identify how many switches you are using.
- If you choose two switches then you use one switch to move your selection and another to make it. So you press one “movement” switch to move along each column until you get to the column with the button you want to press. Then you press the “select” switch to select the column. Now you press the “movement” switch again to move down the column until you get to the button you want to press, and you press the “select” switch to press it. Now you start again with the columns.
- If you choose one switch then you don’t have separate “movement” and “select” switches. You only have a “select” switch. The Oska keyboard does the “movement” for you every few seconds, so you wait until it gets to the column you want, then you press your “select” switch, then wait until it goes down to the button you want, then you press your “select” switch again to press it. The slider determines how fast the movement happens.
You can make the keyboard do rows, then columns (instead of columns then rows) by unchecking “Columns then rows”.
Oska accepts three switch inputs.
- “Mouse buttons” makes the left mouse button the “movement” switch and the right mouse button the “select” switch.
- “Joystick buttons” makes Button A, the first “fire” button, the “movement” switch and Button B, the second “fire” button, the “select” switch.
- “Key switches” makes “1” the “movement” switch and “2” the “select” switch.
If you select only one switch then the “movement” and “select” switch still work the same but the selection is also changed every few seconds so you only need to use the “select” switch. The “Speed” slider lets you control how fast the selection changes.
While you have keys or buttons operating the keyboard you cannot use them normally in Windows.
5 Mouse/Touchpad grid
You control the keyboard using the mouse or touchpad, but the mouse is locked to the keyboard so you can’t use it on the normal Windows desktop. You have a button on the Oska keyboard that lets you lock and unlock the mouse, see “Toggling keyboard and screen”. Locking the mouse to the keyboard makes it easier to use the keyboard with the mouse – for example, you can’t “slip off” the keyboard or lose the mouse pointer.
- With “Mouse X & Y” you simply select a key with the mouse and click to press it.
- “Mouse Wheel” and “Mouse X” and “Mouse Y” all work like switches – see the Scanning section for more explanation. The movement type is your “movement” switch and you click for your “select” switch.
The “Sensitivity” slider lets you adjust how much mouse movement is required to move the selection on the keyboard. So if you can’t move very much, increase the sensitivity so you can move easily all over the keyboard with tiny movements.
The “Mouse button” checkboxes let you select which mouse buttons operate the keyboard. Mouse buttons that are not checked won’t operate the keyboard, but can then be used on the Windows desktop if you unlock the mouse from the keyboard. See “Toggling keyboard and screen”.
Toggling keyboard and screen
Certain input options “seize” the normal operation of the mouse – Mouse/Touchpad grid and Scanning both stop the mouse working normally in Windows because it is being used by the Oska keyboard.
You can add a button to the Oska keyboard that changes this. In the Oska Editor, select a key and right-click on “Actions”, then select “Mouse control” and “Toggle keyboard/screen”.
When this button is pressed then the mouse stops being used by the Oska keyboard and can be used normally on the Windows system. To get the mouse back to the keyboard then press the button again. This might be useful if you can use the mouse but with difficulty, so you want to switch to Windows use to operate a program then back to the keyboard to do some text input.