12. Validating the New Model
From NI MAX System Identification Assistant
12. Validating the New Model
Now that you have the parameters for an ARMAX model, you can validate the model to determine if the model type provides an accurate estimation of the system.
Complete the following steps to validate the ARMAX model.
- Click the Add Step button to open the Add Step menu.
- Select System Identification»Model Analysis»Model Validation to add a Model Validation step to the Project View.
- On the Input Signals tab in the Configuration View, verify that ARMAX Model is selected in the Model pull-down menu.
- Select Test Stimulus from the Stimulus Signal pull-down menu to specify Test Stimulus as the stimulus signal to use to perform the k-step-ahead prediction.
- Select Test Response from the Response Signal pull-down menu to specify Test Response as the response signal to use to perform the k-step-ahead prediction.
- Notice that the mean square error (MSE) is 0.00084. On the Settings tab, notice that Prediction Step is set to 1. When the prediction step is small, so is the error.
Recall that the MSE of the ARX model with one prediction step was 0.00075. Because the MSE of the ARX model is smaller than the MSE of the ARMAX model, the ARX model is a slightly more accurate estimation of the system. Nevertheless, both models have very small mean square errors, and therefore they are both accurate models. - Set Prediction Step to 10. Notice that MSE is now 0.00644. When the prediction step is large, so is the MSE. However, as with the ARX model, the error is less than 1%. You can conclude that the model estimation with a Prediction Step value of 10 is accurate but not as accurate as the model estimation with a Prediction Step value of 1.
- In the Project View, rename the SysID Model Prediction output to ARMAX Model Prediction. This output signal is the predicted response from the ARMAX model to the Test Stimulus signal.
- You visually can compare ARX Model Prediction and ARMAX Model Prediction by displaying the two signals in the Data View. Click the Data View tab to display the Data View.
- In the Project View, click the ARMAX Model Prediction output of this Model Validation step and drag it to the Data View.
- In the Project View, click the ARX Model Prediction output of the first Model Validation step and drag it to the same graph on the Data View.
- In the Project View, click the Test Response input of this Model Validation step and drag it to the same graph on the Data View.
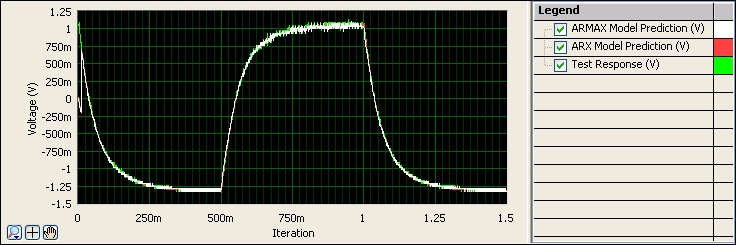
- In the Data View, right-click the graph and select Visible Items»Legend to display the graph legend. The graph legend lists every signal displayed in the graph and the corresponding plot color.
Notice that all three signals overlap very closely, as shown below, illustrating the accuracy of both the ARX and ARMAX models.
| Previous: 11. Estimating a Model for Comparison | Next: 13. Saving the ARMAX Model |