The global user interface
When you start Game Maker the following form is shown. Note that the form might in reality also show some Game Maker news and the tutorial might be visible at the right side.
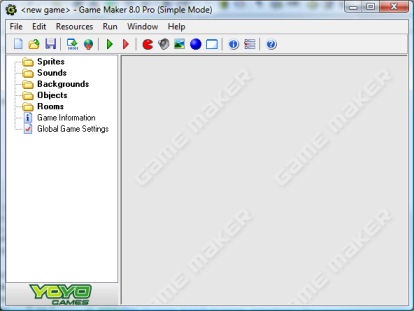
(Actually, this is what you see when you run Game Maker in simple mode. In advanced mode a number of additional items are shown.) At the left, you see the different resources mentioned above: Sprites, Sounds, Backgrounds, Objects, Rooms and two more: Game Information and Global Game Settings. At the top there is the familiar menu and toolbar. In this chapter we will describe briefly the various menu items, buttons, etc. In the later chapters we discuss a number of them in detail. Note that many things can be achieved in different ways: by choosing a command from the menu, by clicking a button, or by right clicking on a resource.
File menu
In the file menu you can find some of the usual commands to load and save files, plus a few special ones:- New. Choose this command to start creating a new game. If the current game was changed you are asked whether you want to save it. There is also a toolbar button for this.
- Open. Opens a game file. Game Maker files have the extension .gmk. You can also open old .gm6 files. (If you want to open .gmd files created with version 5 of Game Maker you must select the appropriate file type at the bottom of the dialog. These might though not work correctly in the new version.) There is a toolbar button for this command. You can also open a game by dragging the file into the Game Maker window.
- Recent Files. Use this submenu to reopen game files you recently opened.
- Save. Saves the game design file under its current name. If no name was specified before, you are asked for a new name. You can only use this command when the file was changed. Again, there is a toolbar button for this.
- Save As. Saves the game design file under a different name. You are asked for a new name.
- Create Executable. Once your game is ready you will probably want to give it to others to play. Using this command you can create a stand- alone version of your game. This is simply an executable that you can give to other people to run.
- Advanced Mode. When clicking on this command Game Maker will switch between simple and advanced mode. In advanced mode additional commands and resources are available.
- Exit. Probably obvious. Press this to exit Game Maker . If you changed the current game you will be asked whether you want to save it.
Edit menu
The edit menu contains a number of commands that relate to the currently selected resource (object, sprite, sound, etc.). Depending on the type of resource some of the commands may not be visible.- Insert resource. Inserts a new instance of the currently selected type of resource before the current one. A form will open in which you can change the properties of the resource. This will be treated in detail in the following chapters.
- Duplicate. Makes a copy of the current resource and adds it. A form is opened in which you can change the resource.
- Delete. Deletes the currently selected resource (or group of resources). Be careful. This cannot be undone. You will, though, be warned.
- Rename. Gives the resource a new name. This can also be done in the property form for the resource. Also, you can select the resource and then click on the name.
- Properties. Use this command to bring up the form to edit the properties. Note that all the property forms appear within the main form. You can edit many of them at the same time. You can also edit the properties by double clicking on the resource.
Resources menu
In this menu, you can create new resources of each of the different types. Note that for each of them there is also a button on the toolbar and a keyboard shortcut. Also you can change the game information and the global game settings.Run menu
This menu is used to run the game. There are two ways to run a game.- Run normally. Runs the game as it would normally run. The game is run in the most efficient way and will look and act as in an executable game.
- Run in Debug mode. Runs the game in debug mode. In this mode you can check certain aspects of the game and you can pause and step through it. This is useful when something goes wrong but is a bit advanced.
Window menu
In this menu you find some of the usual commands to manage the different property windows in the main form:- Cascade. Cascade all the windows such that each of them is partially visible.
- Arrange Icons. Arrange all the iconified property windows. (Useful in particular when resizing the main form.)
- Close All. Close all the property windows, asking the user whether or not to save the changes made.
Help menu
Here you find some commands to help you:- Contents. Use this command to show this help file.
- Tutorials. Use this submenu to show the different tutorials that are provided with Game Maker to teach you how to make your first games.
- Upgrade to Pro Edition. You can use this command to upgrade the Lite Edition of Game Maker to the Pro Edition Online. The Pro Edition has many aditional features.
- Enter Activation Code. If you purchased Game Maker before (and hence, have an activation code or a previous purchase reference) you can use this command to enter your code. You will be brought to a webpage where you can either enter your activation code or your purchase reference from your previous payment.
- News. Here you can see the most recent news about Game Maker.
- Book. This command will bring you to a location on the website where you can find information about the Game Maker book.
- More Tutorials. This command will bring you to a location on the website where you can download some more tutorials.
- Website. Connects you to the Game Maker website where you can find information about the most recent version of Game Maker and collections of games and resources for Game Maker.
- Forum. This command will bring you to the forum where users help each other with many aspects of Game Maker.
- Wiki. This command will bring you to the Game Maker wiki where you can find plenty of information about the use of Game Maker.
- About Game Maker. Gives some short information about this version of Game Maker.
The resource explorer
At the left of the main form you find the resource explorer. Here you will see a tree-like view of all resources in your game. It works in the same way as the Windows Explorer, and you are most likely familiar with it. If an item has a + sign in front of it you can click on the sign to see the resources inside it. By clicking on the - sign these disappear again. You can change the name of a resource (except the top level ones) by selecting it (with a single click) and then clicking on the name. Double click on a resource to edit its properties. Use the right mouse button to access the same commands as in the Edit menu.You can change the order of the resources by clicking on them with the mouse and holding the mouse button pressed. Now you can drag the resource to the appropriate place. (Of course the place must be correct. You cannot drag a sound into the list of sprites.)