LabVIEW FPGA Code (Digital Filter Design Toolkit)
In the Designing a Fixed-Point Filter tutorial, you learned the basics of designing a fixed-point filter using the LabVIEW Digital Filter Design Toolkit. After you design a fixed-point filter, you can generate LabVIEW field-programmable gate array (FPGA) code and implement the fixed-point filter on any NI Reconfigurable I/O (RIO) device.
 |
Note To generate LabVIEW FPGA code, you must install the LabVIEW FPGA Module and NI-RIO driver software with R Series support. To execute the FPGA code, you also need an FPGA target on which to run the code. |
|
Note If you did not complete the Designing a Fixed-Point Filter tutorial, refer to labview\examples\Digital Filter Design\Getting Started\Tutorials\Designing a Fixed-Point Filter\Designing a Fixed-Point Filter Part 6.vi for a completed version of the digital filter from that tutorial. |
Generating LabVIEW FPGA Code
Complete the following steps to generate FPGA code from a fixed-point filter by using the DFD FXP Code Generator VI.
- Place the DFD FXP Code Generator VI on the block diagram.
 Place
Find
Place
Find
- Wire the filter out and error out outputs of the DFD FXP Modeling VI to the filter in and error in inputs of the DFD FXP Code Generator VI.
- Click the polymorphic VI selector of the DFD FXP Code Generator VI and select LabVIEW FPGA Code from the pull-down menu.
- Right-click the destination folder input of this VI and select Create»Control from the shortcut menu.
A front panel control appears to the left of this VI. This control represents the destination folder in which this VI generates the code. - Right-click the filter name input of this VI and select Create»Control from the shortcut menu.
A front panel control appears to the left of this VI. This control represents the filter name this VI uses for the code generation. - Right-click the lvproj path output of this VI and select Create»Indicator from the shortcut menu.
A front panel indicator appears to the right of this VI. This indicator represents the path to the generated project file.
The block diagram now resembles the following figure.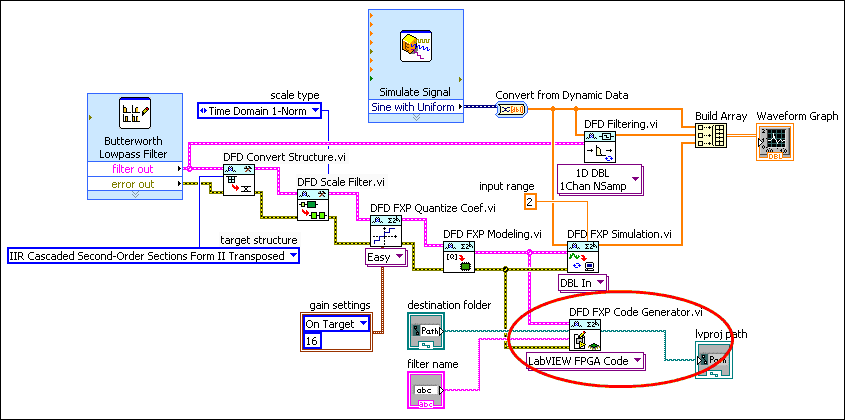
- Display the front panel window and click the Browse button on the destination folder control to select the folder in which you this VI generates the code.
- Click the filter name control and enter the name for the generated code.
- Click the Run button to run the VI.
- Select File»Save As and save this VI as Generating FPGA LabVIEW Code.vi in an easily accessible location
|
Note Refer to labview\examples\Digital Filter Design\Getting Started\Tutorials\Generating Code\Generating FPGA Code.vi for a completed version of the digital filter from this part of the tutorial. |
Implementing LabVIEW FPGA Code
After you generate LabVIEW FPGA code, you can implement the code on any National Instruments FPGA target, such as an NI-RIO device.
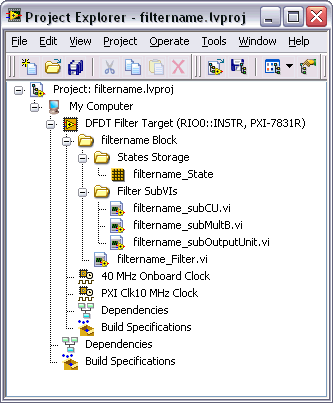
The Digital Filter Design Toolkit uses LabVIEW projects to manage the resulting LabVIEW FPGA code. The following figure displays an example project file that contains LabVIEW FPGA code.