Designing a Fixed-Point Filter Part 5: Creating a Fixed-Point Filter Model (Digital Filter Design Toolkit)
In Part 3 of this tutorial, you quantized the coefficients of the reference floating-point filter. In Part 4 of this tutorial, you analyzed the fixed-point filter to determine if the filter design meets the filtering requirements. In Part 5 of this tutorial, you create a fixed-point filter model by configuring all other quantizers, such as the input, output, and multiplicand quantizers.
You must create a fixed-point filter model before you simulate the filtering process or generate code from the filter. To use the DFD FXP Modeling VI to create a fixed-point filter model, you must specify the word lengths for the input and output signals and set the rounding mode for the output signal.
 |
Note If you did not complete Part 4 of this tutorial, refer to labview\examples\Digital Filter Design\Getting Started\Tutorials\Designing a Fixed-Point Filter\Designing a Fixed-Point Filter Part 4.vi for a completed version of the digital filter from that part. |
Complete the following steps to create a fixed-point filter model by using the DFD FXP Modeling VI.
- Remove the Filter Analysis Express VI and the magnitude indicator from the block diagram by selecting the icons and pressing the <Delete> key.
- Remove all broken wires by selecting Edit»Remove Broken Wires or by pressing the <Ctrl-B> keys.
- Place the DFD FXP Modeling VI on the block diagram.
 Place
Place
 Find
Find
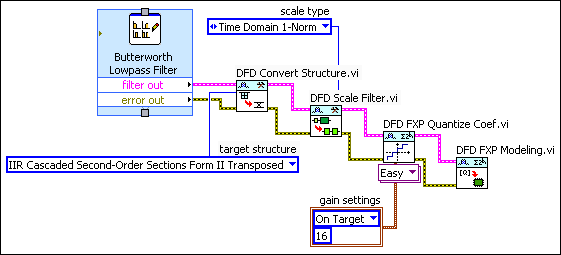
- Wire the filter out and error out outputs of the DFD FXP Quantize Coef VI to the filter in and error in inputs of the DFD FXP Modeling VI.
The block diagram now resembles the following figure.
- (Optional) The default word lengths for the input and output signals are 16. To specify different word lengths, right-click the input word length and the output word length inputs of the DFD FXP Modeling VI and select Create»Constant or Create»Control from the shortcut menu. Then, use the constants or controls to specify the value(s) to use for the word lengths.
- (Optional) The default rounding mode for the output signal is Truncation. To specify a different output rounding mode option, right-click the output rounding mode input of the DFD FXP Modeling VI and select Create»Constant or Create»Control from the shortcut menu. Then, use the constant or control to specify the rounding option to use.
- Select File»Save to save the VI.
After you create the fixed-point filter model, you can simulate the fixed-point filter model in Part 6 of this tutorial. Later in the design process, you can change the value for the word lengths and rounding mode if the filter design does not meet the filtering requirements.
 |
Note Refer to labview\examples\Digital Filter Design\Getting Started\Tutorials\Designing a Fixed-Point Filter\Designing a Fixed-Point Filter Part 5.vi for a completed version of the digital filter from this part of the tutorial. |
| Previous: Analyzing a Fixed-Point Filter | Next: Simulating a Fixed-Point Filter Model |