Designing a Fixed-Point Filter Part 6: Simulating a Fixed-Point Filter Model (Digital Filter Design Toolkit)
From Digital Filter Design Toolkit
Designing a Fixed-Point Filter Part 6: Simulating a Fixed-Point Filter Model (Digital Filter Design Toolkit)
In Part 5 of this tutorial, you created a fixed-point filter model. In Part 6 of this tutorial, you simulate the fixed-point filter model to verify that this model works as you expect.
| Note If you did not complete Part 5 of this tutorial, refer to labview\examples\Digital Filter Design\Getting Started\Tutorials\Designing a Fixed-Point Filter\Designing a Fixed-Point Filter Part 5.vi for a completed version of the digital filter from that part. |
Adding and Configuring an Input Signal
Complete the following steps to add and configure an input signal.
- If you do not see the Functions palette, select View»Functions Palette to display this palette.
- On this palette, select Express»Input to display the Input Express VIs.
- Click the Simulate Signal Express VI and place it on the block diagram.
The Configure Simulate Signal dialog box appears. Make sure Sine is selected from the Signal type pull-down menu. - Enter 100 in the Frequency (Hz) text box.
- Place a checkmark in the Add noise checkbox. Make sure Uniform White Noise is selected from the Noise type pull-down menu.
- Click the OK button to close the dialog box and return to the block diagram.
- On the Functions palette, select Express»Signal Manipulation to display the Signal Manipulation Express VIs.
- Click the Convert from Dynamic Data Express VI and place it on the block diagram. You use this Express VI to convert the input signal into the 1D array data type.
The Configure Convert from Dynamic Data dialog box appears. Make sure 1D array of scalars - automatic is selected from the Resulting data type list. - Click the OK button to close the dialog box and return to the block diagram.
- Wire the Sine with Uniform Noise output of the Simulate Signal Express VI to the Dynamic Data Type input of the Convert from Dynamic Data Express VI.
Simulating a Fixed-Point Filter
Complete the following steps to simulate a fixed-point filter model by using the DFD FXP Simulation VI.
- Place the DFD FXP Simulation VI on the block diagram.
 Place
Find
Place
Find
- Wire the filter out and error out outputs of the DFD FXP Modeling VI to the filter in and error in inputs of the DFD FXP Simulation VI.
- Place the DFD Filtering VI on the block diagram. You use this VI to process the input signal with the reference floating-point filter.
Place
Find
- Wire the Array output of the Convert from Dynamic Data Express VI to the signal in input of the DFD Filtering VI.
- Wire the filter out output of the Classical Filter Design Express VI to the filter in input of the DFD Filtering VI.
- Wire the Array output of the Convert from Dynamic Data Express VI to the signal in input of the DFD FXP Simulation VI.
The block diagram now resembles the following figure.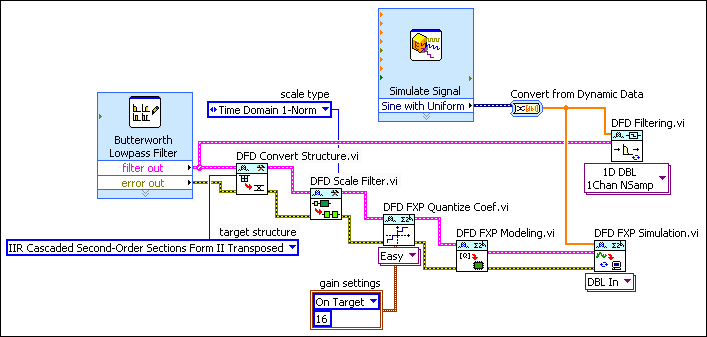
- On the Functions palette, select Programming»Array to display the Array functions.
- Click the Build Array function and place it on the block diagram. The Build Array function concatenates the original input signal, the reference floating-point filtered signal, and the fixed-point filtered signal so that you can compare the characteristics of the floating-point and the fixed-point filters.
- Move the cursor over the Build Array function. When a double-headed arrow appears, click and drag the border of the Build Array function to add two more element terminals.
- Wire the Array output of the Convert from Dynamic Data Express VI to the first element input of the Build Array function. This input is the Sine with Uniform Noise input signal.
- Wire the signal out output of the DFD Filtering VI to the second element input of the Build Array function. This input is the reference floating-point filtered signal.
- Wire the DBL signal out output of the DFD Simulation VI to the third element input of the Build Array function. This input is the fixed-point filtered signal.
- Display the front panel window. If you do not see the Controls palette, select View»Controls Palette to display this palette.
- On this palette, select Modern»Graph to display the Graph indicators.
- Click the Waveform Graph indicator and add it to the front panel. A Waveform Graph indicator also appears on the block diagram.
- Display the block diagram and move the Waveform Graph indicator to the right of the Build Array function.
- Wire the appended array output of the Build Array function to the input of the waveform graph.
The block diagram now resembles the following figure.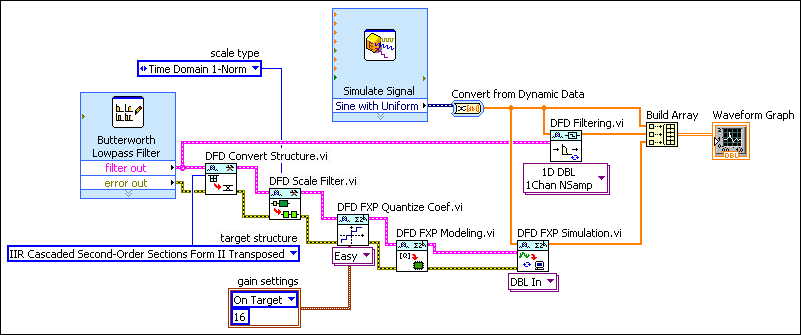
- Display the front panel window and move the cursor over the top of the plot legend on the waveform graph. When a double-headed arrow appears, click and drag the border of the plot legend to add two items to the legend. When you release the mouse button, three plot names appear.
- Click the Run button to run the VI. The following figure displays the waveform graph of the original input signal, the reference floating-point filtered signal, and the fixed-point filtered signal.
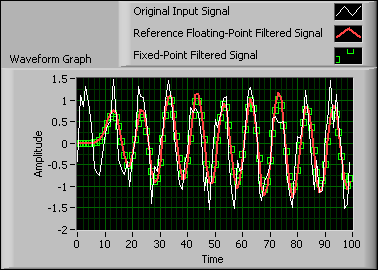
In this graph, the white line represents the original input signal, which is the Sine with Uniform Noise input signal. The red line represents the reference floating-point filtered signal. The green dots represent the fixed-point filtered signal. Notice the characteristics of the fixed-point filtered signal match the characteristics of the reference floating-point filtered signal. The fixed-point filter works well and is ready to be deployed to a fixed-point hardware target, such as a National Instruments field-programmable gate array (FPGA) target.
Note You can customize the graph by clicking the plot legend and configuring the plot labels, display, and colors. - Select File»Save to save the VI.
Simulation is a trial-and-error process. If the fixed-point filtered signal does not match the reference floating-point filtered signal, try one of more of the following steps:
- Redefine the filter specifications of the reference floating-point filter.
- Change the implementation structure of the reference floating-point filter.
- Modify the quantization settings of the filter coefficients.
- Modify the fixed-point filter model.
After you verify that the characteristics of the fixed-point filter model match the characteristics of the reference floating-point filter, you can implement the fixed-point filter on a supported execution target.
| Note Refer to labview\examples\Digital Filter Design\Getting Started\Tutorials\Designing a Fixed-Point Filter\Designing a Fixed-Point Filter Part 6.vi for a completed version of the digital filter from this part of the tutorial. |