Pixmap
From PyMuPDF
Pixmap
Pixmaps (“pixel maps”) are objects at the heart of MuPDF’s rendering capabilities. They represent plane rectangular sets of pixels. Each pixel is described by a number of bytes (“components”) plus an (optional since v1.10.0) alpha byte.
In PyMuPDF, there exist several ways to create a pixmap. Except one, all of them are available as overloaded constructors. A pixmap can be created …
- from a document page (via methods
Page.getPixmap()orDocument.getPagePixmap()) - empty based on Colorspace and IRect information
- from an image file
- from an in-memory image (bytearray)
- from a memory area of plain pixels
- from an image inside a PDF document
- as a copy of another pixmap
Note
A number of image formats is supported as input for points 3. and 4. above. See section Supported Input Image Types.
Have a look at the example section to see some pixmap usage “at work”.
| Method / Attribute | Short Description |
|---|---|
Pixmap.clearWith() |
clear parts of a pixmap |
Pixmap.copyPixmap() |
copy parts of another pixmap |
Pixmap.gammaWith() |
applie a gamma factor to the pixmap |
Pixmap.getPNGData() |
return a PNG as a memory area |
Pixmap.invertIRect() |
invert the pixels of a given area |
Pixmap.setAlpha() |
sets alpha values |
Pixmap.shrink() |
reduce size keeping proportions |
Pixmap.tintWith() |
tint a pixmap with a color |
Pixmap.writeImage() |
save a pixmap in various formats |
Pixmap.writePNG() |
save a pixmap as a PNG file |
Pixmap.alpha |
transparency indicator |
Pixmap.colorspace |
pixmap’s Colorspace |
Pixmap.height |
pixmap height |
Pixmap.interpolate |
interpolation method indicator |
Pixmap.irect |
IRect of the pixmap |
Pixmap.n |
bytes per pixel |
Pixmap.samples |
pixel area |
Pixmap.size |
pixmap’s total length |
Pixmap.stride |
size of one image row |
Pixmap.width |
pixmap width |
Pixmap.x |
X-coordinate of top-left corner |
Pixmap.xres |
resolution in X-direction |
Pixmap.y |
Y-coordinate of top-left corner |
Pixmap.yres |
resolution in Y-direction |
Class API
-
class
Pixmap -
__init__(self, colorspace, irect, alpha) Empty pixmap: Create an empty pixmap of size and origin given by a rectangle. So, for a
fitz.IRect(x0, y0, x1, y1),fitz.Point(x0, y0)designates the top left corner of the pixmap. Note that the image area is not initialized and will contain crap data.Parameters: - colorspace (Colorspace) – colorspace of the pixmap.
- irect (IRect) – Tte pixmap’s area and location.
- alpha (bool) – Specifies whether transparency bytes should be included. Default is
False.
-
__init__(self, colorspace, source[, alpha]) Copy and set colorspace: Copy
sourcepixmap choosing the colorspace. Any colorspace combination is possible.Parameters: - colorspace (Colorspace) – desired target colorspace. This may also be
None. In this case, a “masking” pixmap is created: itsPixmap.sampleswill consist of the source’s alpha bytes only. - source (
Pixmap) – the source pixmap. - alpha (bool) – whether to also copy the source’s alpha channel. If the source has no alpha, this parameter has no effect. If
Falsethe result will have no alpha.
- colorspace (Colorspace) – desired target colorspace. This may also be
-
__init__(self, source, width, height[, clip]) Copy and scale: Copy
sourcepixmap choosing new width and height values. Supports partial copying.Parameters: - source (
Pixmap) – the source pixmap. - width (float) – desired target width.
- height (float) – desired target height.
- clip (IRect) – a region of the source pixmap to take the copy from.
- source (
-
__init__(self, source) Copy and add alpha: Identical copy from
sourcewith an added alpha channel. The alpha values are set to 255.Parameters: source ( Pixmap) – the source pixmap, must not have alpha.
-
__init__(self, filename) From a file: Create a pixmap from
filename. Image type and all properties are determined automatically.Parameters: filename (str) – Path / name of the file. The origin of the resulting pixmap is (0, 0).
-
__init__(self, img) From memory: Create a pixmap from bytearray
img. Image type and all properties are determined automatically.Parameters: img (bytearray) – Data containing a complete, valid image in one of the supported formats. Could have been created by something like img = bytearray(open('somepic.png', 'rb').read()). The origin of the resulting pixmap is (0,0). Typebytesis not supported here, because that cannot be distinguished fromstringin Python 2.
-
__init__(self, colorspace, width, height, samples, alpha) From plain pixels: Create a pixmap from
samples. Each pixel must be represented by a number of bytes as controlled by thecolorspaceandalphaparameters. The origin of the resulting pixmap is (0,0). This method is useful when raw image data are provided by some other program - see examples below.Parameters: - colorspace (Colorspace) – Colorspace of the image. Together with
alphathis parameter controls the interpretation of thesamplesarea. The following must be true:(colorspace.n + alpha) * width * height == len(samples). - width (int) – image width
- height (int) – image height
- samples (bytes) – an area containing all pixels of the image. Must include alpha values if specified. Type
bytearrayis also supported. - alpha (bool) – whether a transparency channel is included.
Caution
The method will not make a copy of
samples, but rather record a pointer. Therefore make sure that it remains available throughout the lifetime of the pixmap. Otherwise the pixmap’s image will likely be destroyed or even worse things will happen.- colorspace (Colorspace) – Colorspace of the image. Together with
-
__init__(self, doc, xref) From a PDF image: Create a pixmap from an image contained in PDF
docidentified by its XREF number. All pimap properties are set by the image.Parameters: - doc (Document) – an opened PDF document.
- xref (int) – the XREF number of the image.
-
clearWith([value[, irect]]) Initialize the samples area.
Parameters: - value (int) – if specified, values from 0 to 255 are valid. Each color byte of each pixel will be set to this value, while alpha will always be set to 255 (non-transparent). If omitted, then all bytes including alpha are cleared to 0x00.
- irect (IRect) – the area to be cleared. Omit to clear the whole pixmap. Can only be specified, if
valueis also specified.
-
tintWith(red, green, blue) Colorize (tint) a pixmap with a color provided as a value triple (red, green, blue). Only colorspaces
CS_GRAYandCS_RGBare supported.If the colorspace is
CS_GRAY,(red + green + blue)/3will be taken as the tinting value.Parameters: - red (int) –
redcomponent. - green (int) –
greencomponent. - blue (int) –
bluecomponent.
- red (int) –
-
gammaWith(gamma) Apply a gamma factor to a pixmap, i.e. lighten or darken it.
Parameters: gamma (float) – gamma = 1.0does nothing,gamma < 1.0lightens,gamma > 1.0darkens the image.
-
shrink(n) Shrink the pixmap by dividing both, its width and height by 2n.
Parameters: n (int) – determines the new pixmap (samples) size. For example, a value of 2 divides width and height by 4 and thus results in a size of one 16th of the original. Values less than 1 are ignored. Note
Use this methods to reduce a pixmap’s size retaining its proportion. The pixmap is changed “in place”. If you want to keep original and also have more granular choices, use the resp. copy constructor above.
-
setAlpha([alphavalues]) Change the alpha values. The pixmap must have an alpha channel.
Parameters: alphavalues (bytes) – the new alpha values. Type bytearrayis also permitted. If provided, its length must be at leastwidth * height. If omitted, alpha values are all set to 255 (no transparency).
-
invertIRect(irect) Invert the color of all pixels in IRect
irect.Parameters: irect (IRect) – The area to be inverted. Omit to invert everything.
-
copyPixmap(source, irect) Copy the IRect part of
sourceinto the corresponding area of this one. The two pixmaps may have different dimensions and different colorspaces (provided each is eitherCS_GRAYorCS_RGB), but currently must have the same alpha property. The copy mechanism automatically adjusts discrepancies between source and target like so:If copying from
CS_GRAYtoCS_RGB, the source gray-shade value will be put into each of the three rgb component bytes. If the other way round,(r + g + b) / 3will be taken as the gray-shade value of the target.Between
irectand the target pixmap’s rectangle, an “intersection” is calculated at first. Then the corresponding data of this intersection are being copied. If the intersection is empty, nothing will happen.If you want your
sourcepixmap image to land at a specific target position, set itsxandyattributes to the top left point of the desired rectangle before copying. See the example below for how this works.Parameters:
-
writeImage(filename, output="png") Save pixmap as an image file. Depending on the output chosen, only some or all colorspaces are supported and different file extensions can be chosen. Please see the table below. Since MuPDF v1.10a the
savealphaoption is no longer supported and will be ignored with a warning.Parameters: - filename (str) – The filename to save to. Depending on the chosen output format, possible file extensions are
.pam,.pbm,.pgm,ppm,.pnm,.pngand.tga. - output (str) – The requested image format. The default is
pngfor which this function is equal towritePNG(), see below. Other possible values arepam,pnmandtga.
- filename (str) – The filename to save to. Depending on the chosen output format, possible file extensions are
-
writePNG(filename) Save the pixmap as a PNG file. Please note that only grayscale and RGB colorspaces are supported (this is not a MuPDF restriction). CMYK colorspaces must either be saved as
*.pamfiles or be converted first.Parameters: filename (str) – The filename to save to (the extension pngmust be specified). Existing files will be overwritten without warning.
-
getPNGData() Like
writePNGbut returnes a bytearray instead.Return type: bytearray
-
alpha Indicates whether the pixmap contains transparency information.
Type: bool
-
colorspace The colorspace of the pixmap. This value may be
Noneif the image is to be treated as a so-called image mask or stencil mask (currently happens for extracted PDF document images only).Type: Colorspace
-
stride Contains the length of one row of image data in
samples. This is primarily used for calculation purposes. The following expressions are true:len(samples) == height * stride,width * n == stride.Type: int
-
samples The color and (if
alpha == 1) transparency values for all pixels.samplesis a memory area of sizewidth * height * nbytes. Each n bytes define one pixel. Each successive n bytes yield another pixel in scanline order. Subsequent scanlines follow each other with no padding. E.g. for an RGBA colorspace this means,samplesis a sequence of bytes like..., R, G, B, A, ..., and the four byte values R, G, B, A define one pixel.This area can be passed to other graphics libraries like PIL (Python Imaging Library) to do additional processing like saving the pixmap in other image formats. See example 3.
Type: bytes
-
size Contains
len(pixmap). This will generally equallen(pix.samples) + 60(32bit systems, the delta is 88 on 64bit machines).Type: int
-
width
-
w Width of the region in pixels.
Type: int
-
height
-
h Height of the region in pixels.
Type: int
-
x X-coordinate of top-left corner
Type: int
-
y Y-coordinate of top-left corner
Type: int
-
n Number of components per pixel. This number depends on colorspace and alpha. If colorspace is not
None(stencil masks), thenPixmap.n - Pixmap.aslpha == pixmap.colorspace.nis true.Type: int
-
xres Horizontal resolution in dpi (dots per inch).
Type: int
-
yres Vertical resolution in dpi.
Type: int
-
interpolate An information-only boolean flag set to
Trueif the image will be drawn using “linear interpolation”. IfFalse“nearest neighbour sampling” will be used.Type: bool
-
Supported Input Image Types
The following file types are supported as input to construct pixmaps: BMP, JPEG, GIF, TIFF, JXR, and PNG. This support is two-fold:
- Directly create a pixmap with
Pixmap(filename)orPixmap(byterray). The pixmap will then have properties as determined by the image. - Open such files with
fitz.open(...). The result will then appear as a document containing one single page. Creating a pixmap of this page offers all options available in this context: apply a matrix, choose colorspace and alpha, confine the pixmap to a clip area, etc.
SVG images are only supported via method 2 above, not directly as pixmaps. In any case, this will turn the SVG into a raster image. If you need a vector image you must first convert it to a PDF and then display it e.g. via Page.showPDFpage(). There exist many tools for SVG-to-PDF conversion, among them the Python package svglib or Java solutions like Apache Batik. Have a look at our Wiki for example solutions.
Details on Saving Images with writeImage()
The following table shows possible combinations of file extensions, output formats and colorspaces of method writeImage():
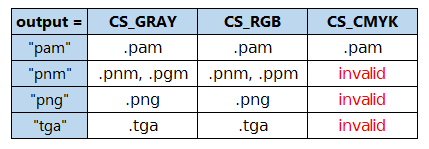
Note
Not all image file types are available, or at least common on all platforms, e.g. PAM is mostly unknown on Windows. Especially pertaining to CMYK colorspaces, you can always convert a CMYK pixmap to an RGB pixmap with rgb_pix = fitz.Pixmap(fitz.csRGB, cmyk_pix) and then save that as a PNG.
Pixmap Example Code Snippets
Example 1
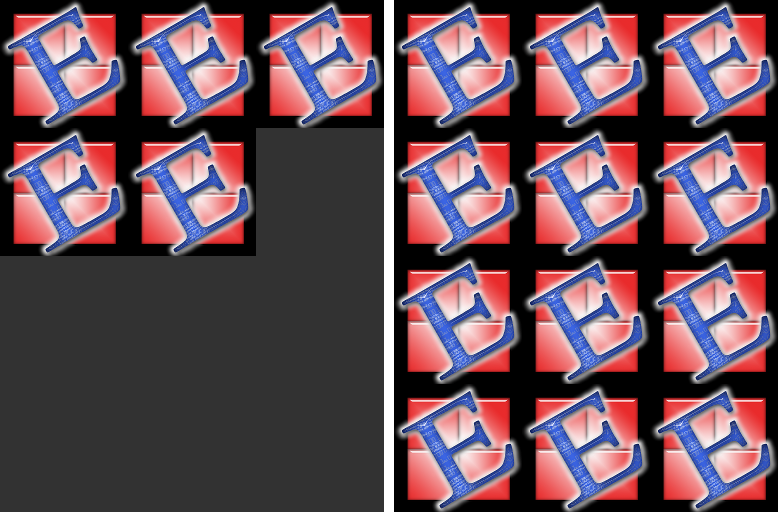
This shows how pixmaps can be used for purely graphical, non-PDF purposes. The script reads a PNG picture and creates a new PNG file which consist of 3 * 4 tiles of the original one:
import fitz
# create a pixmap of a picture
pix0 = fitz.Pixmap("editra.png")

# set target colorspace and pixmap dimensions and create it
tar_width  = pix0.width * 3              # 3 tiles per row
tar_height = pix0.height * 4             # 4 tiles per column
tar_irect  = fitz.IRect(0, 0, tar_width, tar_height)
# create empty target pixmap
tar_pix    = fitz.Pixmap(fitz.csRGB, tar_irect, pix0.alpha)
# clear target with a very lively stone-gray (thanks and R.I.P., Loriot)
tar_pix.clearWith(90)

# now fill target with 3 * 4 tiles of input picture
for i in range(4):
    pix0.y = i * pix0.height                     # modify input's y coord
    for j in range(3):
        pix0.x = j * pix0.width                  # modify input's x coord
        tar_pix.copyPixmap(pix0, pix0.irect)     # copy input to new loc
        # save all intermediate images to show what is happening
        fn = "target-%i-%i.png" % (i, j)
        tar_pix.writePNG(fn)
This is the input picture editra.png (taken from the wxPython directory /tools/Editra/pixmaps):

Here is the output, showing some intermediate picture and the final result:
Example 2
This shows how to create a PNG file from a numpy array (several times faster than most other methods):
import numpy as np
import fitz
#==============================================================================
# create a fun-colored width * height PNG with fitz and numpy
#==============================================================================
height = 150
width  = 100
bild = np.ndarray((height, width, 3), dtype=np.uint8)

for i in range(height):
    for j in range(width):
        # one pixel (some fun coloring)
        bild[i, j] = [(i+j)%256, i%256, j%256]

samples = bytearray(bild.tostring())    # get plain pixel data from numpy array
pix = fitz.Pixmap(fitz.csRGB, width, height, samples, alpha=False)
pix.writePNG("test.png")
Example 3
This shows how to interface with PIL / Pillow (the Python Imaging Library), thereby extending the reach of image files that can be processed:
>>> import fitz
>>> from PIL import Image
>>> pix = fitz.Pixmap(...)
>>> ...
>>> # create and save a PIL image
>>> img = Image.frombytes("RGB", [pix.width, pix.height], pix.samples)
>>> img.save(filename, 'jpeg')
>>> ...
>>> # opposite direction:
>>> # create a pixmap from any PIL-supported image file "some_image.xxx"
>>> img = Image.open("some_image.xxx").convert("RGB")
>>> samples = img.tobytes()
>>> pix = fitz.Pixmap(fitz.csRGB, img.size[0], img.size[1], samples, alpha=False)