|
Assistant for Single Images
|
Previous Top Next |
For other solutions to display images see: Images
|
Single Images are commonly
inserted in Wikipedia articles. But
only an image already hosted on
Wikipedia or the Wikimedia
Commons can be inserted in
Wikipedia articles. Do not attempt to
insert images from other sources.
|
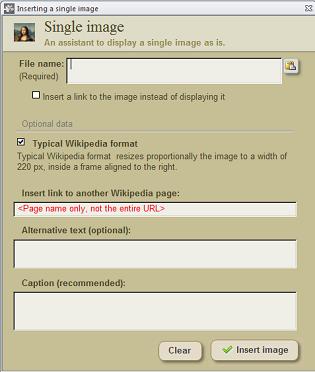 An assistant to insert single images into a page.
|
|
For accessibility and other reasons, you should put an image inside the section it
belongs to, after any "Main" or "See also" template at the top of the section. The more
general rule is to put an image immediately above the paragraph of text to which it
most closely belongs. It's certainly okay to have text following the image, within the
section where it's placed.
Multiple images within a single section, while not forbidden, can cause problems,
particularly if the section is short. In particular, don't place an image on the left side of a
section and a second image directly opposite, on the right side. For some readers, this
squeezes text into a tiny column between the two images. On some computer screens
the images may even overlap. (Even if you know how to use special parameters in the
image links to force blank space between the images to avoid squeezing the text, don't
do it. The blank text looks terrible on larger computer screens).
One place that's bad for an image is left-aligned immediately under a subheading. The
heading ends up directly above the image (making it look somewhat like a label) and
puts the subsection text to the right of the image, disconnecting it from the heading. If
you want an image left-aligned in a subsection, make sure there is at least a paragraph
of text between the image and the subheading. If you absolutely want the image to
follow directly after a subsection heading, right-align it.
There are several techniques you can apply with the help of these assistants to insert
images, even if you do not know the sintax.
Assistant for single images
1. Dimensions of the image
2. Alignment
3. A frame to contain the image
4. Alternative text (for the case the image is not shown)
5. Image caption (recommended)
If you need to include links inside the caption, you can do this after inserting the image
code in the Edit window. In the code, you can find the image caption between the last
pipe (|) and the two closing square brackets (]]). Locate the image caption and make
the necessary changes.
Assistant for cropped images
Assistant for images with annotations
The assistant also allows to customize detail dimensions, alignment, headings, caption
and background color, likewise the format of the annotations, font size, text color, and
background color if you need to highlight the annotations. The assistant also allows to
turn the annotations into links.
{{Site plan}} To display an image such as a site plan or map with another image
superimposed on it.
{{Superimpose}} To place one image over another.
{{Superimpose2}} To place up to 50 image layers over one another.
{{Location map}} To place a single image over another at a map coordinate location.
{{Location map+}} This template places one or more location marks on a map, with
optional labels. It is in the same family of templates as the Location map template and
the documentation for that template might be helpful. This template uses a helper
template, Location map~, one or more times to generate a mark for each location.
{{Overlay}} To place up to 30 marker images of various configurable kinds over a
base image with optional grid and legend.
| |