|
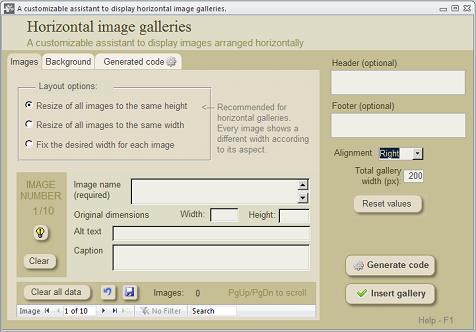
Assistant for horizontal image galleries
This assistant helps you to display a series of 2-10 images arranged
horizontally.
Galleries of this type are aligned to the left by default (recommended) but
you can change alignment according to your needs. Although image
alignment to the right is typical in Wikipedia, it should be avoided for
galleries built with this assistant, because galleries anchored to the left side
of the browser window may overlap the left frame of the Wikipedia page
when the browser window get narrower, offering an odd appearance.
This galleries can optionally show a header and/or a footer.
Note that the galleries build with this technique have a fixed width, so you
should not make too much wide galleries which exceed the usual page
width. But the galleries aligned to one side, let the subsequent text to float
on the other side, which is not allowed with the technique based on the
<gallery> tag (Assistant #2)
The assistant is based on the template {{Multiple image}} which allows to
display up to ten images per gallery. The data you must enter for every
image are the following:
· Image file name (Required)
· Dimensions of the original image (width and height)
· Alt text (optional)
· Caption (optional)
The dimensions of the original images are required for the template to
calculate the relation of aspect while adjusting the images to the same
height.
Main options:
· Resize all images to the same height
· Resize all images to the same width
· Fix the desired width for each image
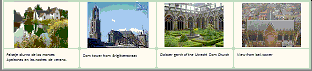
Resize all images to the same height
This is the default option, and the most recommended for the sake of
height uniformity. The images show different width, especially those
differing in their relation of aspect. You have to declare the total desired
width for the whole gallery and the template adjusts the corresponding
width for each image
Resize all images to the same width
When the images do not differ in their relation of aspect, this option leads
to similar results than the described above. But when the images have very
different aspects the results are quite different. Here you have to declare
the desired common width for all images, while the template ignores the
dimensions of the original images
Fix the desired width for each image
To use this option you should not declare neither the total desired width of
the gallery, nor the desired width for all images, but only the desired width
for each image. This way you can individually assign a width to each
image according to your needs.
Background color
The default background color is white, but if you want to consider using a
background color for the containing frame you can easily select a shade of
white from a panel of 15 colors. If you prefer some other color aside from
this panel you will have to type it manually in the generated code. Be aware
that darker background colors might affect legibility.
Removing the border around the images
The border around the images can be removed using
|image_style=border:none. Add this code after total-width and before the
first image.
Increasing the gap between images
The gap between the images can be increased using |image_gap=N where
N is the number of pixels. Ex. |image_gap=20 . This is a resource to
increase the distance between images for the sake of clarity. Add this code
after the total-width and before the first image.
|