|
Assistant for Images with Annotations
|
Previous Top Next |
For other solutions to display images see: Images
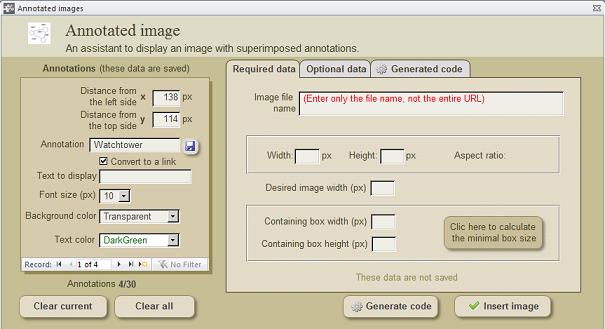 An assistant to build and insert wikicode for images with superimposed annotations.
|
|
Annotated images are images with wikitext notes superimposed. These notes can also
be links to other parts of the article or to other Wikipedia articles. It is not advisable to
upload images with embedded annotations to Wikimedia Commons. Embedded
annotations are less readable, especially when the images are resized.
The superimposition of annotations allows no only to keep those annotations more
readable when the images are re-sized, but allows modify the annotations not affecting
the image. It facilitate the internationalization of the article, because those annotations
can be translated to any language. Do not forget that Wikipedia is a free encyclopedia
that anyone can edit.
The assistant lets you to include in your articles annotated images, although you do not
know the wikitext sintax. This assistant is based on the template {{Annotated image 4}},
also know as {{AI4}} (see Template:{{Annotated image 4}}), which is the same template
which allows to crop images (see the Assistant for Cropped images). But when you are
using this template to produce annotated images you should also make use of the sub-
template {{Annotations}} which has been designed to contain the coordinates of each
annotation and its text format (see Template:{{Annotations}}).
1. Image name - Only image file name, not the entire address. Only for images stored
in Wikipedia or Wikimedia Commons. Both
rasterized and Scalable
Vector Graphics
(SVG) images are allowed.
2. Desired image width (image-width) - Width of the image to be displayed in the
Wikipedia page. This width may be different from that of the original image.
3. Width of the containing box (width) Total width (px) of the frame containing the
image and the annotations. It is usual to declare the same image width, but you can
use a greater value if you need to display annotations that exceed the limits of the
image.
4. Height of the containing box (height) Total height (px) of the frame containing
the image and the annotations. The minimum value is calculated automatically
according
to the aspect ratio of the image. But you can use a greater value to cover those
annotations exceeding the limits of the image.
Header - Adds a header text to the image. This header is centered and with a
transparent background by default.
Caption - Adds a footnote to the image. After the generation or the wikicode , you can
modify this text. Common modifications are: insertion of links, unbreakable spaces,
special characters and changes in text format.
Box background color - Background color of the box containing the image and the
annotations. The default color is white, but this assistant offers a panel with other 10
shades. This parameter is of low importance, because this color can only be seen in the
(less common) case when the the image is smaller than the containing box.
Annotations
The necessary data to enter for each annotation are:
· Distance X - Distance (in px) from left side of the box to the annotation.
· Distance Y - Distance (in px) from top side of the box to the annotation
· Text of the annotation - Text of the annotation if it is not a link.
· Text to display (if it is a link) - Text to be displayed instead of the link string.
· Font size (px) -
· Annotation background color - The default background color of the annotations
is transparent, but the assistant offers a panel of 14 neutral shades, To use a
background color for the annotations may be useful to improve legibility, especially
when the image and the annotation do not contrast much.
· Text color - If you choose a transparent background color for the annotations,
the default text color will be black. But the assistant offers a panel of six different web
colors to choose: Black, White, DarkRed, DarkGreen, Indigo and OrangeRed. This
panel does not intentionally include blue neither red,
because these colors are
reserved for links Observe that when you select a non-transparent background
color for the annotations, then the assistant automatically decides for you the most
contrasting text color, without your intervention, to maximize legibility.
1. Using your favorite image editor (Microsoft ® Paint, for instance) create a frame with
the same size of the containing box you want to display in the page. In most cases
this box will have the same desired size of the image. If it is the case, then open the
image in the editor and resize the image to the final desired size.
2. With the help of the mouse find the coordinates x,y of the point of insertion of the
every annotation. The mouse coordinates are usually displayed at the state bar of the
image editor.
Generate code and insert table
Once generated the wikicode, click on the button <Insert image> to insert the image in
the Edit window.
that including spaces between the vertical bars will result in a parsing error which will
make you sad. As an example, to specify 200 by 300 pixels here, you should only use
|200|300| instead of | 200 | 300| or similar.
|