Generating, Collecting, and Displaying Simulation Data (Control Design and Simulation Module)
The LabVIEW Control Design and Simulation Module includes several functions you use to generate, collect, and display simulation data. The following sections provide information about using these functions.
Generating and Combining Signals
Use the Signal Generation functions to generate many different types of signals, including sine, ramp, step, pulse, and chirp signals. These functions are useful when you want to see how a dynamic system responds to a particular type of input. For example, the Step Signal function generates a step signal, which you commonly use to test controller performance. Each Signal Generation function has configuration options you can use to fit the needs of a particular situation. Use the Signal Arithmetic functions to add, subtract, multiply, and divide signals.
Collecting and Indexing Simulation Data
To store all or part of a signal history over the entire simulation for later analysis, use the Collector function. This function stores values in an array, similar to the auto-indexing output tunnel of a For Loop. However, whereas LabVIEW indexes For Loop arrays by the loop iteration, the Control Design and Simulation Module indexes Collector arrays by simulation time. Therefore, after the simulation finishes, you can see the values that correspond with certain points in time.
The opposite of the Collector function is the Indexer function, which takes an array of data and returns the correct value based on the simulation time. For example, you can define an arbitrary signal as an array of timestamps and values at each timestamp. You then wire this array to the Input input of an Indexer function. When you run the simulation, this function returns the correct array value at the correct time. If you do not define a value for a specific time, this function linearly interpolates the expected result according to several options you can specify. The Indexer function operates similarly to the auto-indexing input tunnel of a For Loop, except LabVIEW indexes For Loop arrays by loop iteration instead of simulation time.
Displaying Simulation Data
The SimTime Waveform function and Buffer XY Graph function operate similarly to the LabVIEW Waveform Chart and XY Graph objects. However, whereas LabVIEW displays the loop iteration on the x-axis of these objects, the Simulation versions of these functions properly display simulation time on the x-axis. This distinction is important when you are using a variable step-size ordinary differential equation (ODE) solver. In this situation, the simulation might not return a value at every loop iteration, due to changes in the step size. However, the LabVIEW Waveform Chart still plots a value every loop iteration. The SimTime Waveform function corrects this behavior and properly displays unevenly-spaced values on the x-axis.
The following figure shows how a SimTime Waveform Chart and a LabVIEW Waveform Chart display the output of the Pulse Signal function when simulated for 30 seconds using a variable step-size ODE solver.
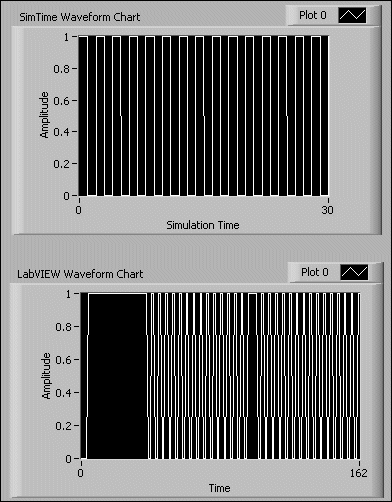
Notice the irregularities in the LabVIEW Waveform Chart when compared to the SimTime Waveform Chart.
 |
Note When you place a SimTime Waveform function or Buffer XY Graph function on the simulation diagram, LabVIEW automatically creates a chart or graph object connected to the function output. |
Storing Precalculated Data in Lookup Tables
Lookup tables are useful for defining sets of experimental data, such as the result of a function, and then retrieving that data without calculating the function. If you store the data in a lookup table, the simulation does not have to compute the function every time step. Instead, you call the lookup table to obtain the appropriate value. In this situation, you improve computation performance by reducing the need to calculate functions at each iteration of the Simulation Loop.
A lookup table consists of two data sets: a set of table values and a corresponding set of data values. When you specify an input value, the lookup table matches that input value to a table value and returns the appropriate data value.
For example, consider a lookup table with table values of [0 1 5] and data values of [4 2 8]. If you specify an input value of 0, the lookup table returns 4. If you specify an input value of 5, the lookup table returns 8. You also can configure how the lookup table operates if you specify an input value that does not exist as a table value. For example, you can configure a lookup table to interpolate or extrapolate the appropriate data value from the available table values. Use the Method parameter of the Lookup Tables functions to define this behavior.
This example uses a one-dimensional lookup table; however, the Control Design and Simulation Module also includes functions that implement two- and three-dimensional lookup tables.
Transferring Data Between Simulation Loop Iterations
Use the Memory function to transfer the value of a signal from one iteration of the Simulation Loop to the next. This function behaves similarly to a shift register you can place on a While Loop. This function is polymorphic and accepts any data type you wire to the Initial Value input. To implement a fixed-time delay, use the Discrete Unit Delay function.