|
Name |
Description |
|
|
- Before inserting PIC18F87J50 PIM PIM in the PIC18 Explorer board, insure that the processor selector switch (S4) is in the “ICE” position as seen in the image below. Failure to so will result in difficulties in getting the PIC18F87J50 PIM to sit properly on the PIC18 Explorer.

- Note: The processor selector switch (S4) should be in “PIC® MCU” position when on board PIC18F8722 chip is used for the demo application.
- Be careful while inserting the PIC18F87J50 PIM into PIC18 board. Insure that no pins are bent or damaged during the process. Also insure that the PIM is not shifted in... more
|
|
|
- Before attaching the PIM to the Explorer 16 board, insure that the processor selector switch (S2) is in the “PIM” position as seen in the image below.

- Short the J7 jumper to the “PIC24” setting:

- Be careful while inserting the appropriate PIM into Exp 16 board. Insure that no pins are bent or damaged during the process. Also insure that the PIM is not shifted in any direction and that all of the headers are properly aligned.
- On the SD Card PICTail™ Plus board, short JP1, JP2, and JP3 on the side farthest from the SD Card holder. Depending on... more
|
|
|
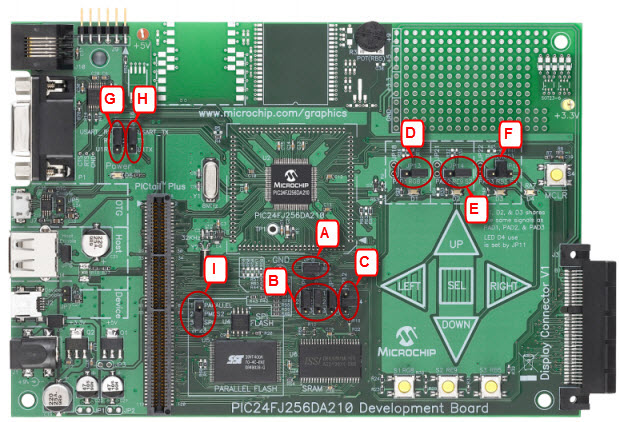
- Before attaching the SD Card PICTail™ Plus Daughter Card to the PIC24FJ256DA210 Development Board, make sure that the jumpers on the development board are set to the default positions as seen in the image below.
- JP8 – Install jumper
- JP9, JP10, JP11 – Install jumper to pins 1-2
- JP12 – Install jumper to pins 2-4
- JP13 – Install jumper to pins RG8-S1
- JP14 – Install jumper to pins RE9-S2
- JP15 – Install jumper to pins RB5-POT
- JP16 – Install jumper to TX-USART_TX
- JP17 – Install jumper to RX-USART_RX
- JP23 – Install jumper to PMCS2-SPI

- On the SD Card PICTail™ Plus... more
|


