


| Microsoft Enterprise Library 5.0 |
| Using the Configuration Tools |
|
|
The Enterprise Library configuration tools are graphical tools that allow you to create, change, and validate application block settings without having to manually edit the XML configuration files where they are stored. There is a configuration editor that integrates with Visual Studio 2008, plus standalone versions for different operating system and Microsoft® .NET Framework versions that you can launch from within Visual Studio or open from your Start menu.
These tools display the available configuration settings, the default values that you can change, and information about what each setting means.
This topic contains the following sections:
- Launching Configuration Editor from Visual Studio
- Setting the Visual Studio Configuration Editor as the Default Editor
- Launching the Standalone Configuration Tool
- Using Wizards in the Configuration Tool
- Using the Keyboard with the Configuration Tool
- The Configuration Type Selector
- Enterprise Library Configuration Schema
- Building the Configuration Console
- Specifying Different Assemblies
- Configuration Tool Usage Notes
 Launching the Configuration Editor from Visual Studio
You can use the integrated Visual Studio configuration editor with Visual Studio 2008 to configure Enterprise Library. In Visual Studio 2010 you can launch the Enterprise Library configuration console stand-alone tool. The version launched depends on the target framework and target platform for the project owning the configuration file. See Launching the Stand-alone Configuration Tool for more information on the available versions.
For information on using the type selector dialog in the configuration tool, and the types and assemblies are available to the integrated Visual Studio configuration editor see the Type Selector topic.
 Note: Note: |
|---|
| Do not add a reference to the EnterpriseLibrary.Configuration.DesignTime assembly in a Visual Studio project. This assembly is a part of the configuration tool's implementation and is not designed to be referenced from within the configuration tool. When you write an extension to the configuration tool, do not use the integrated Visual Studio Editor to edit a configuration file; use the stand-alone configuration tool instead. |
To launch and use the configuration editor from Visual Studio
- Open a solution in Visual Studio on a computer that has Enterprise Library installed.
- If the solution does not contain a configuration file, add one using the Visual Studio Add menu.
- In Solution Explorer, right-click the configuration file and then click Edit Enterprise Library V5 Configuration. This launches the integrated configuration editor or the appropriate standalone version of the configuration tool.
- On the Blocks menu click an application block in the list to add a settings section for that block. For example, click Add Logging Settings.
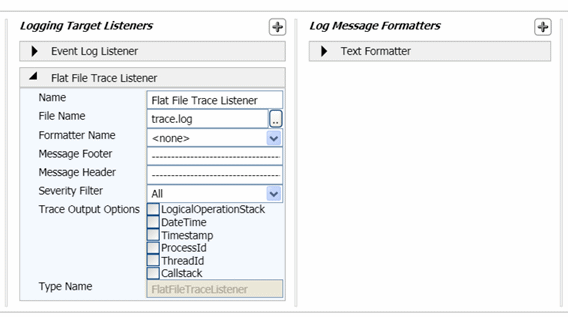
- The configuration section and child elements for that application block are displayed. Click the left-hand child element expander arrow to display the child elements and their settings. Click the right-hand property expander arrow to display the block properties for edit. You can also right-click to show/hide properties, show/hide elements or delete the selected block settings. For example, if you are configuring the Logging Application Block and you want to add a flat file trace listener, do the following:
- Click the Logging Target Listeners expander (the plus sign on the right), point to Add Logging Target Listeners, and then click Add Flat File Trace Listener in the list that is displayed.
- In the properties pane next to the File Name property, click the ellipsis button (...), select the target folder for the file, and enter a file name for the trace listener file.

- After you make all your configuration changes, click Save, Save As or Save All on the File menu.Note:
You can save the file with Warnings but you cannot save the file with Errors.
The configuration tool always saves fully qualified assembly names.
If your configuration file contains other configuration sections such as ASP.NET settings, the configuration tool will not display these. When you save the configuration to an existing configuration file it will not modify these sections.
Setting the Visual Studio Configuration Editor as the Default Editor
In Visual Studio, the XML editor is the default editor for .config files. When you double-click a .config file in Solution Explorer, the XML editor opens. The following procedure describes how to change the default editor.
To set the Visual Studio Configuration Editor as the default editor
- Open a project in Visual Studio.
- In Solution Explorer, right-click a configuration (.config) file.
- Click Open With.
- Click Enterprise Library V5 Configuration Editor. If you have more than one version of Enterprise Library installed, you will see more than one entry for the configuration editor.
- Click the Set as Default button.
- Click OK.
Launching the Stand-alone Configuration Tool
You can use the stand-alone configuration console to manage configuration for Enterprise Library. The minimum required assemblies for the configuration tool are the following:
- EntLibConfig.exe
- Microsoft.Practices.EnterpriseLibrary.Common.dll
- Microsoft.Practices.EnterpriseLibrary.Configuration.DesignTime.dll
- Microsoft.Practices.EnterpriseLibrary.Configuration.Design.HostAdapterV5.dll
- Microsoft.Practices.EnterpriseLibrary.Configuration.EnvironmentalOverrides.dll
- Microsoft.Practices.Unity.dll
You must also include the assemblies for any application blocks you wish to configure, such as Caching Application Block and Logging Application Block.
To launch and use the Enterprise Library Configuration Console
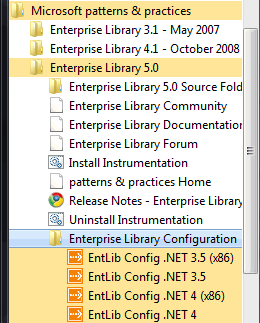
- On the taskbar, click Start, point to All Programs, point to Microsoft patterns & practices, point to Enterprise Library 5.0, point to Enterprise Library Configuration, and then select the version of the configuration editor you require. There are versions specifically aimed at the 32-bit (x86) platform and versions compiled for any platform. For each of these platforms, there is a separate version for the 3.5 and 4.0 versions of the .NET Framework.
- This loads the copy of the configuration console that uses the strong-named assemblies. If you are using a different set of assemblies, navigate to the appropriate copy of EntLibConfig.exe using Windows® Explorer. On the File menu, click New (if you are configuring a new application) or Open (if you are configuring an existing application). The blocks and their child elements from that file are displayed.
- When you open an existing application configuration file, the configuration console displays the Data Access Application Block if your Machine.config file contains any connection strings. For more information, see Configuration Tool Usage Notes.
- On the Blocks menu click an application block in the list to add that blocks settings to be edited. For example, click Add Logging Settings.
- The configuration section and child elements for that application block are displayed. Click the left-hand child element expander arrow to display the child elements and their settings. Click the right-hand property expander arrow to display the block properties for edit. You can also right-click to show/hide properties, show/hide elements or delete the selected block settings. For example, if you are configuring the Logging Application Block and you want to add a flat file trace listener, do the following:
- Click the Logging Target Listeners expander (the plus sign on the right), point to Add Logging Target Listeners, and then click Add Flat File Trace Listener in the list that is displayed.
- In the properties pane next to the File Name property, click the ellipsis button (...), select the target folder for the file, and enter a file name for the trace listener file.
- After you make all your configuration changes, click Save or Save As… on the File menu.Note:
You can save the file with Warnings but you cannot save the file with Errors.
The configuration tool always saves fully qualified assembly names.
If your configuration file contains other configuration sections such as ASP.NET settings, the configuration tool will not display these. When you save the configuration to an existing configuration file it will not modify these sections.
You can also use the configuration tool by using the keyboard. For details, see Using the Keyboard with the Configuration Tool.
See the configuration information in each of the application block sections of this documentation for more information on entering configuration information.
Using Wizards in the Configuration Tool
Wizards that will automatically create and set up dependent and related blocks are available in the configuration tool. For example the Log Exception to Database wizard creates and configures the Logging Application Block, the Exception Handling Application Block, and the Database Application Block. The wizard is disabled if a required block, such as the Logging Application Block, was not installed when you installed Enterprise Library.
To use the Log Exception to Database Wizard
- Open the Wizards menu and click Log Exception to Database.
- Select an exception type by clicking on the ellipses (…) icon to open the type selector.
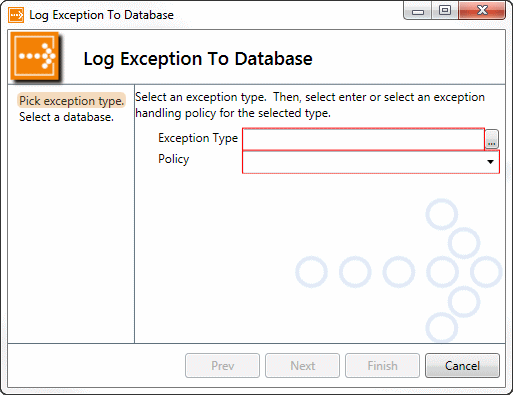
- Enter a name for the exception handling policy that the wizard will create. Alternatively, if you have previously created an exception handling policy, you can select this in the drop-down list. Then click Next.
- Enter appropriate values for the Connection Name, Connection String and Provider Name properties of the database that the wizard will specify for logging. Alternatively, if you have already configured a suitable database, select the values in the drop-down lists.
- Click Finish. The wizard adds the Logging, Exception Handling, and Database Application Block settings sections and configures them. It creates a new category for the Logging Application Block named Logging Category Filter, and configures a database trace listener and a text formatter for this category.
- If you have not already done so, use the script provided with the Logging Application Block to create the required tables and stored procedures in the target database. For more information, see The Logging Application Block.
Using the Keyboard with the Configuration Tool
The following table provides a list of the keyboard gestures that are available in the configuration tool.
|
Command |
Scope |
Description |
|---|---|---|
|
Ctrl+N |
Global |
New configuration file |
|
Ctrl+O |
Global |
Open configuration file |
|
Ctrl+S |
Global |
Save |
|
Ctrl+A |
Global |
Save As |
|
Shft+F10 Context Menu Key |
Element |
Standard Windows keyboard commands to open the context menu for the current field. |
|
Space |
Section, Element |
Expand or Collapse properties |
|
Return |
Section |
Expand or Collapse section |
|
Del |
Section, Element |
Delete element or section |
|
Ctrl+Up Arrow |
Element (where multiple elements exist in the section) |
Move element up in sequence |
|
Ctrl+Down Arrow |
Element (where multiple elements exist in the section) |
Move element down in sequence |
|
Alt+Left Arrow and Alt+Right Arrow |
Element or Section Property |
Decrease or Increase the Name/Value property split. |
|
Alt+Ctrl+Left / Alt+Ctrl+Right |
Element |
Decrease/Increase column width for element. |
The Configuration Type Selector
The type selector dialog is a part of the Enterprise Library configuration tools. It enables you to select from a list of classes. You can also choose the assembly to load. The type selector has the following features:
- Ability to filter types. As you type in the Type Name text box, the non-matching types are removed from the tree listing of assemblies.
- Ability to load assemblies from the global assembly cache (GAC). There is no filter in the dialog box for picking the assembly from the GAC, but you can type the assembly name when the list has focus. The list has focus by default.
- Ability to specify closed generic types. You can define a closed generic type by choosing the generic type and its parameters in the Type Building Tree at the top of the window. These parameters can also be generic types, so the tree can become arbitrarily deep.
The way you open the type selector dialog is usage dependent. It opens when you click the ellipsis button (…) in a property that defines a type in the properties pane. It also opens when you add a custom provider, and in other cases where the tool must prompt you to select a type.
To use the type selector dialog to select a type
- In the tree view list in the type selector dialog, navigate to the assembly you want to use.
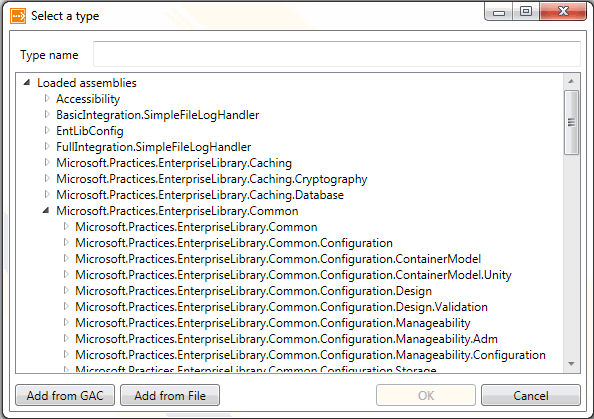
- You can also filter the list by typing a string to use to filter the list in the Type name edit box. For example type string to filter for all classes containing the word "string". When just matching by type name the type names are matched in a prefix-based, case-insensitive way. Assemblies and namespaces are expanded to show the matching types. When there is no dot in the entry, namespaces are not matched. As soon as a dot is entered as part of the name, namespaces are matched and filtered.
- If the required assembly is not in the dialog box, click Add from GAC or Add from File and navigate to it.Note:
The Add from GAC and Add from File options do not exist in the Visual Studio integrated configuration editor. - In the tree view list in the type selector dialog, click on the type you require.
- To accept the selection, click the OK button.
When a generic type is selected, the dialog shows one or more text boxes where you specify the generic type arguments. There is one text box for each generic type parameter. The OK button is enabled even if the generic type arguments are not yet specified. When clicking OK, an error message is displayed if the selected type is not correctly specified.
Notes on Using the Type Selector
Consider the following when using the configuration tool type selector:
- The integrated Visual Studio Enterprise Library configuration tool displays types that belong to the project and its referenced assemblies. The available types will be retrieved solely from the assemblies referenced by the project that owns the configuration file. To add or remove types displayed, you must add or remove the references within the project. For example, you will not be able to select exception formatters and database types using the integrated editor unless you add the appropriate assembly references to your project.
- Do not select Microsoft.Practices.EnterpriseLibrary.Configuration.DesignTime assembly in the Enterprise Library configuration tool type selector dialog. This assembly is a part of the configuration tool implementation and is not designed to be referenced from within the tool.
- The Visual Studio integrated configuration editor will not display assemblies if the current project has a 64-bit target platform, and will not display types in assemblies specifically compiled for a 64-bit target platform.
- You can only load assemblies that correspond to the current platform constraints, such as 32-bit or 64-bit assemblies or assemblies compiled for any version. You cannot load assemblies that target the x64 platform when running the integrated configuration tool because this runs inside Visual Studio as a 32-bit process.
Enterprise Library Configuration Schema
Enterprise Library installs a schema into Visual Studio that provides IntelliSense® for editing Enterprise Library configuration files in the Visual Studio XML editor. You must turn on the schema before you can use it.
To enable the Enterprise Library configuration schema
- Open the configuration file in Visual Studio by double-clicking it in Solution Explorer.
- On the XML menu, click Schemas... to open the XML Schemas dialog.
- Locate the schema named EnterpriseLibrary.Configuration.xsd. This is installed automatically. However, if it is not shown in the list, click Add and navigate to the folder %Program Files%\Microsoft Visual Studio [version] \Xml\Schemas\, then select EnterpriseLibrary.Configuration.xsd and click Open.
- Change the value in the Use column to Use this schema. Then click OK.
Building the Configuration Console
Enterprise Library includes four versions of the configuration tools in order to support the integrated editor, and 32-bit and 64-bit platforms. However, all are built from a single project. If you customize the configuration console source code, you may need to recompile the source code as the version of the configuration tool must match the version of the Enterprise Library binaries. You can use the BuildLibrary batch file to do this.
The configuration console requires the Enterprise Library assemblies and any assemblies for custom providers to be located in the same directory as the configuration tool. The tool scans these assemblies to find the available configuration objects. It requires both the run-time assemblies and the design-time assemblies.
Design-time assemblies are not required for running an application that uses the application blocks. However, the configuration console uses them when you edit an application configuration. Use the CopyAssemblies batch file to copy the required run-time and design-time assemblies into the bin directory. Alternatively, you can use the BuildLibraryAndCopyAssemblies batch file to recompile the source code and copy the run-time and design-time assemblies into the bin directory.
For more details about the relationship between the run-time configuration component and the design-time configuration component, see Design Time Configuration.
Specifying Different Assemblies
By default, the configuration tools use the assemblies provided with the Enterprise Library. You can redirect the tools to use other assemblies, such as assemblies that you have compiled yourself because you have modified the source code. If you use the stand-alone configuration console, simply place a copy of the tool in the correct bin directory.
If you have your own versions of the Enterprise Library assemblies, you must change a registry key. There is a default assembly set that refers to the signed binaries. For installed source code, another assembly set entry is created in the registry. The configuration editor allows you to select which assemblies you want to use as the default. It is also possible to choose a non-default set for a specific solution. This information is saved in the .sln file.
By default, every .config file you open with the configuration editor uses the default assembly set. If you would like to override this for a specific solution, you can use the SelectedEnterpriseLibraryConfigurationSet property of the solution root element to select an alternative configuration set that will be associated with all .config files in the solution. The registry settings determine the possible options for this property. This property is exposed in Visual Studio as Enterprise Library 5 Assembly Set.
To add, edit, or remove definitions of assembly sets, you need to change the registry key. By default, there are two assembly sets: the Microsoft Signed set, which points to the strong-named binaries, and the EntLib[version]Src set (for example, EntLibV5Src), which points to the bin directory under the installed copy of the source code.
To change the registry key for the Visual Studio 2008 and Visual Studio 2010 integration package under HKCU, for per-user settings, open Registry Editor (Regedit.exe), and then navigate to HKCU\Software\Microsoft\Practices\EnterpriseLibraryV5\ConfigurationEditor (for per-user settings).
To define shared configuration sets, for computer-wide settings, change the registry key under HKLM. This requires administrative privileges. For Visual Studio 2008, navigate to HKEY_LOCAL_MACHINE\SOFTWARE\Microsoft\VisualStudio\[version]\Packages\{ 88220936-600F-4815-8F00-E9EF22A31929 }\ConfigurationEditor .
For Visual Studio 2010, open Registry Editor (Regedit.exe), and then navigate to HKEY_LOCAL_MACHINE\SOFTWARE\Microsoft\Enterprise Library v5.0\ConfigurationEditor (for computer-wide settings)
Each assembly set is defined in a key below this root key. The assembly sets are the following:
- ConfigurationUIAssemblyPath. This points to an assembly that contains a class that implements Microsoft.Practices.EnterpriseLibrary.Configuration.Design.HostAdapter.ISingleHierarchyConfigurationUIHostAdapter. If you are using unmodified Enterprise Library assemblies, this value should point to a copy of Microsoft.Practices.EnterpriseLibrary.Configuration.DesignTime.dll.
- ConfigurationUIAdapterClass. This points to the namespace-qualified name of a class that implements Microsoft.Practices.EnterpriseLibrary.Configuration.Design.HostAdapter.ISingleHierarchyConfigurationUIHostAdapter. If you are using unmodified Enterprise Library assemblies, this value should refer to the class Microsoft.Practices.EnterpriseLibrary.Configuration.Design.Hosting.SingleHierarchyConfigurationUIHostAdapter.
- ConfigurationUIPluginDirectory. This points to the directory that contains the design-time assemblies and run-time assemblies that should be loaded into the configuration tool for this assembly set. In this case design-time assemblies only.
To specify which assembly set is the default set, modify the defaultConfigurationSet value under the root key.
|
Note: |
|---|
| When the Enterprise Library source is installed to multiple locations on the same computer, the keys in the existing assembly set are overwritten with the path of the new installation. For example, the assembly keys of an initial installation into C:\EntLibSrc01 would be overwritten with those of the subsequent installation into C:\EntLibSrc02. |
Configuration Tool Usage Notes
Here are some additional points about the configuration tools:
- The configuration files are not encrypted by default. A configuration file may contain sensitive information about connection strings, user IDs, passwords, database servers, and catalogs. You should consider protecting this information by setting appropriate permissions on configuration files and by Encrypting Configuration Data.
- In order to help ensure that assemblies on the disk that the user can load into the configuration tool are secure, they should be protected by using appropriate access control lists and should be deployed within the trust boundary. It is also recommended that you use strong names for all the assemblies and assembly locations (excluding assemblies stored in the GAC).
- The configuration tools do not support editing or storing Enterprise Library configuration sections in the Machine.config file. Enterprise Library configuration section information in the Machine.config file can be accessed at run time, but it cannot be modified at design time. Therefore, if possible, you should not store Enterprise Library configuration information in the Machine.config file.
- The configuration tools display connection strings stored in the Machine.config file, and you will see the Data Access Application Block settings section when you open any application configuration file on a machine that has connection strings stored in the Machine.config file—regardless of whether you added the application block to your configuration file. The Data Access Application Block can use these connection strings at run time, but any modifications you make to them in the configuration tool are lost. The Machine.config file is not updated.
- When the configuration console opens an application configuration file, it attempts to load all the provider assemblies referenced in that file. If your application configuration includes a custom provider, you must make that custom provider assembly available to the Enterprise Library configuration console. To do this, you can copy the assembly to the same directory as the configuration console executable or install it in the global assembly cache. You should avoid using the DEVPATH environment variable as it may affect loading, and is not recommended for use in a production environment as it does not check the versions on strong-named assemblies. It simply uses the first assembly it finds.
- The <appSettings> sections must be included in a single file and not distributed across multiple files. Examples of files that you cannot edit include the Machine.config file and <appSettings> sections that include the optional file attribute that specifies a relative path to an external configuration file.

To report documentation errors or provide feedback on this documentation, please send email to [email protected].
Copyright © 2010 by Microsoft Corporation. All rights reserved.