


| Microsoft Enterprise Library 5.0 |
| Entering Configuration Information |
|
|
These procedures explain how to configure the Cryptography Application Block. Also see Using the Cryptographic Key Wizard. For details of the configuration schema, see Source Schema for the Cryptography Application Block. You can also configure the block in code by using an alternate configuration source. For more information, see Advanced Configuration Scenarios and Using the Fluent Configuration API.
To add the Cryptography Application Block
- Open the configuration file. For more information, see Configuring Enterprise Library.
- Open the Blocks menu and then click Add Cryptography Settings.
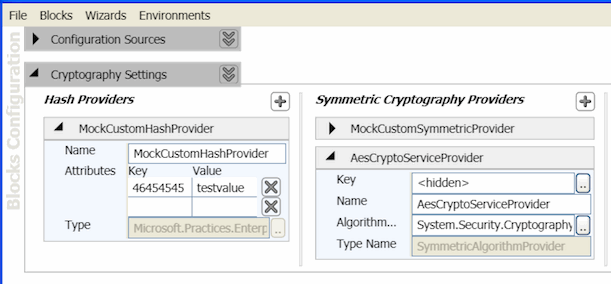
- The configuration tool automatically adds the Cryptography Settings section, and the Hash Providers and Symmetric Cryptography Providers sub sections, with default settings.
- To edit the properties of the Cryptography Settings section, click the property expander chevron.
To configure a hash algorithm provider
- Click the Hash Providers plus sign icon, point to Add Hash Providers, and then click Add Hash Algorithm Provider.
- In the type selector dialog, select the hash algorithm provider type you want to use. If the hash provider is not included, click Add from File or Add from GAC to locate the assembly that contains the required type.
- (Optional) In the Name property textbox, change the name of the hash algorithm provider. The default name is the type name you selected in step 2.
- Set the Salt Enabled property by clicking True or False in the drop-down list. The default is True.
 Note: Note: |
|---|
| The Cryptographic Key Wizard appears for keyed hash algorithm providers. For information about generating and importing keys, see the section Using the Cryptographic Key Wizard later in this topic. |
To configure a custom hash provider
- Click the Hash Providers plus sign icon, point to Add Hash Providers, and then click Add Custom Hash Provider.

- In the type selector dialog either type the full path name for a custom hash provider or navigate to it in the list. You can filter the classes displayed by typing in the text box. To add a custom provider from another assembly, click Add from File and navigate to the assembly file. To add a provider stored in the global assembly cache (GAC), click Add from GAC.
- (Optional) Add custom AttributesKey/Value pairs in the edit box.
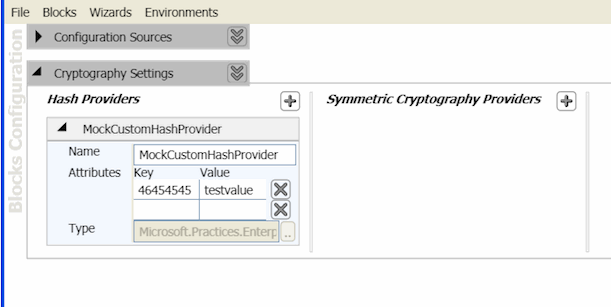
- (Optional) Set the Name property by typing the name in the edit box. The default name is the name of the type selected by using the Type Selector tool.
To configure a DPAPI symmetric cryptography provider
- Click the Symmetric Cryptography Providers plus sign icon, point to Add Symmetric Cryptography Providers, and then click Add DPAPI Symmetric Crypto Provider.
- (Optional) Change the Name property of the DPAPI symmetric cryptography provider. The default name is DPAPI Symmetric Crypto Provider.
- Set the Protection Scope property. In the drop-down list, click CurrentUser or LocalMachine.
The CurrentUser value means that DPAPI uses a loaded user profile to generate the key. Only that particular user account can decrypt the encrypted data. The LocalMachine value means that that any code running on the machine has access to the protected key; therefore, it can decrypt any secret encrypted in LocalMachine mode. To counteract this, your application code can pass an entropy value when it calls the Encrypt or Decrypt methods. Entropy makes it more difficult for one application, running on the same computer, to compromise another application's encryption key. However, you must protect the entropy value. If it is simply saved to an unprotected file, attackers can access the file, retrieve the entropy value, and use it to decrypt an application's data. The Cryptography Application Block configuration does not include the entropy value. This means that you cannot use the configuration tools to create or save an entropy value.
To configure a symmetric algorithm provider
- Click the Symmetric Cryptography Providers plus sign icon, point to Add Symmetric Cryptography Providers, and then click Add Symmetric Algorithm Provider.
- In the type selector dialog, select the symmetric algorithm provider type you want to use. You can filter the classes displayed by typing in the text box. To add a custom provider from another assembly, click Add from File and navigate to the assembly file. To add a provider stored in the global assembly cache, click Add from GAC.
- After selecting the algorithm provider, the Cryptographic Key Wizard will run to either import or generate a key. For more information on using the Wizard, see Using the Cryptographic Key Wizard.
- On the final page of the Wizard click on Finish to add the new provider.
To configure a custom symmetric cryptography provider
- Click the Symmetric Cryptography Providers plus sign icon, point to Add Symmetric Cryptography Providers, and then click Add Custom Symmetric Crypto Provider.
- In the type selector dialog either type the full path name for the custom symmetric cryptography provider or navigate to it. You can filter the classes displayed by typing in the text box. To add a custom provider from another assembly, click Add from File and navigate to the assembly file. To add a provider stored in the global assembly cache, click Add from GAC.
- (Optional) Add custom AttributesKey/Value pairs in the edit box.
- (Optional) In the Name property textbox, change the name of the custom symmetric cryptography provider. The default name is the name of the type selected by using the Type Selector tool.
To configure the default providers for the block
- Open the Cryptography Settings properties by either right clicking on the Cryptography Settings section or by clicking on the property expander chevron.
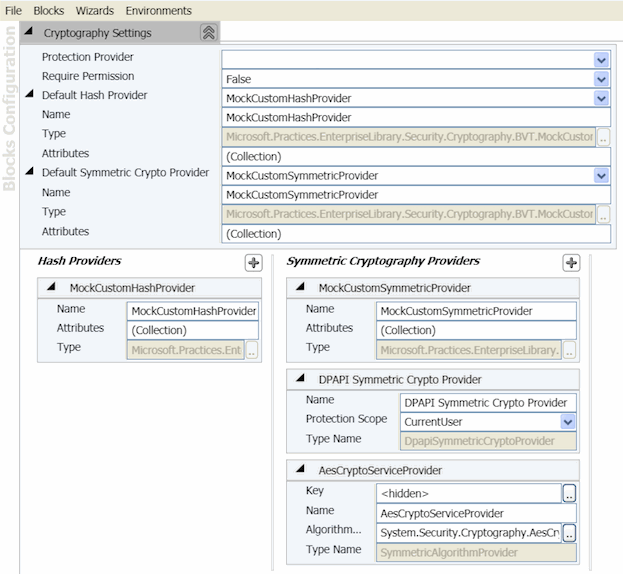
- (Optional) In the properties pane, set the Default Hash Provider property. This sets the instance of the hash provider that the Cryptography Application Block uses if the application code does not specify another provider. In the drop-down list, click the hash provider. The default is none.
- (Optional) In the properties pane, set the Default Symmetric Crypto Provider property. This sets the instance of the symmetric cryptography provider that the Cryptography Application Block uses if the application code does not specify another provider. In the drop-down list, click the symmetric provider. The default is none.
 Using the Cryptographic Key Wizard
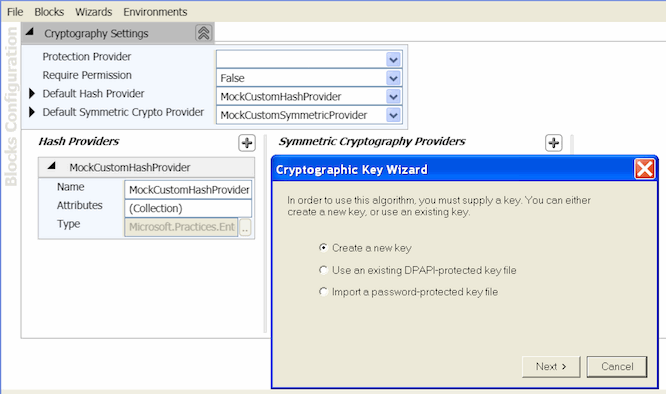
By using the Cryptographic Key Wizard when configuring a symmetric encryption provider, you can choose to create a new key, use an existing DPAPI-protected key file, or import a password-protected key file. Each key is stored in a separate file that is protected with DPAPI. When you create the key, you choose either machine mode or user mode to limit access to the key.
The following procedures describe how to use the Cryptographic Key Wizard.
To create a new key
- Select Create a new key, and then click Next.
- Enter the hexadecimal key you want to use or click Generate to create a new key. Click Next.
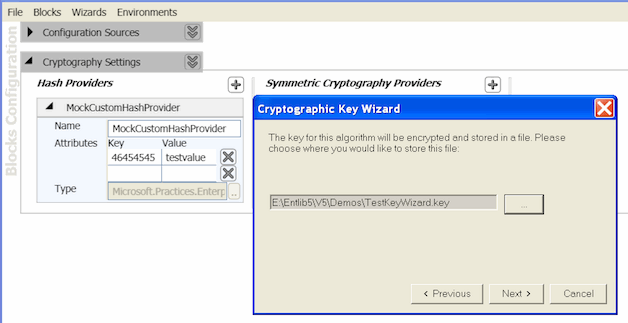
- Choose where you want to store the key file. Enter the location or click the ellipsis button (…) and select the location. Click Next.
- Select either User mode or Machine mode. User mode uses the credentials of the user who is currently logged on to encrypt the key. In machine mode, any user who is logged on can encrypt and decrypt the key. Click Finish.Note:
Select machine mode if your application runs on its own dedicated server with no other applications, or if you have multiple applications that run on the same server and you want those applications to be able to share sensitive information.
Select user mode if you run your application in a shared hosting environment and you want to make sure that your application's sensitive data is not accessible to other applications on the server. In this situation, each application should run under a separate identity, and the resources for the application—such as files and databases—should be restricted to that identity.
When you select machine mode, the encrypted key file is specific to a particular computer, so you must generate the encrypted data on every computer. Do not copy the encrypted data across computers that are in a server farm or a cluster. - The Key property appears in the right pane of the configuration console. Click the ellipsis button (…) to use the Cryptographic Key Wizard again to generate a different key.
- Save your application configuration.
To use an existing DPAPI-protected key file
- Select Use an existing DPAPI-protected key file, and then click Next.
- Enter the location of the key file. The file must contain a key that is associated with the same algorithm type as the type you are using now. For example, if you are currently configuring a RijndaelManaged type algorithm, the key you are importing must also be associated with a RijndaelManaged type algorithm. For more information, see the section Usage Notes later in this topic. Enter the location or click the ellipsis button (…) and select the location. Click Next.
- Select either User mode or Machine mode. User mode uses the credentials of the user who is currently logged on to encrypt the key. In machine mode, any user who is logged on can encrypt and decrypt the key. Note:
Select machine mode if your application runs on its own dedicated server with no other applications, or if you have multiple applications that run on the same server and you want those applications to be able to share sensitive information.
Select user mode if you run your application in a shared hosting environment and you want to make sure that your application's sensitive data is not accessible to other applications on the server. In this situation, each application should run under a separate identity, and the resources for the application—such as files and databases—should be restricted to that identity.
When you select machine mode, the encrypted key file is specific to a particular computer, so you must generate the encrypted data on every computer. Do not copy the encrypted data across computers that are in a server farm or a cluster. - Click Finish.
- The Key property appears in the properties pane of the configuration tool. Click the ellipsis button (…) to use the Cryptographic Key Wizard again to generate a different key.
- Save your application configuration.
To import a password-protected key file
- Select Import a password-protected key file, and then click Next.
- Enter the location of the key file or click the ellipsis button (…) and select the location. The file must contain a key that is associated with the same algorithm type as the type you are currently using. For example, if you are currently configuring a RijndaelManaged type algorithm, the key you are importing must also be associated with a RijndaelManaged type algorithm. For more information, see the section Usage Notes later in this section. Enter the password that was used to encrypt the file, and then click Next.
- Choose where you want to store the key file. Enter the location or click the ellipsis button (…) and select the location, and then click Next.
- Select either User mode or Machine mode, and then click Finish. User mode uses the credentials of the user who is currently logged on to encrypt the key. In machine mode, any user who is logged on can encrypt and decrypt the key.
- The Key property appears in the properties pane of the configuration tool. Click the ellipsis button (…) to use the Cryptographic Key Wizard again to generate a different key.
- Save your application configuration.
Usage Notes
Consider these points when you import and store keys.
- When you import a key for an algorithm, you must select a key file that was exported for the same algorithm type. If you select a key for a different algorithm type, you will receive an exception at application run time.
- The configuration tools store the absolute path to each key file in the <securityCryptographyConfiguration> section of the configuration source. For example, when you use the default configuration source, your application configuration file contains the absolute path to your key files. If you deploy your application to another computer, you must either copy your key files to the same absolute path or update the <securityCryptographyConfiguration> section of the computer's configuration source to reflect the new location.

To report documentation errors or provide feedback on this documentation, please send email to [email protected].
Copyright © 2010 by Microsoft Corporation. All rights reserved.