


| Microsoft Enterprise Library 5.0 |
| Entering Configuration Information |
|
|
These procedures explain how to configure the Caching Application Block. If you add a Database Cache Storage provider to the configuration of the Caching Application Block, the configuration tool automatically adds the Data Access Application Block. You must configure that block before you configure the Database Cache Storage provider in the Caching Application Block configuration.
For details of the schema for the Caching Application Block configuration, see Source Schema for the Caching Application Block. You can also configure the block in code by using an alternate configuration source. For more information, see Advanced Configuration Scenarios and Using the Fluent Configuration API.
To add the Caching Application Block
- Open the configuration file. For more information, see Configuring Enterprise Library.
- Open the Blocks menu and then click Add Caching Settings.
- The configuration tool automatically adds the Caching Settings section with default values, and a default Cache Manager item.
To configure cache managers
- Click the properties expander arrow in the Caching Settings section to open the list of properties.
- (Optional) Change the Default Cache Manager property name. The default cache manager is used if the code does not specify a cache manager. Either enter a new name or select one from the drop-down list. The default name is CacheManager.
- (Optional) If you want to encrypt the configuration, make a selection from the Protection Provider drop-down list. You can select the RsaProtectedConfigurationProvider or the DataProtectedConfigurationProvider. See Encrypting Configuration Data for information about the restrictions on using the RsaProtectedConfigurationProvider.
- (Optional) If you want to run your application in partial trust mode, change the Require Permission property to False. The default is True.
- To access the default Cache Manager properties, click the section expander arrow to the left of the default Cache Manager title. If you renamed the cache manager, the title will be the name you assigned it.
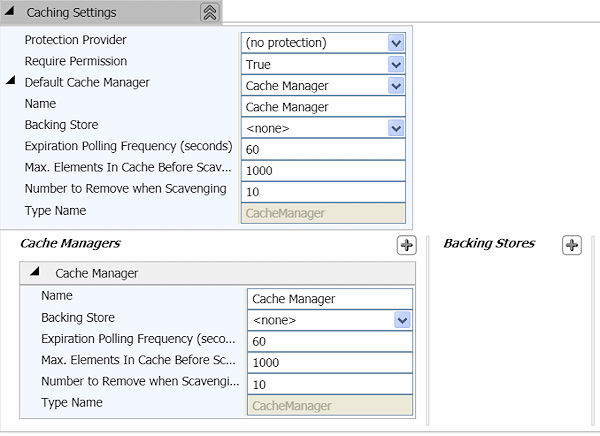
- (Optional) Rename the CacheManager node. The default name is CacheManager.
- (Optional) Set the Backing Store property. The default is <none> which means that the cache manager only stores data in memory. The drop-down list shows you the available backing stores you can choose from. You can add backing stores in the Backing Stores pane.
- (Optional) Set the Number to Remove when Scavenging property. This is the number of elements to remove after scavenging begins. The default setting is 10 elements.
- (Optional) Set the Max. Elements in Cache Before Scavenging property. This is the maximum number of elements that can be in the cache before scavenging. The default setting is 1000 elements.
- (Optional) Set the Expiration Polling Frequency property. This is the frequency of the timer that regulates how often the background scheduler checks for expired items. The unit is seconds, and the default setting is 60.
By default, the cache stores items only in memory and assigns the value of the backing store to NullBackingStore. You can add caching stores and then configure the Caching Application Block to use any of the stores you have added. You can configure the Caching Application Block to use database cache storage, isolated storage, or custom cache storage. Database cache storage uses the Data Access Application Block.
To add database cache storage and configure the Caching Application Block to use it
- Click the plus sign icon in the Backing Stores pane, point to Add Backing Stores and click Add DataCacheStorage.
- The configuration tool automatically adds the Database Settings section. For information about configuring this section, see The Data Access Application Block documentation.
- Click the properties expander arrow in the new DataCacheStorage section to open the list of properties.
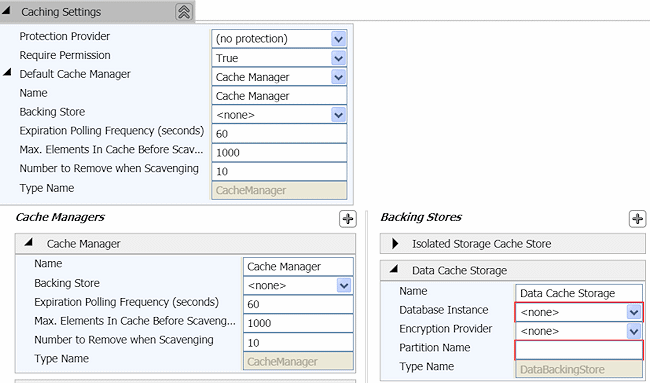
- (Optional) Set the Name property by renaming the DataCacheStorage node.
- Set the Database Instance property by making a selection from the text box drop-down list. This is the name of the database connection string. It must correspond to the name of a connection string in the Database Settings section.
- If you want to encrypt the information stored in the database, you must have configured an encryption provider. To add a new encryption provider, click the plus sign icon in the Encryption Providers pane of the Caching Settings section, point to Add Encryption Providers and then click Add Symmetric Crypto Provider (this is the only encryption provider offered). The configuration tool automatically adds the Cryptography Settings section.
- In the Cryptography Settings section (not the Caching Settings section), add a symmetric cryptography provider to the configuration. For information about configuring this block, see The Cryptography Application Block documentation.
- In the Caching Settings section, select the new symmetric encryption provider you configured in the Cryptography Settings section or an existing encryption provider in that section, in the drop-down list for the Symmetric Crypto Provider property.
- In the Backing Stores pane, in the Data Cache Storage section, set the Encryption Provider property by selecting the Symmetric Crypto Provider item you just configured.
- In the Cache Managers section, select the new backing store you added in the drop-down list for the Backing Store property of the cache manager that will use this backing store.
To add isolated storage and configure the Caching Application Block to use it
- Click the plus sign icon in the Backing Stores pane, point to Add Backing Stores and click Add Isolated Storage Cache Store.
- (Optional) In the new Isolated StorageCacheStore section, set the Name property.
- Set the Partition Name property. This identifies the portion of isolated storage that the cache manager will use.
- If you want to encrypt the information stored in isolated storage, you must have configured an encryption provider. To add a new encryption provider, click the plus sign icon in the Encryption Providers pane of the Caching Settings section, point to Add Encryption Providers and then click Add Symmetric Crypto Provider (this is the only encryption provider offered). The configuration tool automatically adds the Cryptography Settings section.
- In the Cryptography Settings section (not the Caching Settings section), add a symmetric cryptography provider to the configuration. For information about configuring this block, see The Cryptography Application Block documentation.
- In the Caching Settings section, select the new symmetric encryption provider you configured in the Cryptography Settings section or an existing encryption provider in that section, in the drop-down list for the Symmetric Crypto Provider property.
- In the Backing Stores pane, in the Isolated Storage Cache Store section, set the Encryption Provider property by selecting the Symmetric Crypto Provider item you just configured.
- In the Cache Managers section, select the new backing store you added in the drop-down list for the Backing Store property of the cache manager that will use this backing store.
To add a custom cache storage provider
- Click the plus sign icon in the Backing Stores pane, point to Add Backing Stores and click Add Custom Cache Storage.
- The Type Selector dialog is displayed. Navigate to the assembly containing your custom backing store and click on it. The store will be added and displayed in the Backing Stores pane.
- (Optional) In the new custom store section, set the Name property.
- If the custom backing store requires any other configuration values to be provided, add these as key/value pairs to the configuration by typing them into the Key and Value text boxes. As you enter a value, the configuration tool displays a new row in this section. Click the cross button to remove a name/value pair.
If you want to add another cache manager to your application configuration, click the plus sign icon in the Cache Managers pane, point to Add Cache Managers and then click on the manager you wish to add. Repeat the preceding procedures. There can be only one default cache manager. Each instance of the cache manager must have a unique name.
 Usage Notes
The configuration settings for the Caching Application Block should reflect both an application's caching usage pattern and its system environment, such as the amount of available memory. For example, if an application adds items to the cache at a greater rate than it removes them when scavenging (this is a configurable setting), the cache will continue to grow. Over time, this can cause memory starvation. Use the block's performance counters to help tune the configuration settings for each application.

To report documentation errors or provide feedback on this documentation, please send email to [email protected].
Copyright © 2010 by Microsoft Corporation. All rights reserved.