Unknown
From DarkAI
2D DEMO
This
demo shows the use of the AI system in a non-3D environment and
details the methods to move entities around when the AI system cannot
move your entities automatically.
This section will detail
the AI commands used to construct this demo in the context they are
used. For general use of each command you can look them up in the
command list section of the help file.
AI Start
AI Set
Radius 10.0
The AI Start command creates the AI system and
is always called first, the Set Radius command sets the radius for
all entities and is usually the second command called. The radius
should be set in the main setup code since it can become an expensive
operation when many obstacles have already been added.
AI
Add Enemy 1,0
AI Set Entity Speed 1,70
AI Set Entity Position
1,entityX, entityY
AI Set Entity Idle Position 1,entityX,
entityY
This section creates our single enemy, in this
case the entity ID can be any value since we are not linking it with
an object and we use this value to refer to the entity from now on.
The speed, in this case, is set in pixels per second since that is
what we will be using as our units and the AI system will make sure
that any movement happens at a speed that is consistent with 70
pixels per second no matter how often AI Update is called. We then
set our entity to a position on the screen using a predefined X and Y
position, we must also set the position we want the entity to return
to when it becomes idle (i.e. Bored) since our entity defaults to
automatic mode.
AI Start New Obstacle
AI Add Obstacle
Vertex 5,310
AI Add Obstacle Vertex 5,330
AI Add Obstacle
Vertex 500,330
AI Add Obstacle Vertex 500,310
AI End New
Obstacle 0,1
AI Start New Obstacle
AI Add Obstacle Vertex
140,180
AI Add Obstacle Vertex 140,200
AI Add Obstacle Vertex
635,200
AI Add Obstacle Vertex 635,180
AI End New Obstacle
0,1
rem Boundary
AI Start New Obstacle
AI Add Obstacle
Vertex 0,0
AI Add Obstacle Vertex 640,0
AI Add Obstacle Vertex
640,480
AI Add Obstacle Vertex 0,480
AI End New Obstacle
0,1
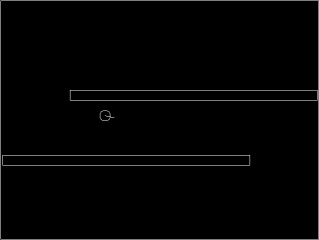
This section (in the MakeLevel function) creates all
our obstacles, since we cannot use AI Add Static Obstacle when not
using DarkBasic objects. The first two create the two long walls in
the middle of the demo, in a clockwise direction for obstacles, and
the third creates a boundary which surrounds the visible area, in an
anti-clockwise direction, to prevent the entity leaving the screen.
Remember the AI system is still using an X, Z system so the
co-ordinates should be specified in clockwise as if looking down on
to the X, Z axes even though we are using a 2D co-ordinate
system.
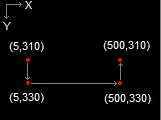
For example, the first obstacles uses the corners
(5,310) (5,330) (500,330) (500,310) in that order. If we were to draw
that on the screen taking the co-ordinates as X,Y values (where 0,0
is in the top left corner) we would be drawing in an anti-clockwise
direction:
But from the AI's point of view it is being defined in X,Z co-ordinates (where 0,0 is in the centre of the screen) in which case we are drawing in a clockwise direction:
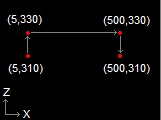
It
is the AI's point of view which is important, and which ultimately
defines whether the obstacle is a boundary or localized obstacle so
always order your points as if you are drawing in the X,Z system no
matter how it may appear in your co-ordinate system.
The third
obstacle in the list is the boundary which prevents the entity
leaving the screen, so is specified in an anti-clockwise direction
(in X,Z co-ordinates) effectively making everything 'behind' it one
big obstacle.
At this point the AI setup is complete and we
enter our main loop where we call AI Update to start updating our
system. These commands are included in our main loop.
entityX
= int( AI Get Entity X(1) )
entityY = int( AI Get Entity Z(1)
)
angle# = AI Get Entity Angle Y(1)
if mouseclick()=1 then
AI Entity Go To Position 1,mousex(),mousey()
AI Update
The
first three commands get the updated position and angle of the entity
so that it can be drawn to the screen, the entity position is updated
after every call to AI Update and since we are not using DarkBasic
objects we need to position the entity ourselves. The next command
sets a new destination for the entity when the mouse is clicked, the
entity will then begin moving towards the destination, wait a while,
then move back to its idle position.