ZONES DEMO
This
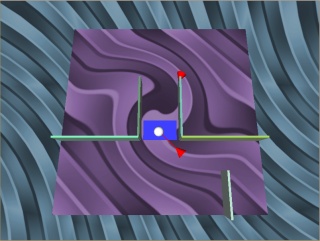
demo shows the zone feature and how it can be assigned to entities to
trigger a response, and also has a user controlled object that acts
as a player in the AI system. It creates two entities and positions
them out of sight of the player, and a zone (blue) which is assigned
to both entities. When the player moves over the zone the entities
will be notified and move to attack the player, even though they have
not seen the player themselves. If the player leaves the zone the
entities will still check out the area the player entered but unless
they can see the player they will return to their idle positions.
This demo also shows how you can create a basic visual attack, like a laser, by drawing a line between the entity and its target. This demo will not cover the setup of obstacles, you should review the path finding demo for details on obstacle setup. The only point to note on obstacles with this demo is the use of convex (in this case square) obstacles to create more complex walls, as long as the walls are no more than than the entity radius apart they will overlap and create a solid wall. This document will cover the AI commands used to create and control the demo in the context they are used.
dim shootTimer(3) as float
This line creates an array that we will use to store a timer for each entity to prevent entities firing too quickly. The AI system will return the 'ready to fire' signal continuously whilst an entity can see a valid target so we must handle delayed firing in DarkBasic to prevent continuous fire. Or we could not if continuous fire is what we wanted, but for this demo we will handle delayed firing.
AI Add Zone 1,-10,-15,10,-5
make object box 11,17,0.1,10
position object 11,0,0.05,-10
color object 11,rgb(0,0,255)
AI Entity Assign Zone 2,1
AI Entity Assign Zone 3,1
This creates the zone and makes the blue object to show it on screen, which is not required for the zone to function it is just used to display the extent of the zone. The zone is specified using the minimum and maximum corners relative to the X,Z co-ordinate system, (-10,-15) is the bottom left corner of the zone and (10,-5) is the top right corner of the zone. The first two values must always be lower than the last two so (10,-15) (-10,-5) is incorrect. Zones can only be rectangular, and cannot be rotated. We then assign our two entities to this zone so that they will be notified when the player enters it.
make object sphere 1,5
position object 1,20,2.5,-40
AI Add Player 1
Next we create a sphere to represent the player and add it to the AI system. This is all we need to do for the player since the AI system will now read the player object's position automatically every frame and update its internal values since the default values link the player to the object.
After some debugging controls and display output we come to calling AI Update and displaying any attacks that are currently occurring.
To position the attack object for this entity we take the co-ordinates of the target the entity is firing at and the current position of the entity and average them to place the attack object between the two (stored in dx# and dz#). Next we calculate the distance between the entity and its target to be able to scale the attack object the correct length to reach between the two. Finally we calculate the Y angle between the two to rotate the attack object correctly and apply all the values to the object (i+1000). Then the entity timer is reset to 100 to prevent the entity firing again until it has reached zero.
The entity timer is decreased every frame by a value that is proportional to the frame rate, stored in speed#, to make sure the entities fire at roughly the same rate no matter the frame rate.
This demo also shows how you can create a basic visual attack, like a laser, by drawing a line between the entity and its target. This demo will not cover the setup of obstacles, you should review the path finding demo for details on obstacle setup. The only point to note on obstacles with this demo is the use of convex (in this case square) obstacles to create more complex walls, as long as the walls are no more than than the entity radius apart they will overlap and create a solid wall. This document will cover the AI commands used to create and control the demo in the context they are used.
dim shootTimer(3) as float
This line creates an array that we will use to store a timer for each entity to prevent entities firing too quickly. The AI system will return the 'ready to fire' signal continuously whilst an entity can see a valid target so we must handle delayed firing in DarkBasic to prevent continuous fire. Or we could not if continuous fire is what we wanted, but for this demo we will handle delayed firing.
-
for i = 2 to 3
-
make object i,1,0
position object i,(i-2)*40 – 20,2.5,15
color object i,rgb(255,0,0)
make object i+1000,2,1
set object light i+1000,0
hide object i+1000
AI Add Enemy i
AI Set Entity Speed i,10.0
AI Set Entity View Arc i,90,170
AI Set Entity View Range i,50
AI Set Entity Can Strafe i,0
AI Add Zone 1,-10,-15,10,-5
make object box 11,17,0.1,10
position object 11,0,0.05,-10
color object 11,rgb(0,0,255)
AI Entity Assign Zone 2,1
AI Entity Assign Zone 3,1
This creates the zone and makes the blue object to show it on screen, which is not required for the zone to function it is just used to display the extent of the zone. The zone is specified using the minimum and maximum corners relative to the X,Z co-ordinate system, (-10,-15) is the bottom left corner of the zone and (10,-5) is the top right corner of the zone. The first two values must always be lower than the last two so (10,-15) (-10,-5) is incorrect. Zones can only be rectangular, and cannot be rotated. We then assign our two entities to this zone so that they will be notified when the player enters it.
make object sphere 1,5
position object 1,20,2.5,-40
AI Add Player 1
Next we create a sphere to represent the player and add it to the AI system. This is all we need to do for the player since the AI system will now read the player object's position automatically every frame and update its internal values since the default values link the player to the object.
After some debugging controls and display output we come to calling AI Update and displaying any attacks that are currently occurring.
-
for i = 2 to 3
-
if AI Entity Exist(i)=1
-
if AI Get Entity Can Fire(i) and shootTimer(i)<=0
-
tx# = AI Get Entity Target X(i)
tz# = AI Get Entity Target Z(i)
x# = object position x(i)
z# = object position z(i)
dx# = ( x# + tx# ) / 2.0
dz# = ( z# + tz# ) / 2.0
dist# = sqrt ( (tx#-x#)*(tx#-x#) + (tz#-z#)*(tz#-z#) )
ang# = acos ( (tz#-z#) / dist# )
if ( (tx#-x#) < 0 ) then ang# = 360 – ang#
position object i+1000,dx#,2.5,dz#
yrotate object i+1000,ang#+0.1
scale object i+1000,100,100,100*dist#
show object i+1000
shootTimer(i)=100
if shootTimer(i)>0 then shootTimer(i) = shootTimer(i)-(speed#*3)
To position the attack object for this entity we take the co-ordinates of the target the entity is firing at and the current position of the entity and average them to place the attack object between the two (stored in dx# and dz#). Next we calculate the distance between the entity and its target to be able to scale the attack object the correct length to reach between the two. Finally we calculate the Y angle between the two to rotate the attack object correctly and apply all the values to the object (i+1000). Then the entity timer is reset to 100 to prevent the entity firing again until it has reached zero.
The entity timer is decreased every frame by a value that is proportional to the frame rate, stored in speed#, to make sure the entities fire at roughly the same rate no matter the frame rate.