| Tutorial |
 Connector/Net Tutorials
Tutorial: An Introduction to Connector/Net Programming
Connector/Net Tutorials
Tutorial: An Introduction to Connector/Net Programming
This section provides a gentle introduction to programming with Connector/Net. The example code is written in C#, and is designed to work on both Microsoft .NET Framework and Mono.
This tutorial is designed to get you up and running with Connector/Net as quickly as possible, it does not go into detail on any particular topic. However, the following sections of this manual describe each of the topics introduced in this tutorial in more detail. In this tutorial you are encouraged to type in and run the code, modifying it as required for your setup.
This tutorial assumes you have MySQL and Connector/Net already installed. It also assumes that you have installed the World example database, which can be downloaded from the MySQL Documentation page. You can also find details on how to install the database on the same page.
 Note Note |
|---|
|
Before compiling the example code, make sure that you have added References to your project as required. The References required are System, System.Data and MySql.Data. |
The MySqlConnection Object
For your Connector/Net application to connect to a MySQL database, it must establish a connection by using a MySqlConnection object.
The MySqlConnection constructor takes a connection string as one of its parameters. The connection string provides necessary information to make the connection to the MySQL database. The connection string is discussed more fully in Connecting to MySQL Using Connector/Net. For a list of supported connection string options, see Connection Options.
The following code shows how to create a connection object:
using System;
using System.Data;

using MySql.Data;
using MySql.Data.MySqlClient;

public class Tutorial1
{
    public static void Main()
    {
        string connStr = "server=localhost;user=root;database=world;port=3306;password=******;";
        MySqlConnection conn = new MySqlConnection(connStr);
        try
        {
            Console.WriteLine("Connecting to MySQL...");
            conn.Open();
            // Perform database operations
        }
        catch (Exception ex)
        {
            Console.WriteLine(ex.ToString());
        }
        conn.Close();
        Console.WriteLine("Done.");
    }
}
When the MySqlConnection constructor is invoked, it returns a connection object, which is used for subsequent database operations. Open the connection before any other operations take place. Before the application exits, close the connection to the database by calling Close on the connection object.
Sometimes an attempt to perform an Open on a connection object can fail, generating an exception that can be handled using standard exception handling code.
In this section you have learned how to create a connection to a MySQL database, and open and close the corresponding connection object.
The MySqlCommand Object
Once a connection has been established with the MySQL database, the next step is do carry out the desired database operations. This can be achieved through the use of the MySqlCommand object.
You will see how to create a MySqlCommand object. Once it has been created, there are three main methods of interest that you can call:
-
ExecuteReader - used to query the database. Results are usually returned in a MySqlDataReader object, created by ExecuteReader.
-
ExecuteNonQuery - used to insert and delete data.
-
ExecuteScalar - used to return a single value.
Once a MySqlCommand object has been created, you will call one of the above methods on it to carry out a database operation, such as perform a query. The results are usually returned into a MySqlDataReader object, and then processed, for example the results might be displayed. The following code demonstrates how this could be done.
using System;
using System.Data;

using MySql.Data;
using MySql.Data.MySqlClient;

public class Tutorial2
{
    public static void Main()
    {
        string connStr = "server=localhost;user=root;database=world;port=3306;password=******;";
        MySqlConnection conn = new MySqlConnection(connStr);
        try
        {
            Console.WriteLine("Connecting to MySQL...");
            conn.Open();

            string sql = "SELECT Name, HeadOfState FROM Country WHERE Continent='Oceania'";
            MySqlCommand cmd = new MySqlCommand(sql, conn);
            MySqlDataReader rdr = cmd.ExecuteReader();

            while (rdr.Read())
            {
                Console.WriteLine(rdr[0]+" -- "+rdr[1]);
            }
            rdr.Close();
        }
        catch (Exception ex)
        {
            Console.WriteLine(ex.ToString());
        }

        conn.Close();
        Console.WriteLine("Done.");
    }
}
When a connection has been created and opened, the code then creates a MySqlCommand object. Note that the SQL query to be executed is passed to the MySqlCommand constructor. The ExecuteReader method is then used to generate a MySqlReader object. The MySqlReader object contains the results generated by the SQL executed on the command object. Once the results have been obtained in a MySqlReader object, the results can be processed. In this case, the information is printed out by a while loop. Finally, the MySqlReader object is disposed of by running its Close method on it.
In the next example, you will see how to use the ExecuteNonQuery method.
The procedure for performing an ExecuteNonQuery method call is simpler, as there is no need to create an object to store results. This is because ExecuteNonQuery is only used for inserting, updating and deleting data. The following example illustrates a simple update to the Country table:
using System;
using System.Data;

using MySql.Data;
using MySql.Data.MySqlClient;

public class Tutorial3
{
    public static void Main()
    {
        string connStr = "server=localhost;user=root;database=world;port=3306;password=******;";
        MySqlConnection conn = new MySqlConnection(connStr);
        try
        {
            Console.WriteLine("Connecting to MySQL...");
            conn.Open();

            string sql = "INSERT INTO Country (Name, HeadOfState, Continent) VALUES ('Disneyland','Mickey Mouse', 'North America')";
            MySqlCommand cmd = new MySqlCommand(sql, conn);
            cmd.ExecuteNonQuery();
        }
        catch (Exception ex)
        {
            Console.WriteLine(ex.ToString());
        }

        conn.Close();
        Console.WriteLine("Done.");
    }
}
The query is constructed, the command object created and the ExecuteNonQuery method called on the command object. You can access your MySQL database with the command interpreter and verify that the update was carried out correctly.
Finally, you will see how the ExecuteScalar method can be used to return a single value. Again, this is straightforward, as a MySqlDataReader object is not required to store results, a simple variable will do. The following code illustrates how to use ExecuteScalar:
using System;
using System.Data;

using MySql.Data;
using MySql.Data.MySqlClient;

public class Tutorial4
{
    public static void Main()
    {
        string connStr = "server=localhost;user=root;database=world;port=3306;password=******;";
        MySqlConnection conn = new MySqlConnection(connStr);
        try
        {
            Console.WriteLine("Connecting to MySQL...");
            conn.Open();

            string sql = "SELECT COUNT(*) FROM Country";
            MySqlCommand cmd = new MySqlCommand(sql, conn);
            object result = cmd.ExecuteScalar();
            if (result != null)
            {
                int r = Convert.ToInt32(result);
                Console.WriteLine("Number of countries in the World database is: " + r);
            }

        }
        catch (Exception ex)
        {
            Console.WriteLine(ex.ToString());
        }

        conn.Close();
        Console.WriteLine("Done.");
    }
}
This example uses a simple query to count the rows in the Country table. The result is obtained by calling ExecuteScalar on the command object.
Working with Decoupled Data
Previously, when using MySqlDataReader, the connection to the database was continually maintained, unless explicitly closed. It is also possible to work in a manner where a connection is only established when needed. For example, in this mode, a connection could be established to read a chunk of data, the data could then be modified by the application as required. A connection could then be reestablished only if and when the application writes data back to the database. This decouples the working data set from the database.
This decoupled mode of working with data is supported by Connector/Net. There are several parts involved in allowing this method to work:
-
Data Set - The Data Set is the area in which data is loaded to read or modify it. A DataSet object is instantiated, which can store multiple tables of data.
-
Data Adapter - The Data Adapter is the interface between the Data Set and the database itself. The Data Adapter is responsible for efficiently managing connections to the database, opening and closing them as required. The Data Adapter is created by instantiating an object of the MySqlDataAdapter class. The MySqlDataAdapter object has two main methods: Fill which reads data into the Data Set, and Update, which writes data from the Data Set to the database.
-
Command Builder - The Command Builder is a support object. The Command Builder works in conjunction with the Data Adapter. When a MySqlDataAdapter object is created, it is typically given an initial SELECT statement. From this SELECT statement the Command Builder can work out the corresponding INSERT, UPDATE and DELETE statements that would be required to update the database. To create the Command Builder, an object of the class MySqlCommandBuilder is created.
Each of these classes will now be discussed in more detail.
Instantiating a DataSet object
A DataSet object can be created simply, as shown in the following example code snippet:
DataSet dsCountry;
...
dsCountry = new DataSet();
Although this creates the DataSet object, it has not yet filled it with data. For that, a Data Adapter is required.
Instantiating a MySqlDataAdapter object
The MySqlDataAdapter can be created as illustrated by the following example:
MySqlDataAdapter daCountry;
...
string sql = "SELECT Code, Name, HeadOfState FROM Country WHERE Continent='North America'";
daCountry = new MySqlDataAdapter (sql, conn);
Note, the MySqlDataAdapter is given the SQL specifying the data to work with.
Instantiating a MySqlCommandBuilder object
Once the MySqlDataAdapter has been created, it is necessary to generate the additional statements required for inserting, updating and deleting data. There are several ways to do this, but in this tutorial you will see how this can most easily be done with MySqlCommandBuilder. The following code snippet illustrates how this is done:
MySqlCommandBuilder cb = new MySqlCommandBuilder(daCountry);
Note that the MySqlDataAdapter object is passed as a parameter to the command builder.
Filling the Data Set
To do anything useful with the data from your database, you need to load it into a Data Set. This is one of the jobs of the MySqlDataAdapter object, and is carried out with its Fill method. The following example code illustrates this:
DataSet dsCountry;
...
dsCountry = new DataSet();
...
daCountry.Fill(dsCountry, "Country");
Note the Fill method is a MySqlDataAdapter method, the Data Adapter knows how to establish a connec tion with the database and retrieve the required data, and then populates the Data Set when the Fill method is called. The second parameter is the table in the Data Set to update.
Updating the Data Set
The data in the Data Set can now be manipulated by the application as required. At some point, changes to data will need to be written back to the database. This is achieved through a MySqlDataAdapter method, the Update method.
daCountry.Update(dsCountry, "Country");
Again, the Data Set and the table within the Data Set to update are specified.
Working Example
The interactions between the DataSet, MySqlDataAdapter and MySqlCommandBuilder classes can be a little confusing, so their operation can perhaps be best illustrated by working code.
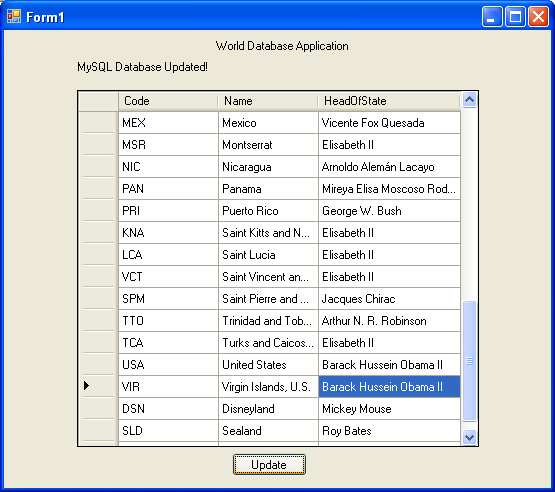
In this example, data from the World database is read into a Data Grid View control. Here, the data can be viewed and changed before clicking an update button. The update button then activates code to write changes back to the database. The code uses the principles explained above. The application was built using the Microsoft Visual Studio to place and create the user interface controls, but the main code that uses the key classes described above is shown below, and is portable.
using System;
using System.Collections.Generic;
using System.ComponentModel;
using System.Data;
using System.Drawing;
using System.Linq;
using System.Text;
using System.Windows.Forms;

using MySql.Data;
using MySql.Data.MySqlClient;

namespace WindowsFormsApplication5
{
    public partial class Form1 : Form
    {
        MySqlDataAdapter daCountry;
        DataSet dsCountry;

        public Form1()
        {
            InitializeComponent();
        }

        private void Form1_Load(object sender, EventArgs e)
        {

            string connStr = "server=localhost;user=root;database=world;port=3306;password=******;";
            MySqlConnection conn = new MySqlConnection(connStr);
            try
            {
                label2.Text = "Connecting to MySQL...";

                string sql = "SELECT Code, Name, HeadOfState FROM Country WHERE Continent='North America'";
                daCountry = new MySqlDataAdapter (sql, conn);
                MySqlCommandBuilder cb = new MySqlCommandBuilder(daCountry);

                dsCountry = new DataSet();
                daCountry.Fill(dsCountry, "Country");
                dataGridView1.DataSource = dsCountry;
                dataGridView1.DataMember = "Country";
            }
            catch (Exception ex)
            {
                label2.Text = ex.ToString();
            }
        }

        private void button1_Click(object sender, EventArgs e)
        {
            daCountry.Update(dsCountry, "Country");
            label2.Text = "MySQL Database Updated!";
        }

    }
}
The application running is shown below:
 Working with Parameters
This part of the tutorial shows you how to use parameters in your Connector/Net application.
Although it is possible to build SQL query strings directly from user input, this is not advisable as it does not prevent erroneous or malicious information being entered. It is safer to use parameters as they will be processed as field data only. For example, imagine the following query was constructed from user input:
string sql = "SELECT Name, HeadOfState FROM Country WHERE Continent = "+user_continent;
If the string user_continent came from a Text Box control, there would potentially be no control over the string entered by the user. The user could enter a string that generates a run time error, or in the worst case actually harms the system. When using parameters it is not possible to do this because a parameter is only ever treated as a field parameter, rather than an arbitrary piece of SQL code.
The same query written user a parameter for user input would be:
string sql = "SELECT Name, HeadOfState FROM Country WHERE Continent = @Continent";
Note that the parameter is preceded by an '@' symbol to indicate it is to be treated as a parameter.
As well as marking the position of the parameter in the query string, it is necessary to add a parameter to the Command object. This is illustrated by the following code snippet:
cmd.Parameters.AddWithValue("@Continent", "North America");
In this example the string "North America" is supplied as the parameter value statically, but in a more practical example it would come from a user input control.
A further example illustrates the complete process:
using System;
using System.Data;

using MySql.Data;
using MySql.Data.MySqlClient;

public class Tutorial5
{
    public static void Main()
    {
        string connStr = "server=localhost;user=root;database=world;port=3306;password=******;";
        MySqlConnection conn = new MySqlConnection(connStr);
        try
        {
            Console.WriteLine("Connecting to MySQL...");
            conn.Open();

            string sql = "SELECT Name, HeadOfState FROM Country WHERE Continent=@Continent";
            MySqlCommand cmd = new MySqlCommand(sql, conn);

            Console.WriteLine("Enter a continent e.g. 'North America', 'Europe': ");
            string user_input = Console.ReadLine();

            cmd.Parameters.AddWithValue("@Continent", user_input);

            MySqlDataReader rdr = cmd.ExecuteReader();

            while (rdr.Read())
            {
                Console.WriteLine(rdr["Name"]+" --- "+rdr["HeadOfState"]);
            }
            rdr.Close();
        }
        catch (Exception ex)
        {
            Console.WriteLine(ex.ToString());
        }

        conn.Close();
        Console.WriteLine("Done.");
    }
}
In this part of the tutorial you have see how to use parameters to make your code more secure.
Working with Stored Procedures
In this section, you will see how to work with stored procedures. This section assumes you have a basic understanding of what a stored procedure is, and how to create one.
For the purposes of this tutorial, you will create a simple Stored Procedure to see how it can be called from Connector/Net. In the MySQL Client program, connect to the World database and enter the following stored procedure:
DELIMITER //
CREATE PROCEDURE country_hos
(IN con CHAR(20))
BEGIN
  SELECT Name, HeadOfState FROM Country
  WHERE Continent = con;
END //
DELIMITER ;
Test that the stored procedure works as expected by typing the following into the command interpreter:
CALL country_hos('Europe');
Note that The stored routine takes a single parameter, which is the continent to restrict your search to.
Having confirmed that the stored procedure is present and correct, you can see how to access it from Connector/Net.
Calling a stored procedure from your Connector/Net application is similar to techniques you have seen earlier in this tutorial. A MySqlCommand object is created, but rather than taking an SQL query as a parameter, it takes the name of the stored procedure to call. Set the MySqlCommand object to the type of stored procedure, as shown by the following code snippet:
string rtn = "country_hos";
MySqlCommand cmd = new MySqlCommand(rtn, conn);
cmd.CommandType = CommandType.StoredProcedure;
In this case, the stored procedure requires you to pass a parameter. This can be achieved using the techniques seen in the previous section on parameters, Working with Parameters, as shown in the following code snippet:
cmd.Parameters.AddWithValue("@con", "Europe");
The value of the parameter @con could more realistically have come from a user input control, but for simplicity it is set as a static string in this example.
At this point, everything is set up and you can call the routine using techniques also learned in earlier sections. In this case, the ExecuteReader method of the MySqlCommand object is used.
Complete working code for the stored procedure example is shown below:
using System;
using System.Data;

using MySql.Data;
using MySql.Data.MySqlClient;

public class Tutorial6
{
    public static void Main()
    {
        string connStr = "server=localhost;user=root;database=world;port=3306;password=******;";
        MySqlConnection conn = new MySqlConnection(connStr);
        try
        {
            Console.WriteLine("Connecting to MySQL...");
            conn.Open();

            string rtn = "country_hos";
            MySqlCommand cmd = new MySqlCommand(rtn, conn);
            cmd.CommandType = CommandType.StoredProcedure;

            cmd.Parameters.AddWithValue("@con", "Europe");

            MySqlDataReader rdr = cmd.ExecuteReader();
            while (rdr.Read())
            {
                Console.WriteLine(rdr[0] + " --- " + rdr[1]);
            }
            rdr.Close();
        }
        catch (Exception ex)
        {
            Console.WriteLine(ex.ToString());
        }

        conn.Close();
        Console.WriteLine("Done.");
    }
}
In this section, you have seen how to call a stored procedure from Connector/Net. For the moment, this concludes our introductory tutorial on programming with Connector/Net.
Tutorial: ASP.NET Membership and Role Provider
Many web sites feature the facility for the user to create a user account. They can then log into the web site and enjoy a personalized experience. This requires that the developer creates database tables to store user information, along with code to gather and process this data. This represents a burden on the developer, and there is the possibility for security issues to creep into the developed code. However, ASP.NET 2.0 introduced the Membership system. This system is designed around the concept of Membership, Profile and Role Providers, which together provide all of the functionality to implement a user system, that previously would have to have been created by the developer from scratch.
Currently, provides Membership, Role, Profile and Session State Providers.
This tutorial shows you how to set up your ASP.NET web application to use the Membership and Role Providers. It assumes that you have MySQL Server installed, along with and Microsoft Visual Studio. This tutorial was tested with 6.0.4 and Microsoft Visual Studio 2008 Professional Edition. It is recommended you use 6.0.4 or above for this tutorial.
-
Create a new database in the MySQL Server using the MySQL Command Line Client program (mysql), or other suitable tool. It does not matter what name is used for the database, but record it. You specify it in the connection string constructed later in this tutorial. This database contains the tables, automatically created for you later, used to store data about users and roles.
-
Create a new ASP.NET Web Site in Visual Studio. If you are not sure how to do this, refer to Tutorial: Databinding in ASP.NET using LINQ on Entities, which demonstrates how to create a simple ASP.NET web site.
-
Add References to MySql.Data and MySql.Web to the web site project.
-
Locate the machine.config file on your system, which is the configuration file for the .NET Framework.
-
Search the machine.config file to find the membership provider MySQLMembershipProvider.
-
Add the attribute autogenerateschema="true". The appropriate section should now resemble the following (note: for the sake of brevity some information has been excluded):
<membership>
 <providers>
   <add name="AspNetSqlMembershipProvider"
     type="System.Web.Security.SqlMembershipProvider"
     ...
     connectionStringName="LocalSqlServer"
     ... />
   <add name="MySQLMembershipProvider"
     autogenerateschema="true"
     type="MySql.Web.Security.MySQLMembershipProvider, MySql.Web, Version=6.0.4.0, Culture=neutral, PublicKeyToken=c5687fc88969c44d"
     connectionStringName="LocalMySqlServer"
     ... />
 </providers>
</membership>
Note that the name for the connection string to be used to connect to the server that contains the membership database is LocalMySqlServer.
The autogenerateschema="true" attribute will cause to silently create, or upgrade, the schema on the database server, to contain the required tables for storing membership information.
-
It is now necessary to create the connection string referenced in the previous step. Load the web site's web.config file into Visual Studio.
-
Locate the section marked <connectionStrings>. Add the following connection string information:
<connectionStrings>
  <remove name="LocalMySqlServer"/>
  <add name="LocalMySqlServer"
       connectionString="Datasource=localhost;Database=users;uid=root;pwd=password;"
       providerName="MySql.Data.MySqlClient"/>
</connectionStrings>
The database specified is the one created in the first step. You could alternatively have used an existing database.
-
At this point build the solution to ensure no errors are present. This can be done by selecting Build, Build Solution from the main menu, or pressing .
-
ASP.NET supports the concept of locally and remotely authenticated users. With local authentication the user is validated using their Windows credentials when they attempt to access the web site. This can be useful in an Intranet environment. With remote authentication, a user is prompted for their login details when accessing the web site, and these credentials are checked against the membership information stored in a database server such as MySQL Server. You will now see how to choose this form of authentication.
Start the ASP.NET Web Site Administration Tool. This can be done quickly by clicking the small hammer/Earth icon in the Solution Explorer. You can also launch this tool by selecting Website, ASP.NET Configuration from the main menu.
-
In the ASP.NET Web Site Administration Tool click the tab.
-
Now click the link.
-
Select the radio button. The web site will now need to provide a form to allow the user to enter their login details. These will be checked against membership information stored in the MySQL database.
Authentication Type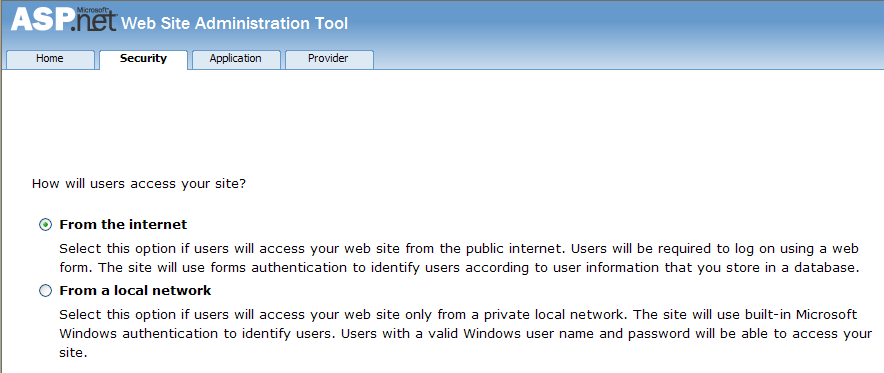
-
You now need to specify the Role and Membership Provider to be used. Click the tab.
-
Click the link.
-
Now select the and the radio buttons.
Select Membership and Role Provider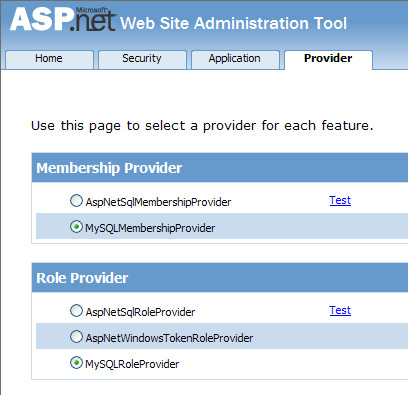
-
In Visual Studio, rebuild the solution by selecting Build, Rebuild Solution from the main menu.
-
Check that the necessary schema has been created. This can be achieved using the command interpreter.
Membership and Role Provider Tables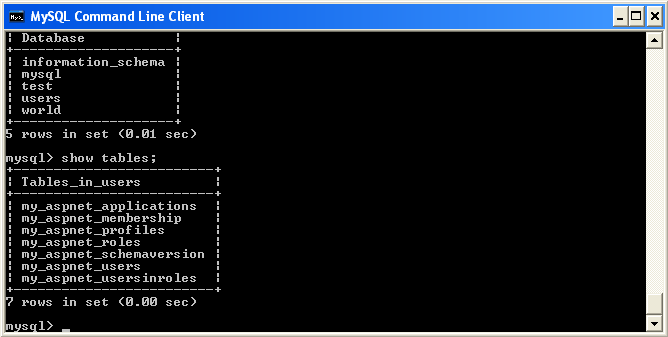
-
Assuming all is present and correct, you can now create users and roles for your web application. The easiest way to do this is with the ASP.NET Web Site Administration Tool. However, many web applications contain their own modules for creating roles and users. For simplicity, the ASP.NET Web Site Administration Tool will be used in this tutorial.
-
In the ASP.NET Web Site Administration Tool, click the tab. Now that both the Membership and Role Provider are enabled, you will see links for creating roles and users. Click the link.
Security Tab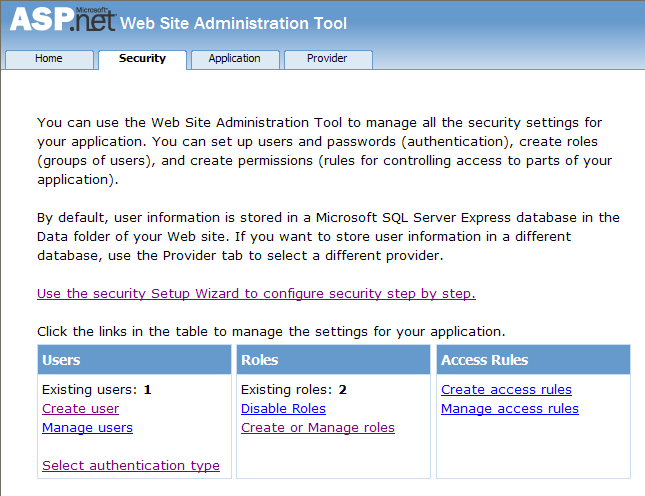
-
You can now enter the name of a new Role and click Add Role to create the new Role. Create new Roles as required.
-
Click the Back button.
-
Click the link. You can now fill in information about the user to be created, and also allocate that user to one or more Roles.
Create User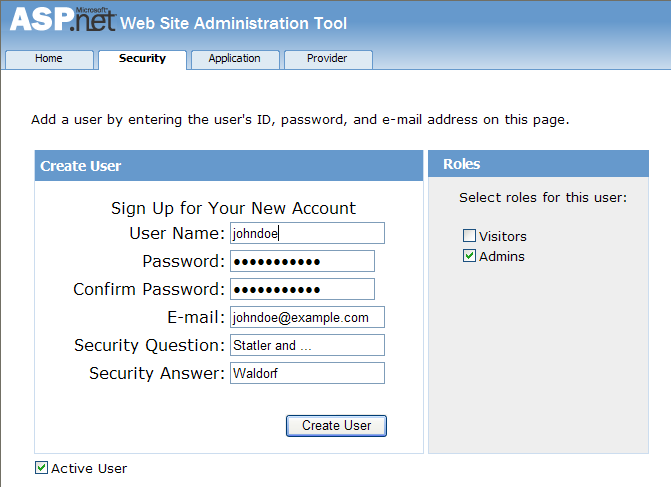
-
Using the command interpreter, you can check that your database has been correctly populated with the Membership and Role data.
Membership and Roles Table Contents
In this tutorial, you have seen how to set up the Membership and Role Providers for use in your ASP.NET web application.
Tutorial: ASP.NET Session State Provider
from version 6.1 has included a MySQL Session State Provider. This provider enables you to store session state in a MySQL database. The following tutorial shows you how to prepare to use the MySQL Session State Provider, and then store session data into the MySQL database. This tutorial uses Microsoft Visual Studio 2008 Professional Edition, 6.1.1 and MySQL Server 5.1. This tutorial also assumes you have created an empty database, for example test, where you will store session data. You could do this using the command interpreter.
-
In Visual Studio, create a new ASP.NET web site. If you are not sure how to do this, refer to the tutorial Tutorial: Databinding in ASP.NET using LINQ on Entities, which demonstrates how to do this.
-
Launch the MySQL MySQL Website Configuration tool. Due to a bug in 6.1.1, this may not appear unless you are connected to a server in the Server Explorer. If you are unfamiliar with the MySQL Website Configuration tool, consider first working through the tutorial in MySQL Website Configuration Tool.
-
Navigate through the wizard to the Session State page. Make sure the check box is selected.
-
On the same page, configure the connection string to the database that will contain your session data. If this database is empty, will create the schema required to store session data.
-
Ensure that the check box is selected so that will create the schema in your database to store the session data correctly.
-
Enter the name of your application.
-
Click Finish. The MySQL Website Configuration tool will now update your application's web.config file with information about the connection string and default providers to be used. In this case, we have selected the MySQL Session State Provider.
At this point, you are ready to use the MySQL database to store session data. To test that the set up has worked, you can write a simple program that uses session variables.
-
Open Default.aspx.cs. In the Page_Load method, add the following code:
Session["SessionVariable1"] = "Test string";
-
Build your solution.
-
Run the solution (without debugging). When the application runs, the provider will autogenerate tables required in the database you chose when setting up the application.
-
Check that the schema was in fact created. Using the MySQL Command Line Client use the target database and then type SHOW TABLES;. You will see that has created the required schema automatically, as we selected this to happen in the MySQL Website Configuration tool.
-
Now view the contents of these tables by typing SELECT * FROM my_aspnet_sessions; in the command interpreter. This will display the session data our application used. Note that this is stored in binary format so some data may not display as expected.
At this point, you have installed the Session State Provider and carried out a preliminary test of the installation. You will now work a bit more with the Session State Provider.
In this part of the tutorial, you will set and retrieve a session variable. You can work with your existing project.
-
Select the Default.aspx and switch to Design View. Add a text box and three buttons. Change the text property for the buttons to , , and . These will be Button1, Button2 and Button3 respectively. Build your solution to ensure that no errors have been introduced.
-
Still in the Design View, double-click Button1. Now to the Button1_Click event handler add code some the handler resembles the following:
protected void Button1_Click(object sender, EventArgs e)
{
    Session["SessionString"] = TextBox1.Text;
}
You have created a new Session variable accessed using the key . This will be set to the text that was entered into the text box when Button1 is clicked.
-
In Design View, double-click Button2 to add its click event handler. This button needs to clear text from the text box. The code to do this is as follows:
protected void Button2_Click(object sender, EventArgs e)
{
    TextBox1.Text = "";
}
The code simply assigns an empty string to the Text property of the text box.
-
In the Design View double-click Button3 and modify the click handler as follows:
protected void Button3_Click(object sender, EventArgs e)
{
    TextBox1.Text = (String)Session["SessionString"];
}
This will retrieve the session string and display it in the text box.
-
Now modify the Page_Load method as follows:
protected void Page_Load(object sender, EventArgs e)
{
    if (!IsPostBack)
    {
       TextBox1.Text = "Enter some text";
    }
}
This ensures that when the page loads the text box Text property is reset.
-
Ensure that the solution is saved and then rebuild the solution.
-
Run the solution without debugging.
-
The form will be displayed. Enter some text into the text box. Now click Store Session Variable. At this point you have stored the string in a session variable.
-
Now click Clear Text to clear the text box.
-
Now click Show Session Variable to retrieve and display the session variable.
-
Refresh the page to destroy the form and display a new form.
-
Click Show Session Variable the text box will display the stored session variable, demonstrating that the refreshing the page does not destroy the session variable.
This illustrates that the session state data is not destroyed when a page is reloaded.
Tutorial: ASP.NET Profile Provider
This tutorial shows you how to use the MySQL Profile Provider to store user profile information in a MySQL database. The tutorial uses 6.1.1, MySQL Server 5.1 and Microsoft Visual Studio 2008 Professional Edition.
Many modern web sites allow the user to create a personal profile. This requires a significant amount of code, but ASP.NET reduces this considerable by including the functionality in its Profile classes. The Profile Provider provides an abstraction between these classes and a data source. The MySQL Profile Provider enables profile data to be stored in a MySQL database. This enables the profile properties to be written to a persistent store, and be retrieved when required. The Profile Provider also enables profile data to be managed effectively, for example it enables profiles that have not been accessed since a specific date to be deleted.
The following steps show you how you can select the MySQL Profile Provider.
-
Create a new ASP.NET web project.
-
Select the MySQL Website Configuration tool. Due to a bug in 6.1.1 you may have to first connect to a server in Server Explorer before the tool's icon will display in the toolbar of the Solution Explorer.
-
In the MySQL Website Configuration tool navigate through the tool to the Profiles page.
-
Select the check box.
-
Select the check box.
-
Click the Edit... button and configure a connection string for the database that will be used to store user profile information.
-
Navigate to the last page of the tool and click Finish to save your changes and exit the tool.
At this point you are now ready to start using the MySQL Profile Provider. With the following steps you can carry out a preliminary test of your installation.
-
Open your web.config file.
-
Add a simple profile such as the following:
<system.web>
  <anonymousIdentification enabled="true"/>
  <profile defaultProvider="MySQLProfileProvider">
    ...
    <properties>
      <add name="Name" allowAnonymous="true"/>
      <add name="Age" allowAnonymous="true" type="System.UInt16"/>
      <group name="UI">
        <add name="Color" allowAnonymous="true" defaultValue="Blue"/>
        <add name="Style" allowAnonymous="true" defaultValue="Plain"/>
      </group>
    </properties>
  </profile>
  ...
Note that anonymousIdentification has been set to true. This enables users who have not been authenticated to use profiles. They are identified by a GUID in a cookie rather than by user name.
Now that the simple profile has been defined in web.config, the next step is to write some code to test the profile.
-
In Design View design a simple page with the following controls:
Simple Profile Application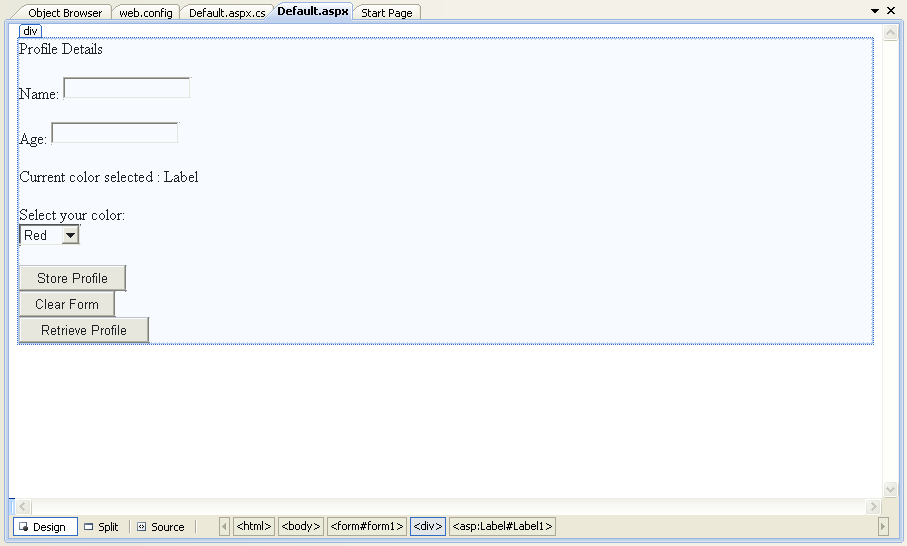
These will allow the user to enter some profile information. The user can also use the buttons to save their profile, clear the page, and restore their profile data.
-
In the Code View add code as follows:
...
protected void Page_Load(object sender, EventArgs e)
{
    if (!IsPostBack)
    {
        TextBox1.Text = Profile.Name;
        TextBox2.Text = Profile.Age.ToString();
        Label1.Text = Profile.UI.Color;
    }
}

// Store Profile
protected void Button1_Click(object sender, EventArgs e)
{
    Profile.Name = TextBox1.Text;
    Profile.Age = UInt16.Parse(TextBox2.Text);
}

// Clear Form
protected void Button2_Click(object sender, EventArgs e)
{
    TextBox1.Text = "";
    TextBox2.Text = "";
    Label1.Text = "";
}

// Retrieve Profile
protected void Button3_Click(object sender, EventArgs e)
{
    TextBox1.Text = Profile.Name;
    TextBox2.Text = Profile.Age.ToString();
    Label1.Text = Profile.UI.Color;
}

protected void DropDownList1_SelectedIndexChanged(object sender, EventArgs e)
{
    Profile.UI.Color = DropDownList1.SelectedValue;
}
...
-
Save all files and build the solution to check that no errors have been introduced.
-
Run the application.
-
Enter your name, age and select a color from the listbox. Now store this information in your profile by clicking Store Profile. Note that if you do not select a color from the listbox your profile will use the default color Blue that was specified in the web.config file.
-
Click Clear Form to clear text from the textboxes and the label that displays your chosen color.
-
Now click Retrieve Profile to restore your profile data from the MySQL database.
-
Now exit the browser to terminate the application.
-
Run the application again. Note that when the page loads your profile information is restored from the MySQL database.
In this tutorial you have seen how to using the MySQL Profile Provider with .
Tutorial: Using an Entity Framework Entity as a Windows Forms Data
Source
In this tutorial you will learn how to create a Windows Forms Data Source from an Entity in an Entity Data Model. This tutorial assumes that you have installed the World example database, which can be downloaded from the MySQL Documentation page. You can also find details on how to install the database on the same page. It will also be convenient for you to create a connection to the World database after it is installed. For instructions on how to do this see Making a Connection.
Creating a new Windows Forms application
The first step is to create a new Windows Forms application.
-
In Visual Studio, select File, New, Project from the main menu.
-
Choose the installed template. Click OK. The solution is created.
Adding an Entity Data Model
You will now add an Entity Data Model to your solution.
-
In the Solution Explorer, right-click your application and select Add, New Item.... From select . Click Add.
Add Entity Data Model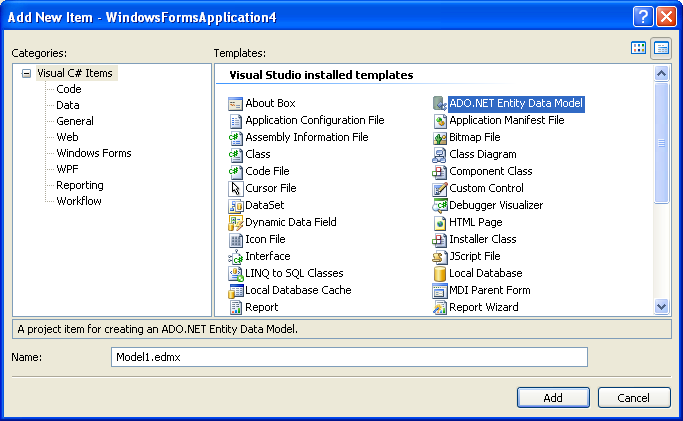
-
You will now see the Entity Data Model Wizard. You will use the wizard to generate the Entity Data Model from the world example database. Select the icon . Click Next.
Entity Data Model Wizard Screen 1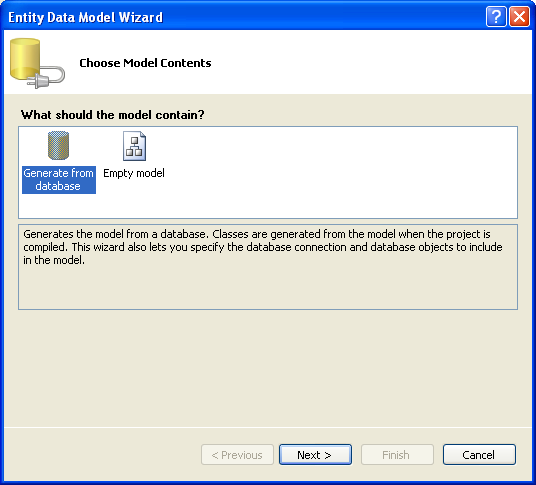
-
You can now select the connection you made earlier to the World database. If you have not already done so, you can create the new connection at this time by clicking New Connection.... For further instructions on creating a connection to a database see Making a Connection.
Entity Data Model Wizard Screen 2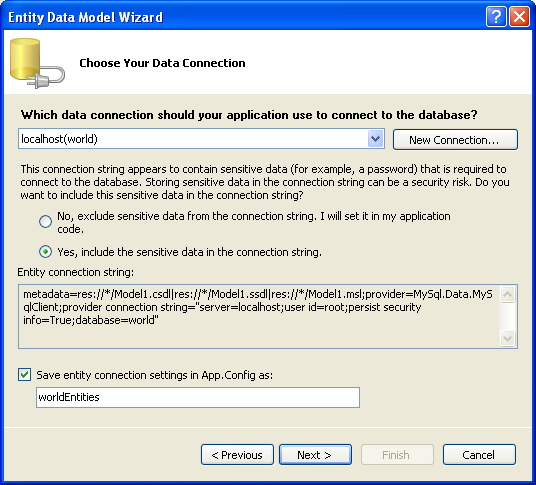
-
Make a note of the entity connection settings to be used in App.Config, as these will be used later to write the necessary control code.
-
Click Next.
-
The Entity Data Model Wizard connects to the database. You are then presented with a tree structure of the database. From this you can select the object you would like to include in your model. If you had created Views and Stored Routines these will be displayed along with any tables. In this example you just need to select the tables. Click Finish to create the model and exit the wizard.
Entity Data Model Wizard Screen 3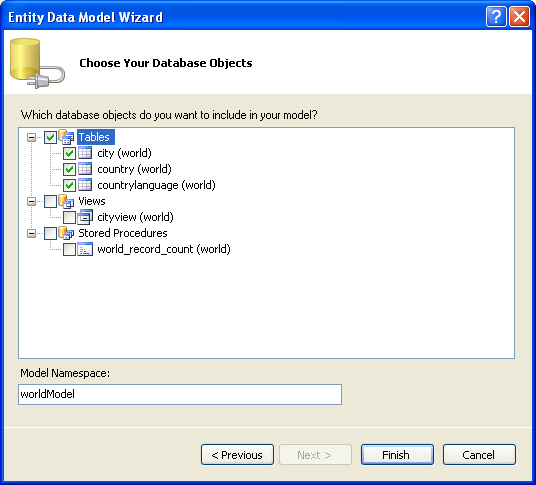
-
Visual Studio will generate the model and then display it.
Entity Data Model Diagram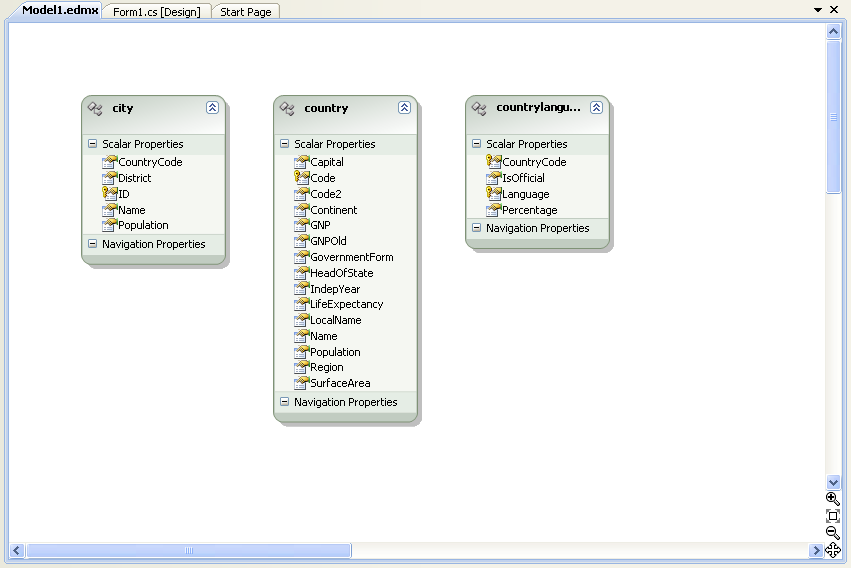
-
From the Visual Studio main menu select Build, Build Solution, to ensure that everything compiles correctly so far.
Adding a new Data Source
You will now add a new Data Source to your project and see how it can be used to read and write to the database.
-
From the Visual Studio main menu select Data, Add New Data Source.... You will be presented with the Data Source Configuration Wizard.
Entity Data Source Configuration Wizard Screen 1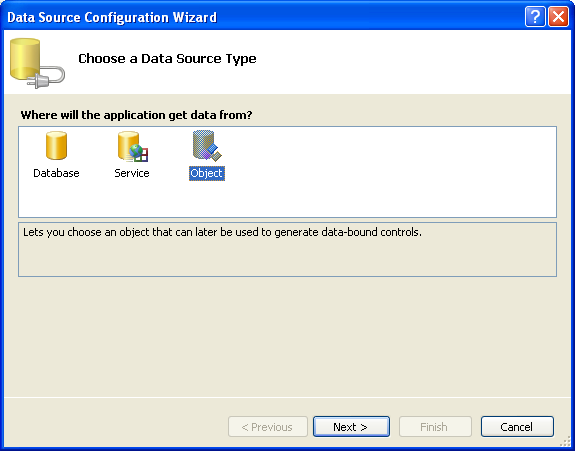
-
Select the icon. Click Next.
-
You will now select the Object to bind to. Expand the tree. In this tutorial, you will select the city table. Once the city table has been selected click Next.
Entity Data Source Configuration Wizard Screen 2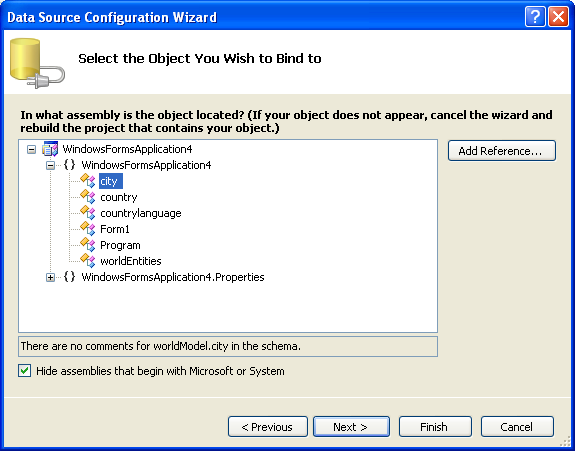
-
The wizard will confirm that the city object is to be added. Click Finish.
Entity Data Source Configuration Wizard Screen 3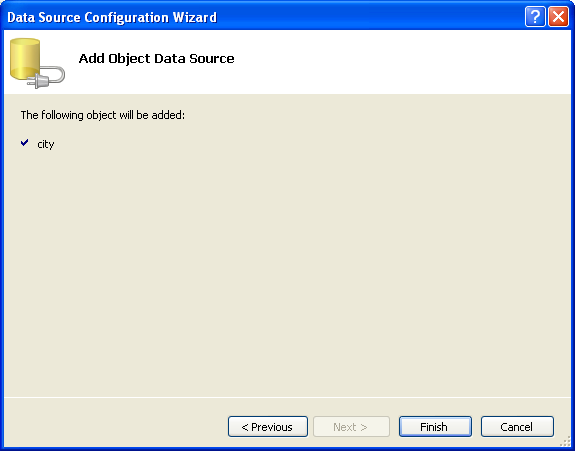
-
The city object will be display in the Data Sources panel. If the Data Sources panel is not displayed, select Data, Show Data Sources from the Visual Studio main menu. The docked panel will then be displayed.
Data Sources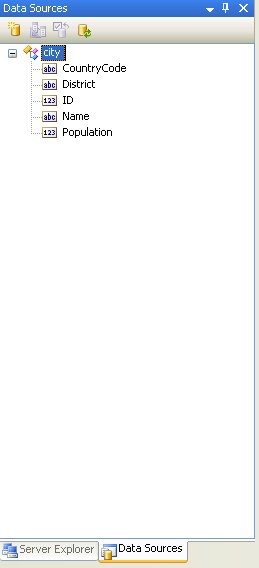
Using the Data Source in a Windows Form
You will now learn how to use the Data Source in a Windows Form.
-
In the Data Sources panel select the Data Source you just created and drag and drop it onto the Form Designer. By default the Data Source object will be added as a Data Grid View control. Note that the Data Grid View control is bound to the cityBindingSource and the Navigator control is bound to cityBindingNavigator.
Data Form Designer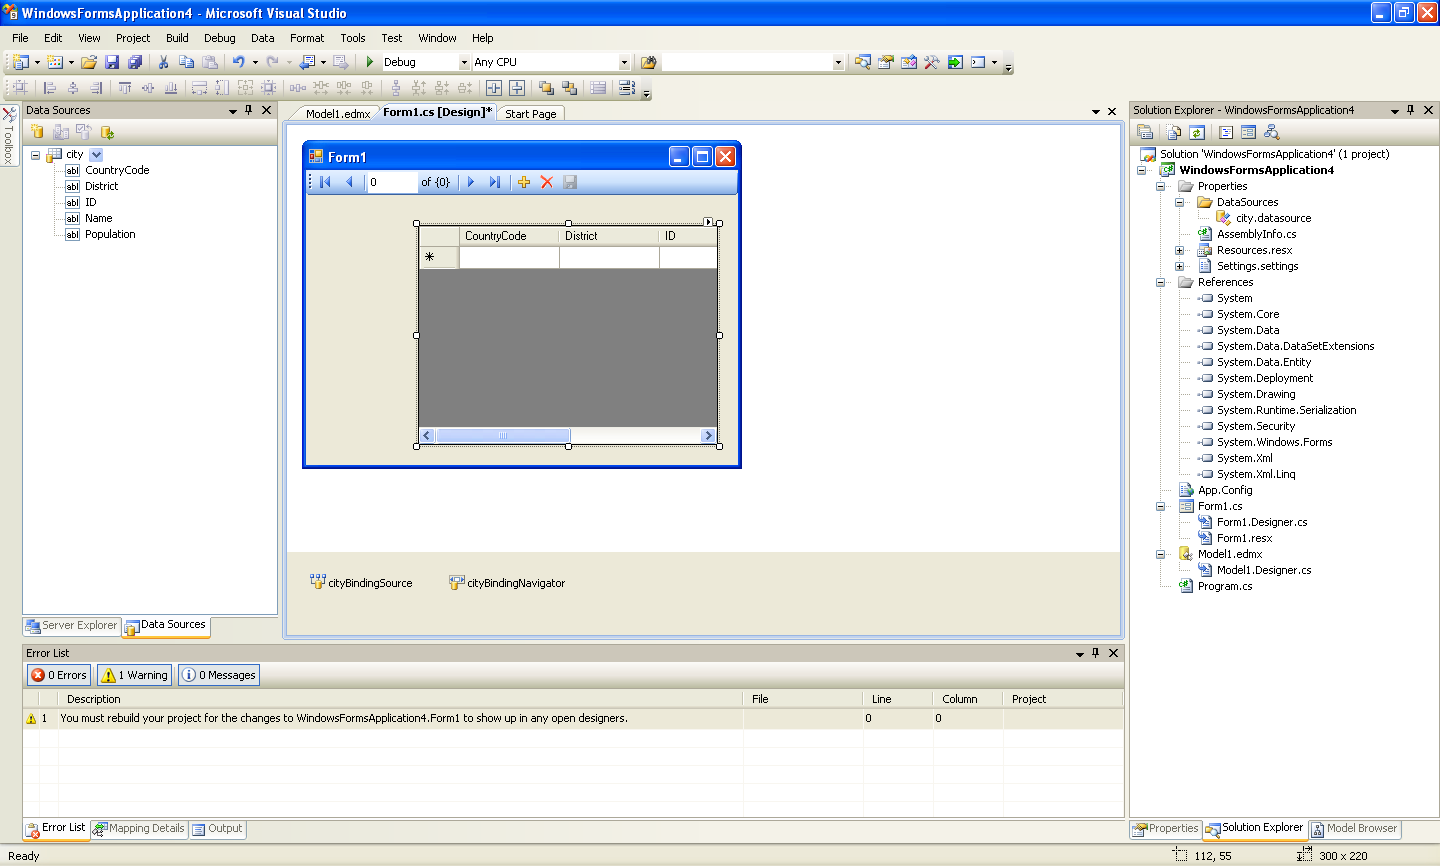
-
Save and rebuild the solution before continuing.
Adding Code to Populate the Data Grid View
You are now ready to add code to ensure that the Data Grid View control will be populated with data from the City database table.
-
Double-click the form to access its code.
-
Add code to instatiate the Entity Data Model's EntityContainer object and retrieve data from the database to populate the control.
Adding Code to the Form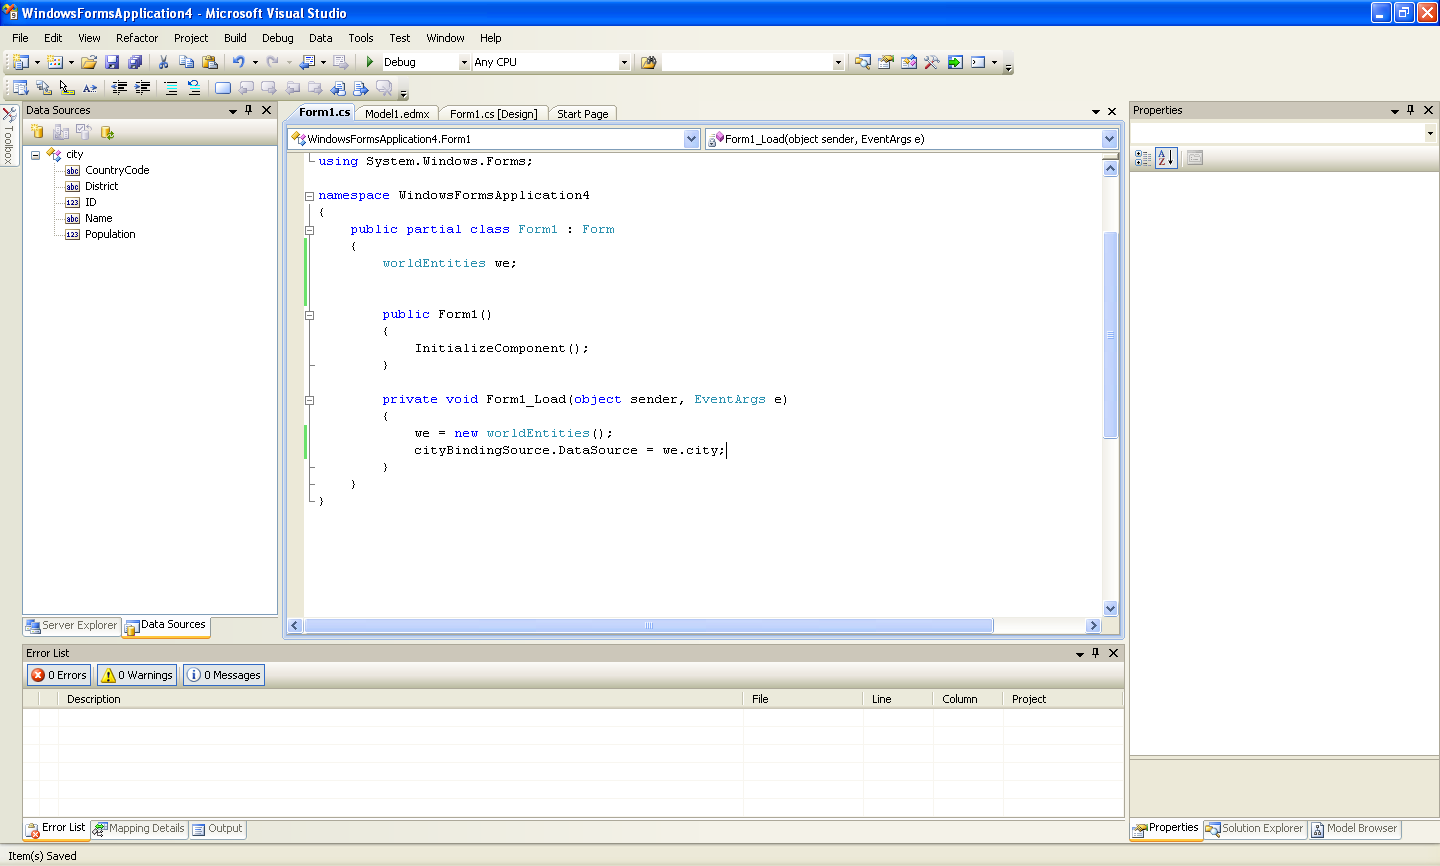
-
Save and rebuild the solution.
-
Run the solution. Ensure the grid is populated and you can navigate the database.
The Populated Grid Control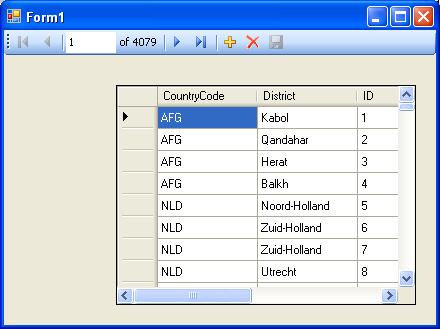
Adding Code to Save Changes to the Database
You will now add code to enable you to save changes to the database.
The Binding source component ensures that changes made in the Data Grid View control are also made to the Entity classes bound to it. However, that data needs to be saved back from the entities to the database itself. This can be achieved by the enabling of the Save button in the Navigator control, and the addition of some code.
-
In the Form Designer, click the Save icon in the Form toolbar and ensure that its Enabled property is set to True.
Save Button Enabled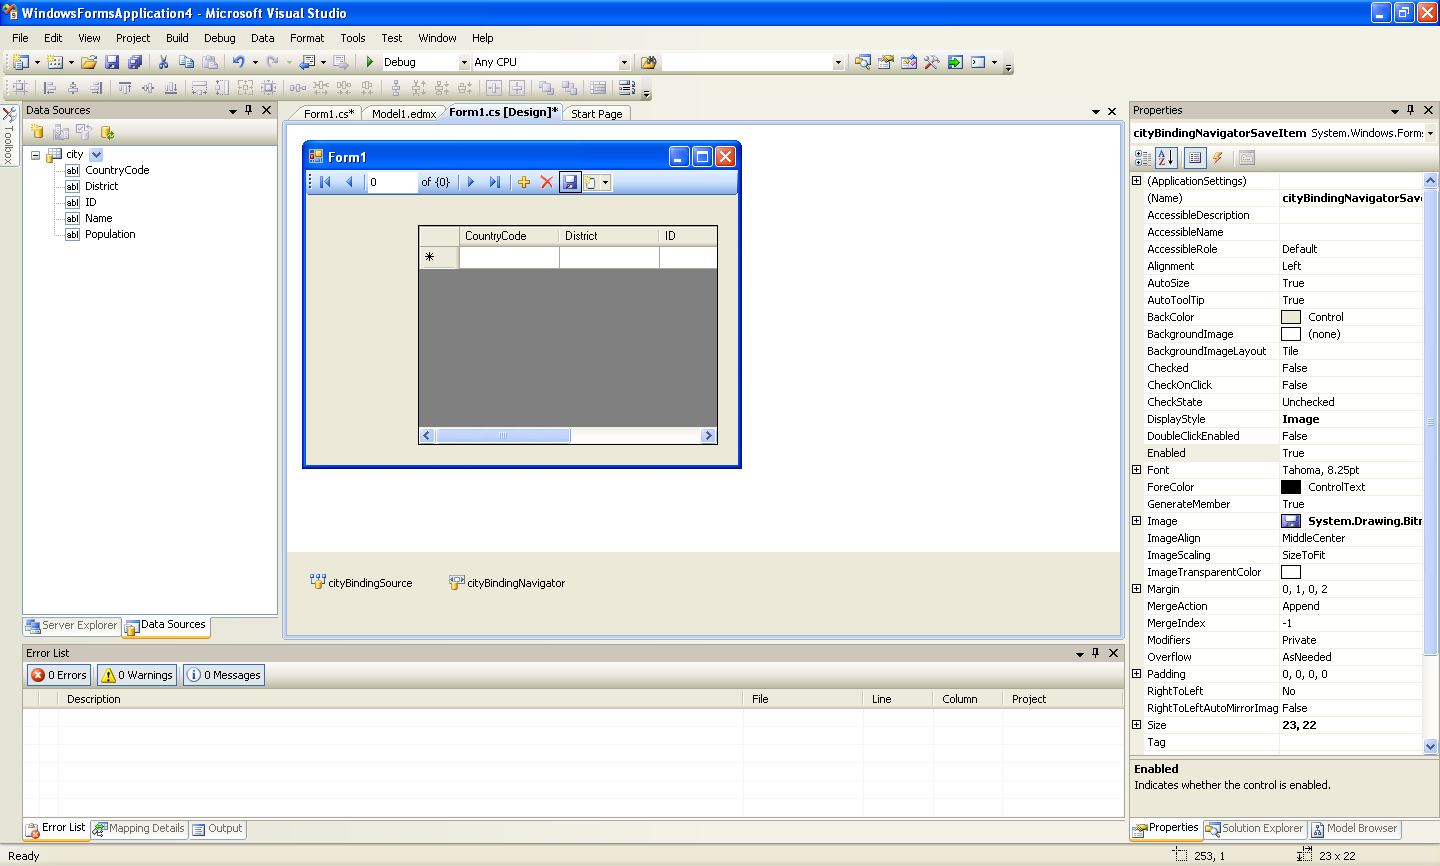
-
Double-click the Save icon in the Form toolbar to display its code.
-
You now need to add code to ensure that data is saved to the database when the save button is clicked in the application.
Adding Save Code to the Form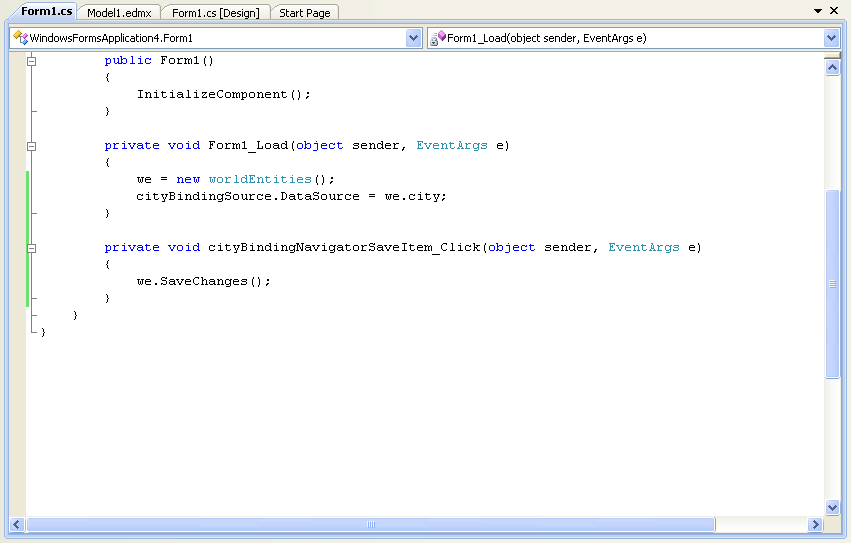
-
Once the code has been added, save the solution and rebuild it. Run the application and verify that changes made in the grid are saved.
Tutorial: Databinding in ASP.NET using LINQ on Entities
In this tutorial you create an ASP.NET web page that binds LINQ queries to entities using the Entity Framework mapping.
If you have not already done so, install the World example database prior to attempting this tutorial. See the tutorial Tutorial: Using an Entity Framework Entity as a Windows Forms Data Source for instructions on downloading and installing this database.
Creating an ASP.NET web site
In this part of the tutorial, you will create an ASP.NET web site. The web site will use the World database. The main web page will feature a drop down list from which you can select a country, data about that country's cities will then be displayed in a grid view control.
-
From the Visual Studio main menu select File, New, Web Site....
-
From the Visual Studio installed templates select . Click OK. You will be presented with the Source view of your web page by default.
-
Click the Design view tab situated underneath the Source view panel.
The Design Tab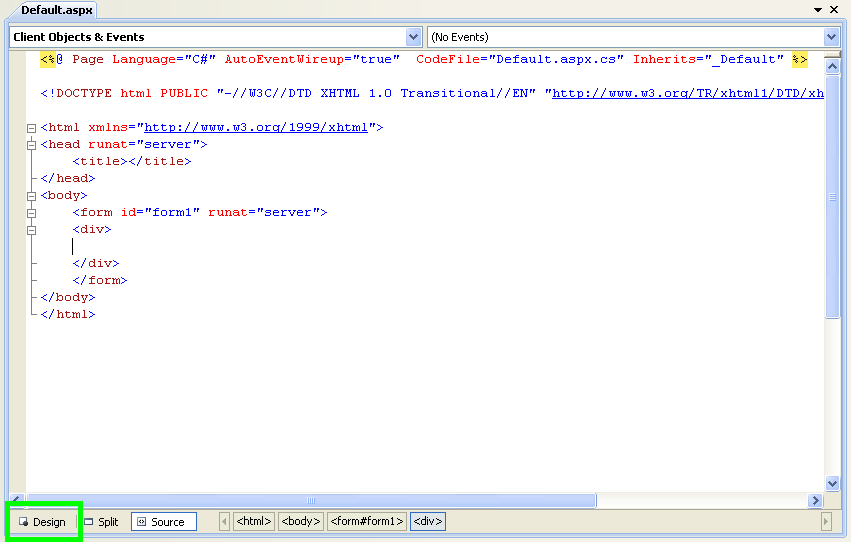
-
In the Design view panel, enter some text to decorate the blank web page.
-
Click Toolbox. From the list of controls select . Drag and drop the control to a location beneath the text on your web page.
Drop Down List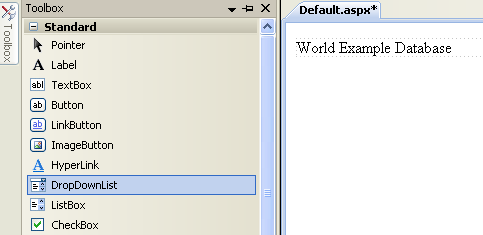
-
From the control's context menu, ensure that the check box is enabled. This will ensure the control's event handler is called when an item is selected. The user's choice will in turn be used to populate the control.
Enable AutoPostBack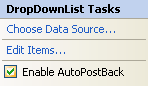
-
From the Toolbox select the control.
Grid View Control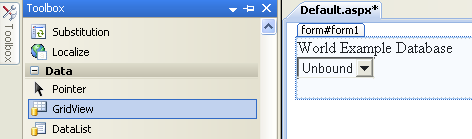
Drag and drop the Grid Vew control to a location just below the Drop Down List you already placed.
Placed Grid Vew Control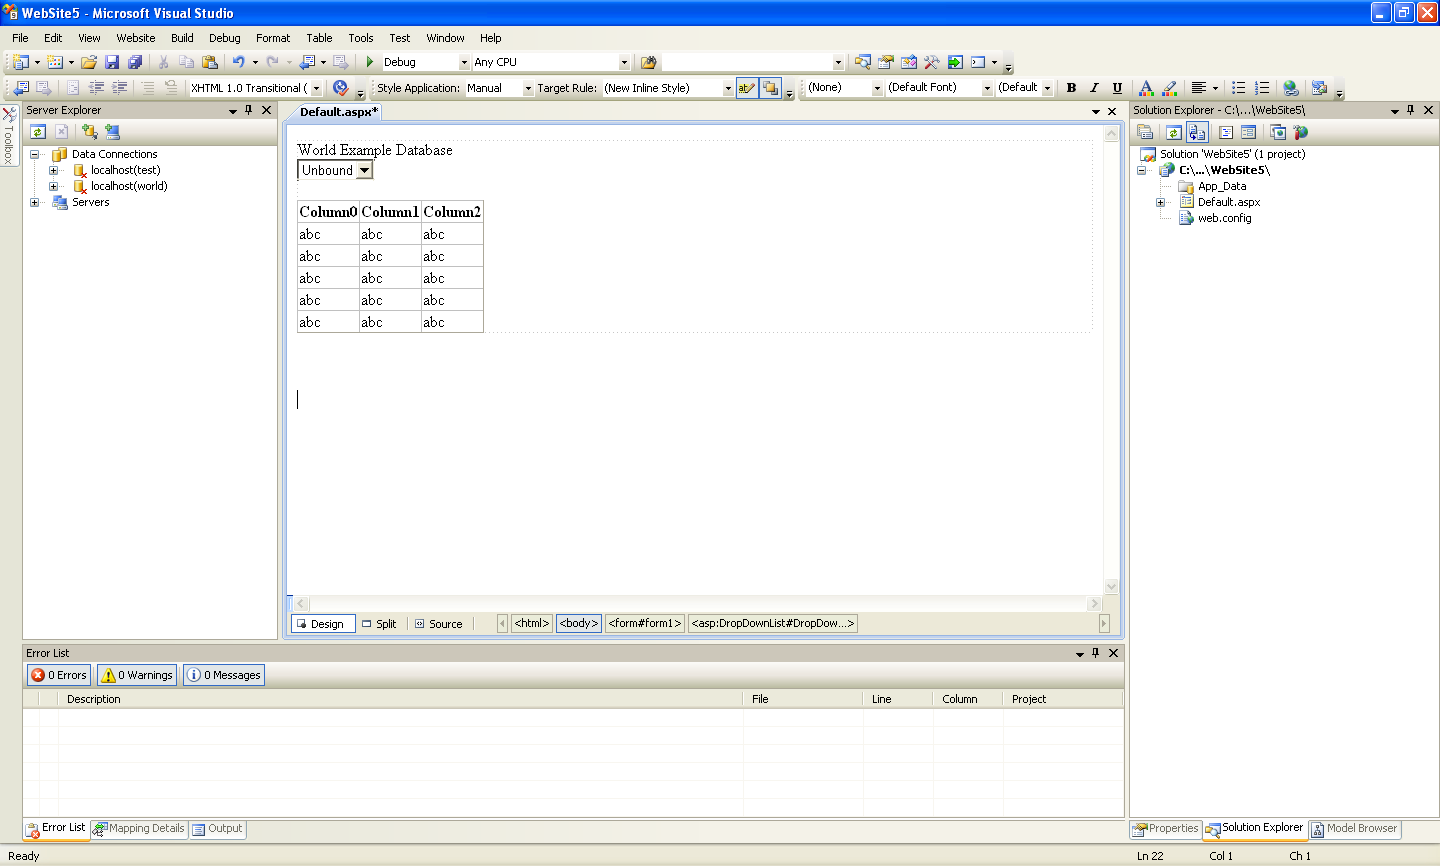
-
At this point it is recommended that you save your solution, and build the solution to ensure that there are no errors.
-
If you run the solution you will see that the text and drop down list are displayed, but the list is empty. Also, the grid view does not appear at all. Adding this functionality is described in the following sections.
At this stage you have a web site that will build, but further functionality is required. The next step will be to use the Entity Framework to create a mapping from the World database into entities that you can control programmatically.
Creating an ADO.NET Entity Data Model
In this stage of the tutorial you will add an ADO.NET Entity Data Model to your project, using the World database at the storage level. The procedure for doing this is described in the tutorial Tutorial: Using an Entity Framework Entity as a Windows Forms Data Source, and so will not be repeated here.
Populating a Drop Data List Box with using the results of a entity LINQ query
In this part of the tutorial you will write code to populate the DropDownList control. When the web page loads the data to populate the list will be achieved by using the results of a LINQ query on the model created previously.
-
In the Design view panel, double-click any blank area. This brings up the method.
-
Modify the relevant section of code according to the following listing:
...
public partial class _Default : System.Web.UI.Page
{
    worldModel.worldEntities we;

    protected void Page_Load(object sender, EventArgs e)
    {
        we = new worldModel.worldEntities();

        if (!IsPostBack)
        {
            var countryQuery = from c in we.country
                               orderby c.Name
                               select new { c.Code, c.Name };
            DropDownList1.DataValueField = "Code";
            DropDownList1.DataTextField = "Name";
            DropDownList1.DataSource = countryQuery;
            DataBind();
        }
    }
...
Note that the list control only needs to be populated when the page first loads. The conditional code ensures that if the page is subsequently reloaded, the list control is not repopulated, which would cause the user selection to be lost.
-
Save the solution, build it and run it. You should see the list control has been populated. You can select an item, but as yet the grid view control does not appear.
At this point you have a working Drop Down List control, populated by a LINQ query on your entity data model.
Populating a Grid View control using an entity LINQ query
In the last part of this tutorial you will populate the Grid View Control using a LINQ query on your entity data model.
-
In the Design view, double-click the control. This causes its code to be displayed. This method is called when a user selects an item in the list control and thus fires an AutoPostBack event.
-
Modify the relevant section of code accordingly to the following listing:
...
    protected void DropDownList1_SelectedIndexChanged(object sender, EventArgs e)
    {
        var cityQuery = from c in we.city
                        where c.CountryCode == DropDownList1.SelectedValue
                        orderby c.Name
                        select new { c.Name, c.Population, c.CountryCode };
        GridView1.DataSource = cityQuery;
        DataBind();
    }
...
The grid view control is populated from the result of the LINQ query on the entity data model.
-
As a check compare your code to that shown in the following screenshot:
Source Code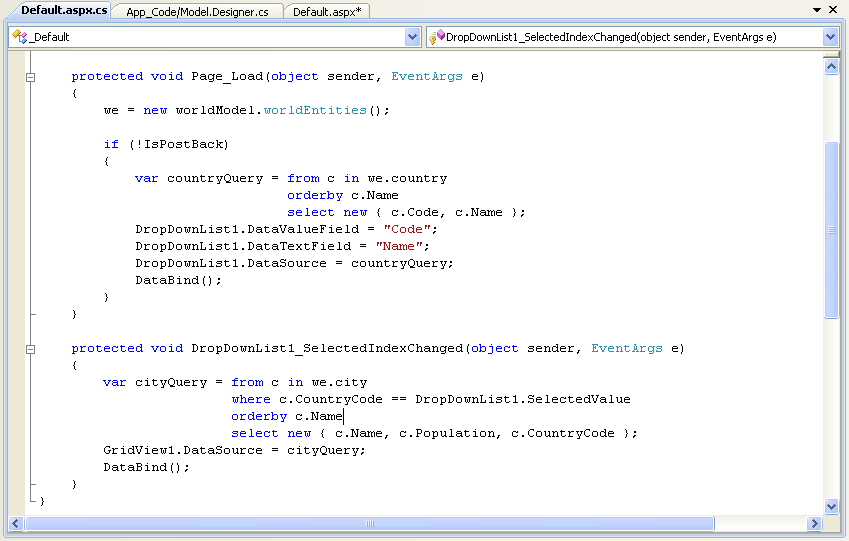
-
Save, build and run the solution. As you select a country you will see its cities are displayed in the grid view control.
The Working Web Site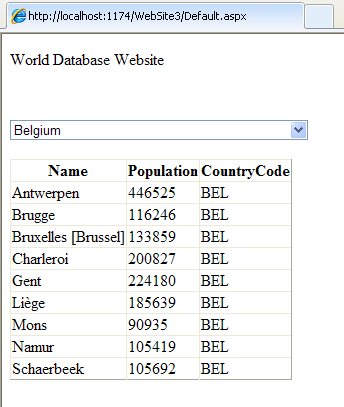
In this tutorial you have seen how to create an ASP.NET web site, you have also seen how you can access a MySQL database using LINQ queries on an entity data model.
Tutorial: Using SSL with
In this tutorial you will learn how you can use to connect to a MySQL server configured to use SSL. Support for SSL client certificates was added with 6.2.
MySQL Server uses the PEM format for certificates and private keys. This tutorial will use the test certificates from the server test suite by way of example. You can obtain the MySQL Server source code from MySQL Downloads. The certificates can be found in the directory ./mysql-test/std_data.
To carry out the steps in this tutorial, you must have Open SSL installed. This can be downloaded for Microsoft Windows at no charge from Shining Light Productions.
Further details on the connection string options used in this tutorial can be found at Connection Options.
Configuring the MySQL Server to use SSL
-
In the MySQL Server configuration file, set the SSL parameters as follows:
ssl-ca=path/to/repo/mysql-test/std_data/cacert.pem
ssl-cert=path/to/repo/mysql-test/std_data/server-cert.pem
ssl-key=path/to/repo/mysql-test/std_data/server-key.pem
Adjust the directories according to the location in which you installed the MySQL source code.
-
In this step you create a test user and set the user to require SSL.
Using the MySQL Command Line Client, connect as root and create the user sslclient.
-
To set privileges and requirements, issue the following command:
GRANT ALL PRIVILEGES ON *.* TO sslclient@'%' REQUIRE SSL;
Creating a certificate file to use with the .NET client
-
The .NET client does not use the PEM file format, as .NET does not support this format natively. You will be using test client certificates from the same server repository, for the purposes of this example. Convert these to PFX format first. This format is also known as PKCS#12. An article describing this procedure can be found at the Citrix website. From the directory server-repository-root/mysql-test/std_data, issue the following command:
openssl pkcs12 -export -in client-cert.pem -inkey client-key.pem -certfile cacert.pem -out client.pfx -
When asked for an export password, enter the password . The file client.pfx will be generated. This file is used in the remainder of the tutorial.
Connecting to the server using a file-based certificate
-
You will use PFX file, client.pfx you created in the previous step to authenticate the client. The following example demonstrates how to connect using the SSL Mode, CertificateFile and CertificatePassword connection string options:
using (MySqlConnection connection = new MySqlConnection(
  "database=test;user=sslclient;" +
  "CertificateFile=H:\\bzr\\mysql-trunk\\mysqlest\\std_data\\client.pfx" +
  "CertificatePassword=pass;" +
  "SSL Mode=Required "))
{
    connection.Open();
}
The path to the certificate file will need to be changed to reflect your individual installation.
Connecting to the server using a store-based certificate
-
The first step is to import the PFX file, client.pfx, into the Personal Store. Double-click the file in Windows explorer. This launches the Certificate Import Wizard.
-
Follow the steps dictated by the wizard, and when prompted for the password for the PFX file, enter .
-
Click Finish to close the wizard and import the certificate into the personal store.
Examine certificates in the Personal Store
-
Start the Microsoft Management Console by entering mmc.exe at a command prompt.
-
Select File, Add/Remove snap-in. Click Add. Select from the list of available snap-ins in the dialog.
-
Click Add button in the dialog, and select the radio button. This is used for personal certificates.
-
Click the Finish button.
-
Click OK to close the Add/Remove Snap-in dialog.
-
You will now have displayed in the left panel of the Microsoft Management Console. Expand the Certificates - Current User tree item and select , . The right-hand panel will display a certificate issued to MySQL. This is the certificate that was previously imported. Double-click the certificate to display its details.
-
After you have imported the certificate to the Personal Store, you can use a more succint connection string to connect to the database, as illustrated by the following code:
using (MySqlConnection connection = new MySqlConnection(
   "database=test;user=sslclient;" +
   "Certificate Store Location=CurrentUser;" +
   "SSL Mode=Required"))
{
   connection.Open();
}
Certificate Thumbprint Parameter
If you have a large number of certificates in your store, and many have the same Issuer, this can be a source of confusion and result in the wrong certificate being used. To alleviate this situation, there is an optional Certificate Thumbprint parameter that can additionally be specified as part of the connection string. As mentioned before, you can double-click a certificate in the Microsoft Management Console to display the certificate's details. When the Certificate dialog is displayed click the tab and scroll down to see the thumbprint. The thumbprint will typically be a number such as 47 94 36 00 9a 40 f3 01 7a 14 5c f8 47 9e 76 94 d7 aa de f0. This thumbprint can be used in the connection string, as the following code illustrates:
using (MySqlConnection connection = new MySqlConnection(
      "database=test;user=sslclient;" +
      "Certificate Store Location=CurrentUser;" +
      "Certificate Thumbprint=479436009a40f3017a145cf8479e7694d7aadef0;"+
      "SSL Mode=Required"))
{
    connection.Open();
}
Spaces in the thumbprint parameter are optional and the value is case-insensitive.
Tutorial: Using MySqlScript
This tutorial teaches you how to use the class. This class enables you to execute a series of statements. Depending on the circumstances, this can be more convenient than using the approach.
Further details of the class can be found in the reference documentation supplied with .
To run the example programs in this tutorial, set up a simple test database and table using the Command Line Client or MySQL Workbench. Commands for the Command Line Client are given here:
-
CREATE DATABASE TestDB;
-
USE TestDB;
-
CREATE TABLE TestTable (id INT NOT NULL PRIMARY KEY AUTO_INCREMENT, name VARCHAR(100));
The main method of the class is the method. This method causes the script (sequence of statements) assigned to the property of the MySqlScript object to be executed. Note the property can be set through the constructor or using the property. returns the number of statements executed.
The object will execute the specified script on the connection set using the property. Again, this property can be set directly or through the constructor. The following code snippets illustrate this:
string sql = "SELECT * FROM TestTable";
...
MySqlScript script = new MySqlScript(conn, sql);
...
MySqlScript script = new MySqlScript();
script.Query = sql;
script.Connection = conn;
...
script.Execute();
The MySqlScript class has several events associated with it. There are:
-
Error - generated if an error occurs.
-
ScriptCompleted - generated when the script successfully completes execution.
-
StatementExecuted - generated after each statement is executed.
It is possible to assign event handlers to each of these events. These user-provided routines are called back when the connected event occurs. The following code shows how the event handlers are set up.
script.Error += new MySqlScriptErrorEventHandler(script_Error);
script.ScriptCompleted += new EventHandler(script_ScriptCompleted);
script.StatementExecuted += new MySqlStatementExecutedEventHandler(script_StatementExecuted);
In VisualStudio, you can save typing by using tab completion to fill out stub routines. Start by typing, for example, . Then press , and then press again. The assignment is completed, and a stub event handler created. A complete working example is shown below:
using System;
using System.Collections.Generic;
using System.Linq;
using System.Text;

using System.Data;
using MySql.Data;
using MySql.Data.MySqlClient;

namespace MySqlScriptTest
{
    class Program
    {
        static void Main(string[] args)
        {
            string connStr = "server=localhost;user=root;database=TestDB;port=3306;password=******;";
            MySqlConnection conn = new MySqlConnection(connStr);

            try
            {
                Console.WriteLine("Connecting to MySQL...");
                conn.Open();

                string sql = "INSERT INTO TestTable(name) VALUES ('Superman');" +
                             "INSERT INTO TestTable(name) VALUES ('Batman');" +
                             "INSERT INTO TestTable(name) VALUES ('Wolverine');" +
                             "INSERT INTO TestTable(name) VALUES ('Storm');";

                MySqlScript script = new MySqlScript(conn, sql);

                script.Error += new MySqlScriptErrorEventHandler(script_Error);
                script.ScriptCompleted += new EventHandler(script_ScriptCompleted);
                script.StatementExecuted += new MySqlStatementExecutedEventHandler(script_StatementExecuted);

                int count = script.Execute();

                Console.WriteLine("Executed " + count + " statement(s).");
                Console.WriteLine("Delimiter: " + script.Delimiter);
            }
            catch (Exception ex)
            {
                Console.WriteLine(ex.ToString());
            }

            conn.Close();
            Console.WriteLine("Done.");
        }

        static void script_StatementExecuted(object sender, MySqlScriptEventArgs args)
        {
            Console.WriteLine("script_StatementExecuted");
        }

        static void script_ScriptCompleted(object sender, EventArgs e)
        {
            /// EventArgs e will be EventArgs.Empty for this method
            Console.WriteLine("script_ScriptCompleted!");
        }

        static void script_Error(Object sender, MySqlScriptErrorEventArgs args)
        {
            Console.WriteLine("script_Error: " + args.Exception.ToString());
        }
    }
}
Note that in the event handler, the parameter e will be EventArgs.Empty. In the case of the ScriptCompleted event there is no additional data to be obtained, which is why the event object is EventArgs.Empty.
Using Delimiters with MySqlScript
Depending on the nature of the script, you may need control of the delimiter used to separate the statements that will make up a script. The most common example of this is where you have a multi-statement stored routine as part of your script. In this case if the default delimiter of is used you will get an error when you attempt to execute the script. For example, consider the following stored routine:
CREATE PROCEDURE test_routine()
BEGIN
    SELECT name FROM TestTable ORDER BY name;
    SELECT COUNT(name) FROM TestTable;
END
This routine actually needs to be executed on the MySQL Server as a single statement. However, with the default delimiter of , the class would interpret the above as two statements, the first being:
CREATE PROCEDURE test_routine()
BEGIN
    SELECT name FROM TestTable ORDER BY name;
Executing this as a statement would generate an error. To solve this problem supports the ability to set a different delimiter. This is achieved through the property. For example, you could set the delimiter to , in which case the above stored routine would no longer generate an error when executed. Multiple statements can be delimited in the script, so for example, you could have a three statement script such as:
string sql = "DROP PROCEDURE IF EXISTS test_routine??" +
             "CREATE PROCEDURE test_routine() " +
             "BEGIN " +
             "SELECT name FROM TestTable ORDER BY name;" +
             "SELECT COUNT(name) FROM TestTable;" +
             "END??" +
             "CALL test_routine()";
You can change the delimiter back at any point by setting the property. The following code shows a complete working example:
using System;
using System.Collections.Generic;
using System.Linq;
using System.Text;

using MySql.Data;
using MySql.Data.MySqlClient;

namespace ConsoleApplication8
{
    class Program
    {
        static void Main(string[] args)
        {
            string connStr = "server=localhost;user=root;database=TestDB;port=3306;password=******;";
            MySqlConnection conn = new MySqlConnection(connStr);

            try
            {
                Console.WriteLine("Connecting to MySQL...");
                conn.Open();

                string sql =    "DROP PROCEDURE IF EXISTS test_routine??" +
                                "CREATE PROCEDURE test_routine() " +
                                "BEGIN " +
                                "SELECT name FROM TestTable ORDER BY name;" +
                                "SELECT COUNT(name) FROM TestTable;" +
                                "END??" +
                                "CALL test_routine()";

                MySqlScript script = new MySqlScript(conn);

                script.Query = sql;
                script.Delimiter = "??";
                int count = script.Execute();
                Console.WriteLine("Executed " + count + " statement(s)");
                script.Delimiter = ";";
                Console.WriteLine("Delimiter: " + script.Delimiter);
                Console.WriteLine("Query: " + script.Query);
            }
            catch (Exception ex)
            {
                Console.WriteLine(ex.ToString());
            }

            conn.Close();
            Console.WriteLine("Done.");
        }
    }
}
Tutorial: Generating MySQL DDL from an Entity Framework Model
In this tutorial, you will learn how to create MySQL from an Entity Framework model. Use Visual Studio 2010 and 6.3 to carry out this tutorial.
-
Create a new console application in Visual Studio 2010.
-
Using the , add a reference to MySql.Data.Entity.
-
From the select Add, New Item. In the dialog select . Select and click Add. The dialog will be displayed.
-
In the dialog select . Click Finish. A blank model will be created.
-
Create a simple model. A single Entity will do for the purposes of this tutorial.
-
In the panel select ConceptualEntityModel from the drop-down listbox.
-
In the panel, locate the in the category .
-
For the property select SSDLToMySQL.tt(VS) from the drop-down listbox.
-
Save the solution.
-
Right-click an empty space in the model design area. The context-sensitive menu will be displayed.
-
From the context-sensitive menu select Generate Database from Model. The dialog will be displayed.
-
In the dialog select an existing connection, or create a new connection to a server. Select an appropriate radio button to show or hide sensitive data. For the purposes of this tutorial you can select (although you might skip this for commercial applications).
-
Click Next. MySQL compatible DDL code will be generated. Click Finish to exit the wizard.
You have seen how to create MySQL DDL code from an Entity Framework model.