Managing Messages
From FxCop
Messages are generated by rules as they analyze targets. Each message is bound to a specific rule and a specific target. A message can report multiple occurrences, also know as issues, of a rule violation.
To generate messages, specify the set of target assemblies and rules and then run an FxCop analysis using one of the following methods:
Click Analyze on the toolbar.
Press the F5 function key.
On the Project menu, select Analyze.
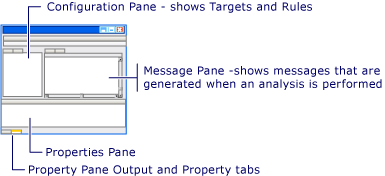
The messages pane displays the messages generated by the analysis as shown in the following screen shot. The text font color of a message indicates its message level. To change the font or color, see the "Setting Preferences and Project Defaults" section of the topic Managing FxCop Projects.
FxCop application window
Use the Active, Excluded In Project, and Absent buttons at the top of the pane to view a list of messages that are in the corresponding message state. For more information, see Message States. Sort the messages by clicking the appropriate column heading.
Right-click a message to see available message actions. Depending on the message state, the message actions include the following:
Changing the state of the message. For more information, see Message States.
Adding a note to a message. For more information, see Viewing Message Details.
Displaying details about the message. For more information, see Viewing Message Details.
Customizing the set of columns displayed in the messages pane. For more information, see Configuring Columns.
Sorting the messages.
Copying the selected message to the Clipboard.
One or more messages can be copied to the Clipboard in either comma-separated value (CSV) format or XML format. The information copied consists of the same columns as those displayed in the messages pane, and is a subset of the information saved in the project or report file.
To copy messages
Select the messages to be copied.
Right-click one of the messages.
Select Copy As and then select the format, either Csv or Xml.
 In This Section
Message States
During its lifetime, the state of a message can change. The following table identifies the possible states of a message. The Active, Excluded In Project, and Absent states are mutually exclusive and can be viewed by using the corresponding buttons at the top of the messages pane. The New state can be combined with any of the other states. Messages in the New state appear in a bold font.
The target associated with an excluded message is not checked by the rule associated with the excluded message during an analysis run.
Message state | Description |
|---|---|
New | The message was reported in the most recent analysis and was not previously present in the project in any other state. |
Active | The message was reported in the most recent analysis. It might be in the New state. |
Excluded In Project | The message was manually removed from the active list. |
Absent | The message was previously in the active list, is not excluded, and was not reported in the most recent analysis. |
Configuring Columns
You can configure which columns are displayed in what order in each of the message lists, and set each column's width.
To configure columns
Right-click in the messages pane.
Select Configure Columns.
Select the check box next to each column name to display.
Select the column name to allow changing the column width.
Use the Move Up and Move Down buttons to arrange the column order.
Click OK.
The following table describes each column.
Column | Description |
|---|---|
New | Whether the message was first seen in the most recent analysis. Appears for active messages only. |
Level | An iconic view of the message level. Appears in the default view. |
Level Name | The message level name. |
Certainty | The estimate of the probability that the issue is detected correctly. Appears in the default view. |
Fix Category | Whether the fix for a violation of the rule constitutes a breaking change. Appears in the default view. |
Resolution | Describes how to resolve a violation of the rule. |
Rule | The name of the rule. Appears in the default view. |
Item | The programming element that caused the message to be generated. Appears in the default view. |
Rule Assembly | The assembly that contains the rule that generated the message. |
File | The assembly that contains the programming element that caused the message to be generated. |
Created | The date and time the message was first seen. |
Last Seen | The date and time the message was last seen. |
Issues | The number of issues associated with the message. An issue is one occurrence of the rule violation. |
User | The user who added the last note. |
Last Note | Contents of the last note. |
Last Note Modified | The date and time the last note was modified. |
Seen Last Run | Whether the message was seen in the most recent analysis. Appears for excluded messages only. |
Filtering Messages
Filtering lets you see a subset of the messages present in the messages pane. After you perform an analysis, you filter the displayed messages by clicking items in the configuration pane:
Select a rule category to display only messages generated by the rules in that category. For more information about rule categories, see the "Grouping Rules" section in the topic
Select a specific rule to display only messages generated by that rule.
Select a target to display only messages for that target and its child nodes.
To remove the current filter and view all the messages, click the FxCop project node at the root of the tree view in the Targets or Rules tab.
When filtering is disabled from the Tools Settings dialog box, all messages are displayed regardless of any selection in the configuration pane. The Tools Settings are described in the "Setting Preferences and Project Defaults" section of the Managing FxCop Projects topic.
Viewing Message Details
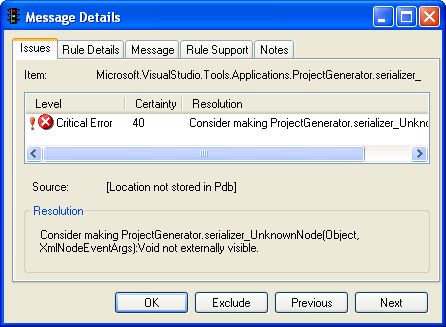
When you select a message and press ENTER, right-click a message and select Properties, or double-click a message, the Message Details dialog box displays information about the message and the rule that generated the message. Previous and Next buttons provide a means to navigation through the list of messages. When an active or an excluded message is displayed, an Exclude or Unexclude button is available, respectively, that lets you change the exclude state of the message. For more information, see
Issues tab of the Message Details dialog box
Message tab of the Message Details dialog box
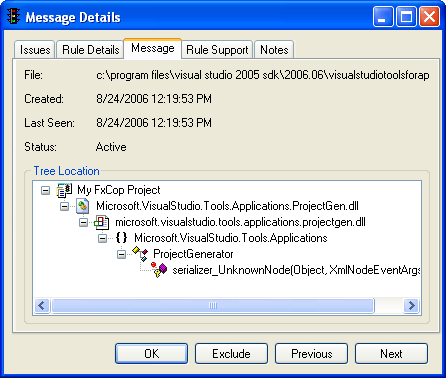
The following table describes the information available on the Issues tab and the Message tab in this dialog box. The Rule Support tab and the Rule Details tab display information about the rule that generated the message. For a description of these elements, see the "Viewing Rule Details" section of the Managing Rules topic.
Message elements | Description |
|---|---|
Issues tab |
|
Item | The item that caused the message to be reported. This can be a namespace, assembly, resource, type, member, or parameter. |
Level | The importance of the issue that is identified by the rule. For a discussion of the levels, see the "Level and Certainty" section of the Managing Rules topic. |
Certainty | An estimate of the probability that the issue is detected correctly. |
Source | The location of this item in source code if Program Database (PDB) information is available. More information is provided immediately following this table. |
Resolution | Instructions on the recommended way to fix the issue reported by the message. |
Message tab |
|
File | The assembly that contains the item. |
Created | The date and time when the message was first reported. This value is stored in coordinated universal time (UTC) but displayed in local time. |
Last Seen | The most recent date and time that the message was reported. This value is stored in UTC but displayed in local time. |
Status | The state of the message. |
Tree Location | The location of the item in the Targets tree of the configuration pane. Double-click the item to change the display focus to the configuration pane that displays the item. |
The Source detail item displays one of the following values:
Source file and line number informationClick the link to have FxCop open the source code in an editor. For information about how to specify a source code editor, see the "Setting Preferences and Project Defaults" section in the Managing FxCop Projects topic.
<Source Lookup Disabled> Source file lookup is disabled. For information about how to enable source file lookup, see the "Attempt source file lookup" section of the Managing FxCop Projects topic.
<Location not stored in Pdb>Either the correct PDB file for the assembly is unavailable or source information is unavailable for the programming element. The PDB file must be located either in the same directory as its corresponding assembly or in the location referred to by the _NT_SYMBOL_PATH environment variable. PDB information is available only for methods and property accessors.
The Notes tab allows optional user-supplied notes to be associated with the message. Notes can also be added to a message when it is excluded from analysis.
To add a note to a message
Double-click a message.
Select the Notes tab.
Click Add to display the Edit Note dialog box.
Type the note in the Text box.
Click OK.
The note, the user who entered the note, and the time the note was entered are displayed in the Note pane.
Excluding Messages
Occasionally, you might want to allow specific exceptions to an FxCop rule without ignoring or removing the rule or target. For example, you might implement a design choice that intentionally violates the .NET Framework best practices for a specific type, or FxCop might report a "false positive," a message that is not accurate.
To eliminate analysis by a specific rule on a specific target, exclude the associated message. Excluded messages are displayed using the Excluded In Project button on the messages pane.
Excluding a message causes the state of the message to change but does not eliminate the message. The excluded message contains the name of the user who created it and an optional note that explains the reason for excluding the message. The excluded message can be un-excluded, in which case it will appear in the active or absent list depending on the value of the Seen Last Run field.
To exclude messages
Right-click the messages and select Exclude.
You can also double-click a single message, and then click Exclude in the Message Details dialog box.
Type relevant information in the Text box.
Click OK.
To re-include excluded messages
Click the Excluded button located on the top of the message pane.
Select one or more excluded messages.
Right-click the selection and then click Mark as Active or Mark as Absent.
You can also double-click a single message, and then click Unexclude in the Message Details dialog box.
Saving Message Reports
FxCop saves message reports in XML format. A saved report contains all messages that match the report settings in the Project Options dialog box. For more information about report settings, see the "Save Messages" section of the
Saved messages can be imported into a project and are treated as an extension of the project contents. For more information about how to import message reports, see the "Importing Messages into a Project" section of the Managing FxCop Projects topic.
To save a report
On the File menu, select Save Report As. If no messages match the report settings, this option is unavailable.
Locate the directory where you want to save the report.
In the File Name box, type a name for the saved report file.
Click Save.
The XML schema for reports is located in the \Xml subdirectory installed by FxCop. The schema file name is FxCopReport.xsd. If the Report Stylesheet box in the Project Options dialog box contains a value, the saved XML will contain a processing instruction for the specified style sheet. If Apply Stylesheet is selected, the report style sheet XSL is applied to the report data, and the result of the transformation is saved. For more information about Report Stylesheets, see the "Report Stylesheet and Apply Stylesheet" section in the Managing FxCop Projects topic.