Quick Start Guide to FxCop
From FxCop
This document provides a brief overview of the FxCop application. For a complete description of the FxCop user interface and features, see Using FxCop.
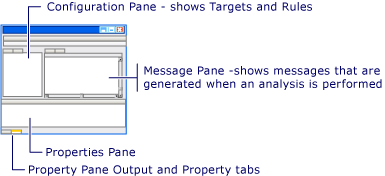
The FxCop application window displays the target assemblies and rules that are included in a project, and the messages that are generated when you perform an analysis. The window is divided into three major areas: the configuration pane, the messages pane, and the properties pane, as shown in the following illustration.
FxCop application window
 Creating a Project and Running an Analysis
To analyze managed assemblies, FxCop requires the following information:
One or more target assemblies to be analyzed.
One or more rules. FxCop enables a default set of rules in new projects.
In addition, FxCop can be used with imported message sources, which typically specify a set of messages to exclude. To begin, specify the managed code assembly, which is either an executable file or a DLL, to analyze.
To create a project and run an FxCop analysis
On the Start menu, click FxCop.
— or —
In the installation directory, double-click FxCop.exe.
On the Project menu, click Add Targets.
Locate the assembly you want to add, and then click Open.
 Note
NoteThe assembly is either an .exe or a .dll file.
Click Analyze to run the analysis.
The analysis report is displayed in the messages pane. If there are no messages, this pane will be empty.
Viewing Message Details
The messages pane displays a report of messages generated by the analysis.
To get detailed message information
Choose a message and press ENTER.
— or —
Double-click a message.
Right-click a message to see the available message actions, which include:
Excluding a message from future reports.
Copying the selected message to the Clipboard.
Customizing the set of columns displayed in the messages pane.
Viewing properties of the message, which include the resolution, the target that generated the message with a link to the source code if available, rule details, a link to a more in-depth rule topic, and any custom notes.
Filtering Messages
Filtering is an optional feature that allows you to see a subset of the messages that are displayed in a report. After performing an analysis, you can filter the messages by clicking items in the configuration pane:
If you want to: | Click: |
|---|---|
View only messages generated by the rules in a specific library. | A rule library you want to view. |
View only messages generated by a specific rule. | A rule you want to view. |
View only messages for a specific target and its child nodes. | A target. |
Remove the current filter and view all the messages. | The FxCop project node at the root of the Targets tab or Rules tab tree view. |
Excluding Messages
Occasionally, you might want to exclude certain messages from future analysis reports for a project. For example, if a design choice intentionally violates a rule or a rule generates an inaccurate message, the message can be excluded from future analysis. An excluded message contains the name of the user who created it, and optional notes about the reason for the exclusion.
To exclude messages
Run an analysis that generates messages.
Select the messages to exclude.
TipTo select adjacent messages, click the first message, and then hold down SHIFT and click the last message. To select nonadjacent messages, click the first message, and then hold down CTRL and click additional messages.
Right-click any of the selected messages to display the shortcut menu.
Click Exclude.
In the Edit Note dialog box, type information relevant to the excluded messages.
Click OK.
Saving a Project or Report
Saving a project allows its settings to be reused in FxCop or imported into FxCopCmd. A report file, which contains a specified subset of messages, can be imported into FxCopCmd or into a new or different project in FxCop. Project files and message reports are saved in XML format.
To save a project or a report
On the Project menu, select Options.
Choose an XML style sheet to apply to the report.
Select the types of messages to save in the project and report.
On the File menu, select either Save Project As or Save Report As.
Locate the directory where you want to save the file.
In the File Name text box, type a name for the saved file.
Click Save.