Managing FxCop Projects
From FxCop
A project specifies a set of targets and rules used by FxCop to perform an analysis and contains a report of the messages from the latest analysis. Each message is associated with a specific target and a specific rule. Projects are saved in files that have the extension .FxCop. Saved projects can be reused by the FxCop application (FxCop.exe) and by the command–line tool (FxCopCmd.exe). For information about how to specify a project to the command–line tool, see the /project option in Command-Line Tool Options.
 In This Topic
Creating New Projects
When a new project is created, FxCop does the following:
Closes the current project if one is open.
Resets all project options to their default values. For more information, see
Loads any rule libraries found in the rules directory specified by your application settings. The default rules directory is the rules subdirectory under the application startup directory, which is where FxCop.exe is located. For example, if you have not specified application settings, and FxCop.exe is installed in the directory C:\Tools\FxCop, then the C:\Tools\FxCop\Rules directory is searched for rules to add to the new project.
To create a new FxCop project
On the File menu, select New Project.
- or -
Press CTRL+N.
Opening Existing Projects
The simplest way to open an FxCop project is to double-click an FxCop project file in Microsoft Windows Explorer. This starts FxCop and loads the project. You can also open a project from within the FxCop application itself.
To open an existing project from within FxCop
On the File menu, choose Open Project.
Locate the project file to open.
Click Open.
FxCop loads the selected project.
FxCop loads only those items named explicitly in the opened project file. Unlike creating a new project, opening an existing project does not cause default rule libraries to be loaded. |
Project Load Errors
If a project cannot be completely loaded, an Error dialog box is displayed. The following errors keep a project from completely loading:
The project file is corrupted.
A rule assembly specified in the project file cannot be found or is corrupted.
A target assembly specified in the project file cannot be found or is corrupted and has an entry in the project report from a previous analysis.
The version number of the project file is later than the version number of FxCop.
A target assembly specified in the project file that cannot be found or that is corrupted and does not have any entries in the project report is loaded, but causes an error on analysis.
If the version number of the project file is less than 1.312, the Project Migration Wizard is invoked.
If a project loads but all targets cannot be added or all messages cannot be imported, the Error(s) Loading Project dialog box appears, as shown in the following screen shot.
Error(s) Loading Project dialog box
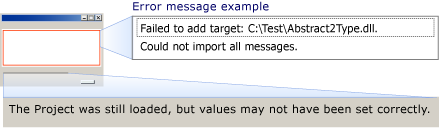
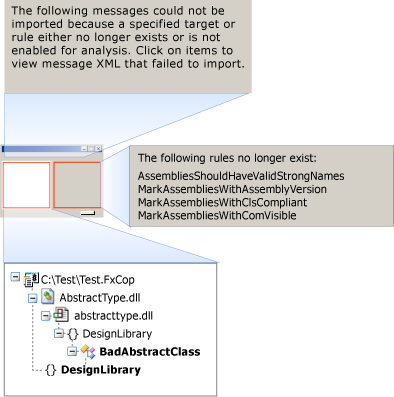
This results when a target or a rule listed in the project report cannot be found. Double-click the "Could not import all messages." error message to display the Warning dialog box, which displays the targets associated with the unimported messages in a tree view, as shown in the following screen shot. Click the target to display the messages that were not loaded.
Warning dialog box
Saving Projects
To retain your current project settings, FxCop projects must be saved before you exit the application or open a different project.
To save a new project
On the File menu, choose Save Project or Save Project As.
Locate the directory where the project is to be saved.
In the File name box, type a name for the project file.
Click Save.
To save an existing project under the same name
On the File menu, choose Save Project.
FxCop overwrites the previous version.
To save an existing project under a new name
On the File menu, choose Save Project As.
Locate the directory where the project is to be saved.
In the File name box, type a name for the project file.
Click Save.
Importing Messages into a Project
You can import multiple reports from previously saved analyses. The contents of a report are treated as an extension of the project contents; when an imported message applies to a target in the project, that message is added to the project. For information about how to save a report, see
To import the messages in a saved report
On the File menu, select Import Report.
Locate the location of the report and select it.
Click OK.
A message is always in one of the following states: active, excluded, or absent. For a more information, see "Message States" in the Managing Messages topic. If the same message appears in multiple sources and has a different message state in each, for example, the message is in both the project and an imported report, or is in more than one imported report, the duplicates are resolved as follows:
If a message is excluded in any input, the message is excluded in the project.
If a message is active in any input, and is not excluded in any input, the message is active in the project.
If a message is neither active nor excluded in any input, and is absent in any input, the message is absent in the project.
Import Errors
If an error occurs while importing a report because of a corrupted report file that is not a well-formed XML document, an error dialog box is displayed with a description and the line number of the error.
A report can be imported but not all messages can be mapped because of the following reasons:
A specified target or rule does not exist in the project.
A specified target or rule is disabled in the project.
If any messages are not mapped, a warning message box appears that asks whether you want additional information about the unimported messages. Click Yes and the Warning dialog box appears and displays the target that the unimported messages are associated with in a tree view. Double-click the target to display the number of messages that were not mapped, and the XML from the report file for the unmapped messages.
Setting Project Options
Use project options to enable or disable FxCop features for the current project. Use
To edit current project options
On the Project menu, select Options to display the Project Options dialog box.
- or -
Right-click the top node of the Targets or the Rules tab in the configuration pane and select Properties.
Standard Tab
The following screen shot shows the Standard tab of the Project Options dialog box.
[Needs art: Standard tab of Project Options dialog box]
Standard tab of Project Options dialog box
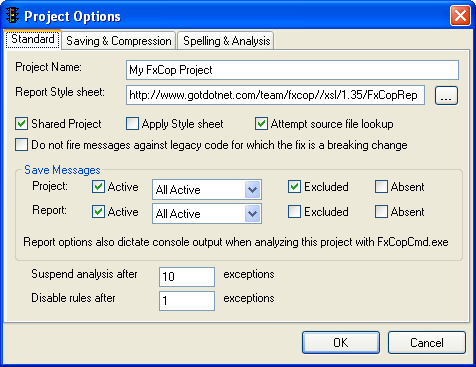
Project Name
This setting allows you to associate a name with your project. The name appears on the application window and is saved with your project settings.
Report Stylesheet and Apply Stylesheet
When a message report is saved, the style sheet URI specified by Report Stylesheet is included in the XML as an XML style sheet processing instruction. Browsers that recognize the instruction will display the XML using the style sheet. By default, the FxCopReport.xsl included with FxCop is specified. To omit the processing instruction, clear the Report Stylesheet text box. Select Apply Stylesheet to have the style sheet applied to the report and the transformed output saved.
Shared Project
This option allows an FxCop project file to be shared by multiple build environments with configurations that are identical except for drive mappings and FxCop installation directories. When this option is selected, project files store file locations using relative paths. Without this option applied, projects save file locations as absolute paths. In a shared project, all items, including assemblies, rules, and excluded messages, must reside in one of the following locations:
On the same drive as the project file.
In the directory where FxCop is installed.
In a subdirectory of the FxCop install directory.
On a UNC share.
For example, if a project is saved in 'C:\Team\Product X', the project’s items can be located in any directory on the C drive, or in or below the FxCop installation directory. You could not, for example, add assemblies from 'D:\TestSuites\Product X', because it is not on the same drive. The project file is not required to be on the same drive as the FxCop installation directory.
The Shared Project option is disabled for new projects. If you enable this option and your project contains items that are not in valid locations, you will not be able to save your project until you remove the items.
Attempt source file lookup
This option determines whether FxCop tries to look up the source code location of the offending programming element when a message is generated. For more information, see the "Viewing Message Details" section in the topic
Managing Messages. Disabling source file lookup can greatly increase performance.Save Messages
These settings allow you to specify which messages are saved in the project and in reports generated by the project. When FxCopCmd is run with the /project option, the output (console or report file) is based on the report settings in the project file. If these settings are not configured to save messages in the report, the output of FxCopCmd will not contain any messages even though messages are generated.
You can save messages with any combination of the following states:
Active - messages that were generated during the most recent analysis. You can save all active messages, or only those messages that first appeared during the most recent analysis, by choosing All Active or New Only, respectively, from the drop-down list.
Excluded - messages that have been marked as such in the current project, or in an imported report.
Absent - messages that were generated in a previous analysis, but were not generated in the most recent analysis.
Suspend analysis after and Disable rules after
These settings specify a limit on the number of exceptions encountered before a rule is disabled or analysis is canceled.
A disabled rule is excluded from the remaining analysis. The default limit is ten exceptions.
The default limit for canceling analysis is one hundred exceptions. For a discussion of the results of canceling an analysis, see
Performing an Analysis.
Project Name
This setting allows you to associate a name with your project. The name appears on the application window and is saved with your project settings.
Report Stylesheet and Apply Stylesheet
When a message report is saved, the style sheet URI specified by Report Stylesheet is included in the XML as an XML style sheet processing instruction. Browsers that recognize the instruction will display the XML using the style sheet. By default, the FxCopReport.xsl included with FxCop is specified. To omit the processing instruction, clear the Report Stylesheet text box. Select Apply Stylesheet to have the style sheet applied to the report and the transformed output saved.
Shared Project
This option allows an FxCop project file to be shared by multiple build environments with configurations that are identical except for drive mappings and FxCop installation directories. When this option is selected, project files store file locations using relative paths. Without this option applied, projects save file locations as absolute paths. In a shared project, all items, including assemblies, rules, and excluded messages, must reside in one of the following locations:
On the same drive as the project file.
In the directory where FxCop is installed.
In a subdirectory of the FxCop install directory.
On a UNC share.
For example, if a project is saved in 'C:\Team\Product X', the project’s items can be located in any directory on the C drive, or in or below the FxCop installation directory. You could not, for example, add assemblies from 'D:\TestSuites\Product X', because it is not on the same drive. The project file is not required to be on the same drive as the FxCop installation directory.
The Shared Project option is disabled for new projects. If you enable this option and your project contains items that are not in valid locations, you will not be able to save your project until you remove the items.
Attempt source file lookup
This option determines whether FxCop tries to look up the source code location of the offending programming element when a message is generated. For more information, see the "Viewing Message Details" section in the topic
These settings allow you to specify which messages are saved in the project and in reports generated by the project. When FxCopCmd is run with the /project option, the output (console or report file) is based on the report settings in the project file. If these settings are not configured to save messages in the report, the output of FxCopCmd will not contain any messages even though messages are generated.
You can save messages with any combination of the following states:
Active - messages that were generated during the most recent analysis. You can save all active messages, or only those messages that first appeared during the most recent analysis, by choosing All Active or New Only, respectively, from the drop-down list.
Excluded - messages that have been marked as such in the current project, or in an imported report.
Absent - messages that were generated in a previous analysis, but were not generated in the most recent analysis.
These settings specify a limit on the number of exceptions encountered before a rule is disabled or analysis is canceled.
A disabled rule is excluded from the remaining analysis. The default limit is ten exceptions.
The default limit for canceling analysis is one hundred exceptions. For a discussion of the results of canceling an analysis, see
Clear the text box or specify -1 to allow an unlimited number of exceptions.
For information about how to view the exceptions, see the "Viewing a Summary of Analysis Results" section in the topic Performing an Analysis.
Saving & Compression Tab
The following screen shot shows the Saving & Compression tab of the Project Options dialog box.
Saving & Compression tab of Project Options dialog box

Project Save
This setting determines whether FxCop minimizes the time it takes to save a project file (the default), or minimizes the difference between project files saved after repeated analyses. To minimize file differences, the "Minimize file differences between saves" option must be set during all the file saves. To minimize file differences, the output is saved in alphabetical order and the last analysis time is not saved.
Save Rules By
This setting determines which group of categories the rules are saved by in the project file. Consequently, this determines how they will appear the next time that the project is loaded, which might be different from their appearance in the current Rules pane. For more information, see the "Grouping Rules" section in the topic Managing Rules.
Compress Project File
This setting allows you to specify whether the project file is compressed when it is saved. To compress a project, FxCop saves information about the target and rule hierarchies only to the depth that it is necessary to reproduce the check states for existing targets and rules. For example, when all nodes under a parent node are selected or none of the child nodes are selected, FxCop saves only the parent node and the check state. When opening the compressed project, FxCop assumes the check state applies to all child nodes.
FxCop compresses project files to minimize their size; however, compressing a file makes it difficult for FxCop to detect additions to the rule libraries and targets that are loaded for analysis. By default, FxCop sets the state of new rules and targets according to the state of the closest ancestor node that exists in the project. For example, if a target assembly contains new types, and the project is set to analyze only certain namespaces in the assembly, the new types will be analyzed only if their namespaces are among those selected. Depending on your project and workflow, this behavior might not be correct. You can use the Compress Project File option to disable project file compression, and to specify whether FxCop should enable new rules and targets.
Spelling & Analysis Tab
The following screen shot shows the Spelling & Analysis tab of the Project Options dialog box.
Spelling & Analysis tab of Project Options dialog box
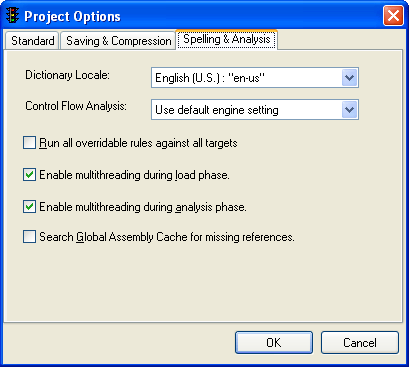
Dictionary Locale
This setting determines the language that is used for the spelling rules. The Microsoft Office Proofing Tools spelling checker for the specified language must be installed. This setting overrides the setting in Spelling Options.
Control Flow Analysis
To enable control flow analysis, select True from the drop-down dialog box; select False to disable it. When Use default engine setting is selected, control flow analysis depends on the Enable Control Flow Analysis setting, which is true by default.
Run all overridable rules against all targets
Most FxCop rules check only targets (programming elements) that are externally visible, that is, a target that can be accessed outside its containing assembly. In C#, this refers to types and members that have public, protected, or protected internal accessibility. However, many rules that typically check only externally visible targets allow this behavior to be overridden. When this setting is enabled, these rules check targets of all visibilities.
Setting Preferences and Project Defaults
Application settings control FxCop's appearance and behavior, and the default options for new projects.
To edit application settings
On the Tools menu, select Settings to display the Settings dialog box.
Settings are divided into four categories, which appear on the tabs in the Settings dialog box:
Preferences
Fonts & Colors
Analysis Engines
Project Defaults
Preferences Tab
The following screen shot shows the Preferences tab of the Settings dialog box.
Preferences tab of the Settings dialog box
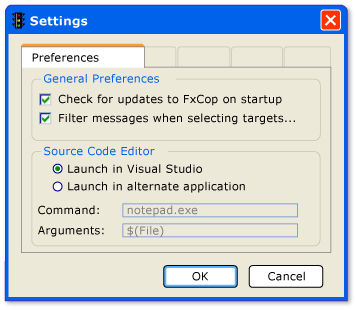
Check for updates to FxCop on startup
When this option is enabled, on startup, FxCop queries its Web site for an updated version. The result of the query is output to the Properties pane. No information other than the version number is transmitted and no files are downloaded.
Filtering messages when you select targets or rules
This setting enables or disables message filtering. For more information, see the "Filtering Messages" section in the topic
Source Code Editor
If Program Database (PDB) information is available for an analyzed assembly, FxCop can locate and open the source code used to build the assembly. This feature is accessed from the Source hyperlink on the Message Details dialog box that is described in the "Viewing Message Details" section of the topic Managing FxCop Projects or from the Properties tab of the properties pane when the message is selected.
By default, FxCop tries to open the source code file by using Microsoft Visual Studio .NET. To use a different code editor, select the Launch in an alternative application option. The Command and Arguments text boxes are pre-filled to use Microsoft Notepad. Specify a different editor program using the Command box. You can use environment variables when you specify this setting. In the Arguments box, specify any arguments to be passed to the program specified in Command. The argument setting can refer to the file to be opened as $(File), and the line number to locate as $(Line).
Fonts & Colors Tab
Use this tab to customize the fonts and colors displayed in the configuration, messages, and properties panes.
To change the font that is used in the configuration pane, click Tree in the Font section. To change the font that is used in the messages pane, click List in the Font section. To change the font that is used in the properties pane, click Output in the Font section. All options display a standard Font dialog box you can use to format the font in the corresponding pane.
In addition to setting the font that is used for report messages, you can also assign a color to each message level. To change the default color that is used for a message level, select the message level from the drop-down list and then click the MessageLevel. Use the Color dialog box that appears to choose the color for the selected message level.
Analysis Engines Tab
The following screen shot shows the Analysis Engines tab of the Settings dialog box and the Introspection Engine Settings dialog box, which is displayed when you click Settings.
Analysis Engines tab of the Settings dialog box
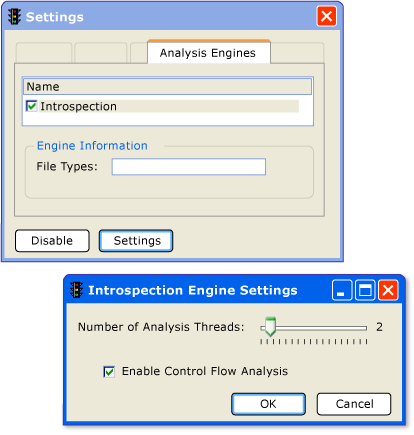
The current version of FxCop uses only one engine, the Introspection engine. If this check box is clear, analysis will not occur.
Select the name Introspection to enable Engine Information and the Settings button. Engine Information provides a brief description of the engine, and lists the types of files the engine can load.
The Settings button displays the Introspection Engine Settings dialog box, which contains the following two settings:
Number of Analysis Threads
By default, the Number of Analysis Threads is set to the number of processors on the analyzing computer. To remove any possibility of a deadlock, which would prevent analysis from completing, set the number of threads to 1; however, this will generally increase analysis time.
Enable Control Flow Analysis
Control flow analysis is an analysis technique that can construct all possible code paths and all possible object manipulations. An example of this technique would be following a string through a method flow graph. This type of analysis is capable of looking at a different set of problems than static analysis techniques but slows down analysis time considerably.
Disabling this option prevents several default FxCop rules from running. When an analysis is performed with this option disabled, a message is displayed in the Output tab of the properties pane. The message is not erased if this option is subsequently enabled and another analysis is performed.
Project Defaults Tab
Use this tab to choose default settings for new projects. The following screen shot shows the Project Defaults tab of the Settings dialog box.
Project Defaults tab of the Settings dialog box
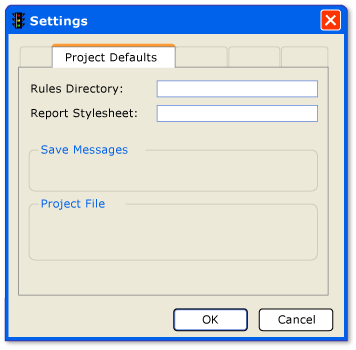
Rules Directory
All rule libraries in this directory are included in a new project. You can use environment variables when specifying this setting.
The following settings are identical to those in the
Rules Directory
All rule libraries in this directory are included in a new project. You can use environment variables when specifying this setting.
The following settings are identical to those in the
Report Stylesheet
Shared Project
Apply Stylesheet
Attempt source file lookup
Do not fire messages against legacy code for which the fix is a breaking change
Save Messages
Compress project file
Suspend analysis after
Disable rules after