Rules, which are contained in rule libraries, determine the issues FxCop looks for during an analysis. FxCop includes a default set of rule libraries. Each rule is assigned a level that indicates the importance of the issue detected by the rule, and a certainty that estimates the probability of an issue being detected correctly.
 In This Section
Ignoring Rules During Analysis
Removing Rule Libraries from a Project
Specifying a Location for a Rule Assembly using Environment Variables
 Default Rule Libraries
FxCop includes the following rule libraries, based on the .NET Framework Design Guidelines that are loaded by default when a new project is created:
COM – rules that detect COM Interop issues.
Design – rules that detect potential design flaws. These coding errors typically do not affect the execution of your code.
Globalization – rules that detect missing or incorrect usage of information related to globalization and localization.
Naming – rules that detect incorrect casing, cross language keyword collisions, and other issues related to the names of types, members, parameters, namespaces, and assemblies.
Performance – rules that detect elements in your assemblies that will degrade performance.
Security – rules that detect programming elements that leave your assemblies vulnerable to malicious users or code.
Usage - rules that detect potential flaws in your assemblies that can affect code execution.
You can view the currently loaded rule libraries from the Rules tab in the configuration pane. Double-click the library name to see the rules contained in a library. Double-click the rule name to display the Rule Details dialog box, which displays the rule's detailed information.
 Adding Rules to a Project
To set the scope of an analysis, one or more rule libraries must be included in a project. For new projects, all rule libraries located in the Rules Directory specified in the New Project Defaults tab (described in the
To drag a rule library into the current project
Click the Rules tab in the configuration pane.
In a file viewer, such as Windows Explorer, drag the file or files to be added into the configuration pane.
To add a rule library to the current project
On the Project menu, select Add Rules.
Locate the rule library to add.
Click Open.
FxCop adds the library to the current project.
 Grouping Rules
Rules can be grouped by file name, message level, or breaking change. This allows messages to be filtered by these groupings, and the rules in a specific group to be enabled or disabled as a unit. By default, rules are grouped by the file name of the assembly that contains the rule. "Breaking change" means that an assembly that has a dependency on one version of a library will no longer work with a new version of the library that has been changed to fix a violation of the rule.
To change how rules are grouped
Right-click a rule or group in the Rules pane.
Select Group By.
Choose one of the groups from the menu.
 Ignoring Rules During Analysis
You can ignore a rule or an entire rule library during analysis. Ignored items remain in the configuration pane but are not used for further analysis of your code.
To exclude a rule or rule library from analysis
Click the Rules tab.
If you want to ignore a rule, expand the library that contains that rule.
Clear the check box next to the rule or rule library to be ignored.
To include an ignored rule or rule library, select the check box next to it.
 Note Note |
|---|
Any changes that you made to the rules are not retained in the project file until you save the project. |
For information about how to remove rule libraries from a project, see
 Removing Rule Libraries from a Project
When you remove a rule library from the current project, it no longer appears in the configuration pane and must be added to the project again before its rules can be included in an analysis. If a rule library is removed, all messages generated by its contained rules are also removed from the project.
To remove a rule library from the current project
Click the Rules tab.
Select the rule library to be removed.
On the Edit menu, choose Remove File.
You can also select the rule library to be removed and press ENTER, or right-click the rule library and choose Remove.
 Note Note |
|---|
Any changes that you made to the rule libraries are not retained in the project file until you save the project. |
For information about how to temporarily ignore rule libraries during analysis, see
 Viewing Rule Details
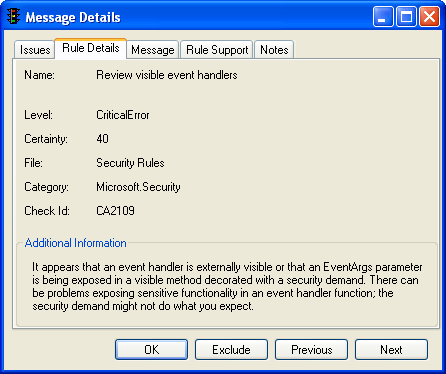
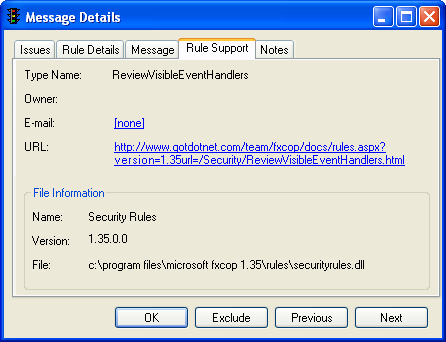
You can access the currently loaded rule libraries from the Rules tab of the configuration pane. To see the rules contained in a rule library, double-click the rule library name. To see detailed information about a rule, double-click the rule. Alternatively, you can right-click the rule and select Properties on the shortcut menu. The following screen shots show an example of the Rule Details dialog box.
Rule Details tab of the Rule Details dialog box

Support tab of the Rule Details dialog box

The following table describes the information stored in a rule and displayed in the Rule Details dialog box.
Rule element | Description |
|---|---|
Rule Details tab |
|
Name | The rule's friendly name; typically, a single sentence that describes the rule. |
Level | The level of importance associated with the rule. (The severity of the problem reported by the rule. For a discussion of the levels, see |
Certainty
The confidence associated with the rule.
File
The name of the library that contains the rule.
Category
The category of the rule.
CheckId
The unique identifier for the rule.
Description
A short description that details the issues and possible causes of errors identified by the rule.
Support tab
Type Name
A unique identifier for the rule.
Group Owner
The organization that authored the rule.
Owner
The individual responsible for the rule.
The e-mail address for support and bug reports related to the rule.
URL
A link to more in-depth information pertaining to the rule.
File Name
The name of the library that contains the rule.
File Version
The version of the library that contains the rule.
File Path
The full path and name of the library that contains the rule.
Not visible
Resolution
Instructions and information about how to fix the issues that are identified by the rule. This information is stored in a rule but exposed through the Message Details dialog box. For more information, see the Viewing Message Details section of the Managing FxCop Projects topic.
Level and Certainty
Each rule is assigned a level that indicates the importance of the issue detected by the rule and a certainty that estimates the probability of an issue being detected correctly.
Three major factors determine the level assigned to a rule:
The visibility of the detected issue.
The probability that the detected issue will adversely affect application behavior.
The risk associated with not fixing the issue.
Rules are assigned one of five importance levels:
Critical ErrorMessages at this level reflect issues that are highly visible, that prevent code from operating correctly in common scenarios, or both. Critical error messages should be resolved first, and should be excluded only after carefully assessing the affect of ignoring the error.
ErrorIssues reported at this level have less affect on usability and behavior than critical errors, but should not be excluded without careful assessment.
Critical WarningMessages at this level reflect issues that generally have little or no adverse effect on code behavior; they are primarily concerned with code maintainability, and correcting less-than-optimal choices for visible elements. However, for a minority of cases, these messages are considered errors. Therefore, they should be reviewed closely before they are excluded.
WarningIssues reported at this level are generally concerned with doing things correctly to keep your code base stable, extensible, and maintainable.
InformationalMessages at this level are returned by rules that report information about a target, as opposed to detecting errors in a target.
The Level Name column in the messages pane indicates the level of the rule that generated the message. The Level column provides an iconic view of the same information.
Certainty estimates the probability of an issue being detected correctly. Certainty is affected by the issue-detection algorithm of a rule and by issue-specific considerations, which cannot be checked using static code analysis. Certainty is expressed as a percentage. A high value indicates confidence that the rule is detecting a real issue. If the certainty factor of a rule is low, because it will be for rules where there is a high expectation of false positives, the message certainty value reflects this.
It is unwise to automatically ignore messages based on level or certainty. You should review all messages to determine whether a message is reporting an actual issue, and then assess the risks involved in ignoring the error.
 Specifying a Location for a Rule Assembly using Environment Variables
You can specify the location a rule assembly is subsequently loaded from using a path that includes environment variables. FxCop reads environment variables when the application is started. Any changes to environment variables are ignored until FxCop is restarted. Rules must be grouped by file name for this option to be available.
To specify the location using environment variables
In the configuration pane, click the Rules tab.
Right-click the rule assembly and select Properties.
Type the location in the Save Name box.
 Note Note |
|---|
Using environment variables for the location of an assembly can cause the assembly failing to load if the environment variables are not initialized. This might require manually editing the project file to correct. As an alternative to environment variables, consider using a Shared Project, which can be found in the "Shared Project" section of the topic |
