Install Prerequisites and Team Foundation Server
From Visual Studio Team Foundation Server 2012
This second topic in the Single-Server Installation tutorial teaches you how to install and configure the prerequisites required by Team Foundation Server, as well as how to install Team Foundation Server in a single-server configuration that uses SharePoint Foundation 2010 and SQL Server Reporting Services.
The examples in this tutorial topic follow Jill Frank, an IT Administrator at the fictitious Fabrikam Fiber company, as she installs and deploys Team Foundation Server in a single-server configuration in order to support her software development teams.
Installing Team Foundation Server and its prerequisites is easier than you might think. While all software installation requires some time and patience, you can follow the steps below to streamline the process and install a new single-server deployment of Team Foundation Server, complete with reporting provided by SQL Server Reporting Services and team project portals hosted on SharePoint Foundation 2010.
There are many different ways you can install and configure Team Foundation Server. This tutorial shows you how to install a new server using all new installations of the prerequisites, but you can choose to use existing installations of the prerequisites, or to install Team Foundation Server in a different configuration. For more information, see Installing Team Foundation Server. |
In the example deployment, Jill reviewed the system requirements and various configuration types for Team Foundation Server by reading the installation guide. She discussed the projected number of users and projects with the project managers, and the features those managers were most interested in. After reviewing the choices and the requirements, Jill decided that the best configuration for her software development teams and the business requirements of the project managers was to install Team Foundation Server on a single server using the Standard Wizard. The Standard Wizard configuration is relatively simple, and uses the Network Service account as the service account for Team Foundation Server. The wizard also installs SharePoint Foundation 2010, which requires a separate service account. In the previous topic in this tutorial, Prepare for Installation, Jill created an Active Directory account specifically for this purpose.
Before Jill can install Team Foundation Server, she must first install and configure the prerequisites on her server, which is running the 64-bit edition of the Windows Server 2008 R2 operating system with Service Pack 1 installed, is equipped with a dual-core processor and 10 GB of RAM, and has 300 GB of free disk space. In order to meet the prerequisites for Team Foundation Server, she must install a supported version of SQL Server to support both Team Foundation Server and SharePoint Foundation 2010. She chooses to install SQL Server 2008 R2, Standard Edition.
In this topic
Required permissions
To perform the procedures in this topic, you must be a member of the Administrators security group on the server where you want to install the software.
To install SQL Server 2008 R2 to support Team Foundation Server
Launch the SQL Server Installation Center.
On the SQL Server Installation Center page, choose Installation, and then choose New installation or add features to an existing installation.
On the Setup Support Rules page, verify that all rules have passed, and then choose OK.
On the Product Key page, provide your product key or choose a free edition, and then choose Next.
 Tip
TipIf you choose an evaluation edition and do not update it before the evaluation expires, your deployment of Team Foundation Server will become unusable.
On the License Terms page, review the license agreement. If you accept the terms, select I accept the license terms. Optionally select the check box to send usage data to Microsoft, and then choose Next.
On the Setup Support Files page, choose Install.
On the Setup Support Rules page, review the setup information. Correct any failure conditions, and then choose Next.
On the Setup Role page, choose SQL Server Feature Installation, and then choose Next.
On the Feature Selection page, select the following check boxes, and then choose Next:
Database Engine Services
Full-Text Search
Analysis Services
Reporting Services
Client Tools Connectivity
Management Tools - Basic
Management Tools - Complete
 Tip
TipWhile the management tools are not technically required for Team Foundation Server, they're required for creating the backup scripts you'll need to back up your deployment in this release, and they make the management of your deployment much simpler.
On the Installation Rules page, address any failures or warnings, and then choose Next.
On the Instance Configuration page, choose Default instance, and then choose Next.
On the Disk Space Requirements page, review the information to make sure you have sufficient disk space, and then choose Next.
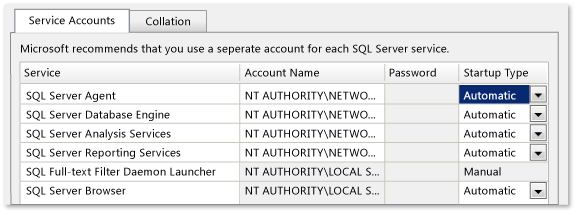
On the Server Configuration page, choose Use the same account for all SQL Server services. In the Use the same account for all SQL Server 2008 R2 services window, choose or specify NT AUTHORITY\NETWORK SERVICE, and then choose OK.
In the Startup Type column, specify Automatic for all services that you can edit, and then choose Next.
On the Database Engine Services page, on the Account Provisioning tab, choose Windows authentication mode and then choose Add Current User to add your account as an administrator for this instance of SQL Server. Optionally, add any other user accounts for users you want to act as database administrators, and then choose Next.
On the Analysis Services Configuration page, on the Account Provisioning tab, choose Add Current User to add your account as an administrator for the analysis services database. Optionally, add any other user accounts for users you want to act as administrators, and then choose Next.
On the Reporting Services Configuration page, choose Install the native mode default configuration, and then choose Next.
On the Error Reporting page, choose whether to send information about errors to Microsoft, and then choose Next.
On the Installation Rules page, review any failures or warnings, and then choose Next.
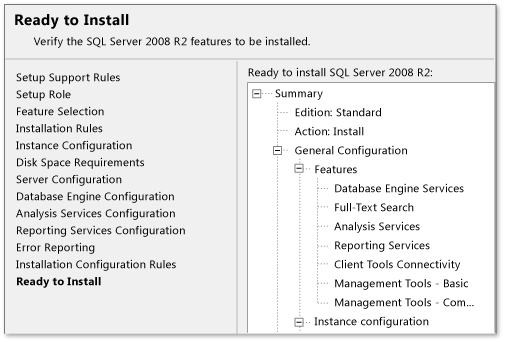
On the Ready to Install page, review the list of components to be installed, and if they match the list of features shown in the illustration below, then choose Install. If you need to make any changes, choose Back.
On the Installation Progress page, optionally monitor the installation progress of each component. When all components have finished installing, the Complete page appears.
On the Complete page, choose Close.
After you finish the installation, visit Microsoft Update to apply any needed service packs or updates that have been released for your product. You must install SP1 in order to meet the basic requirements for Team Foundation Server.
 Installing Team Foundation Server on your server
Once you've finished installing the prerequisites, you're ready to install Team Foundation Server itself. In the example deployment, Jill has decided to install Team Foundation Server using the Standard Wizard.
To install Team Foundation Server using the Standard Wizard
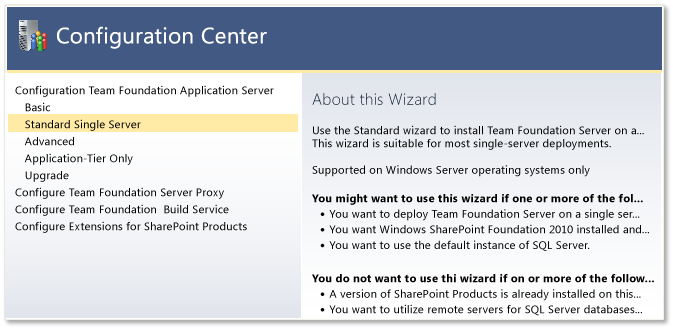
Launch the installation media. In Team Foundation Server Configuration Center, choose Standard Single Server, and then choose Start Wizard.
The Team Foundation Server Standard Configuration wizard appears.
On the Welcome page, choose Next.
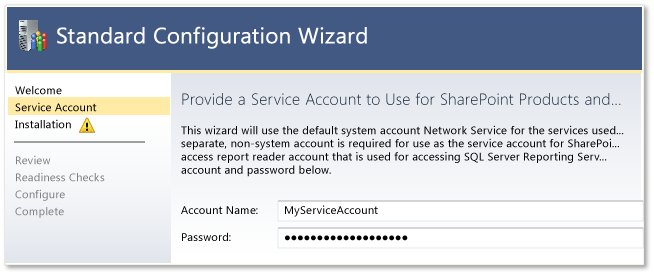
On the Service Account page, in User Account, specify the name of the service account that you want to use for SharePoint Foundation 2010 and as the data source report reader account in SQL Server Reporting services.
In Password, specify the password for this service account.
Optionally choose Test to test if the service account is a valid account. This step is not required, but is recommended. When you have finished providing all the information for the account, choose Next.
On the Installation page, review the information and any warnings, and then choose Install SharePoint Foundation 2010.
After Team Foundation Server completes the installation of SharePoint Foundation 2010, a success message appears. Choose Next.
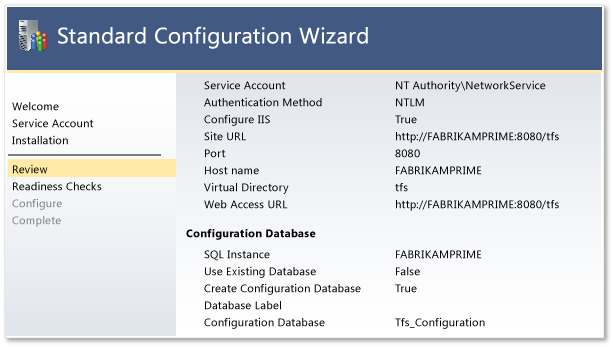
On the Review page, review the information for the installation of Team Foundation Server. If any changes are needed, choose Previous, and make your changes. Once all the information is correct, choose Next.
On the Readiness Checks page, the wizard will verify that all components are ready for installation. If any of the readiness checks fail or provide warnings, review the information and make any adjustments as necessary.
TipWhile a failed readiness check will prevent you from installing the software until the issue is addressed, a warning will not prevent you from proceeding with the installation.
When you are satisfied with the readiness checks, choose Configure.
On the Configuration Progress page, optionally monitor the progress of the installation. When the installation completes, choose Next.
Choose Close to close the Standard Configuration Wizard.
Choose Close to close the Configuration Center.
The Team Foundation Server Administration Console opens. Review the information for your newly configured server.
While Team Explorer is not necessary for most administration tasks, it does have some administrative features, and it is the only way to create the team projects your software development teams will need. Installing it on the server is a convenient way to ensure that you can create projects whenever necessary, without having to go to another computer.
To install Team Explorer
Browse the installation media for Team Foundation Server, and open the Team Explorer folder.
Find the vs_TeamExplorer application, and run it.
The Visual Studio Team Explorer installation window opens.
Select I agree to the License terms and conditions, and then choose Install.
You are ready to start creating your first team projects!
Home |