Configure Team Foundation Server to Support Your Development Teams
From Visual Studio Team Foundation Server 2012
This third part of the Single-Server Installation tutorial teaches you how to create team projects using one of the process templates included with Team Foundation Server. You'll also learn how to add Active Directory users and groups to appropriate groups in Team Foundation Server, SharePoint Foundation 2010, and SQL Server Reporting Services, including how to modify permissions for those security groups, if needed.
The examples in this tutorial topic follow Jill Frank, an IT Administrator at the fictitious Fabrikam Fiber company, as she installs and deploys Team Foundation Server in a single-server configuration in order to support her software development teams.
Installing the software is only part of an administrator's job. Another equally critical part of managing a deployment is making sure that the users in the deployment have appropriate access to the resources in that deployment. You can use the groups you created earlier in this tutorial to help minimize the amount of overhead required to manage your users, and also help ensure that your users have the appropriate level of access to the features and projects in Team Foundation Server.
In this topic
Required Permissions
To perform the procedures in this tutorial, you must be a member of the following groups:
The Administrators security group on the server on which you intend to install Team Foundation Server
The Team Foundation Administrators group in Team Foundation Server
The SQL Server System Administrator security group in SQL Server
The Farm Administrators group in SharePoint Foundation 2010
If you are using and configuring Active Directory group membership, you must be a member of Account Operators, Domain Admins, or Enterprise Admins, or have the equivalent permissions in Active Directory Domain Services.
 Creating and configuring team projects
A team project is the fundamental unit in Team Foundation Server. Each team project that is hosted within a team project collection is a separate unit with its own separate groups, permissions, and work items. You can use the project to store your source code, file bugs, feature requests, and other work items, and coordinate work across teams, schedules, and functional areas. However, the work item types available to each project will depend on the process template you choose when you create a team project. For this release, Team Foundation Server includes three process templates: MSF for Agile Software Development, MSF for CMMI Process Improvement, and Microsoft Visual Studio Scrum.
In this example deployment, Jill has discussed the process template requirements with the project managers, and learned that the three project managers all want to use the Scrum process in their projects. She creates the project using that process template, and additionally chooses to create a source control repository for all three projects. She knows that because she has installed and configured SharePoint Foundation 2010 and SQL Server Reporting Services as part of her deployment, the projects will have team project portals created for them in SharePoint Foundation 2010, and reports will be automatically available for the projects. However, she also knows that she will have to configure user permissions in all three software programs.
To create a team project
Open Team Explorer and connect to the default collection.
 Tip
TipIf you're running Team Explorer on Windows Server 2008 or Windows 7, you'll need to start Team Explorer by choosing the option to Run as administrator.
In the example deployment, on the Team menu, Jill chooses Team, and then chooses Connect to Team Foundation Server. Because Jill has never connected to the server before, the list of servers is blank. She chooses Servers, and in the Add/Remove Team Foundation Server dialog, she chooses Add. In Add Team Foundation Server, she types the name of the server, which is FabrikamPrime. She leaves the rest of the connection details set to the default settings, because that is what her deployment uses, and chooses OK. She makes sure that the server name appears in Add/Remove Team Foundation Server, and chooses Close to close that dialog. In Servers, she makes sure that FabrikamPrime appears in the Select a Team Foundation Server drop-down box, and that DefaultCollection appears in Team Project Collections, and then chooses Connect. The next time she opens Team Explorer, it will automatically connect to this server and collection.
In the Team Explorer sidebar, choose Home, choose Projects and My Teams, and then choose New Team Project.
The Create Team Project wizard opens.
On the Specify the Team Project Settings page, in What is the name of the team project text box, specify a name for the project that will easily identify it to the users who will work in that project. Optionally, provide a description of the project, and then choose Next.
TipThere are some restrictions on project names, such as character limits and restricted characters. For more information, see Restrictions for Project Names.
On the Select a Process Template page, choose a process template to use from the drop-down list, and then choose Next.
In this example deployment, Jill chooses Microsoft Visual Studio Scrum.
On the Team Site Settings page, make sure that Create a new SharePoint Site is specified, and then choose Next.
TipIf you didn't choose to install SharePoint Products as part of your deployment, you won't have this option.
On the Specify Source Control Settings page, make sure that the Create an empty source control folder is specified, and then choose Next.
On the Confirm Team Project Settings page, review your choices, and then choose Finish.
It might take a few minutes for the wizard to complete creating the project.
Jill repeats this process three times, creating the following projects:
Phone Saver
Fuel Tracker 2
Fabrikam Fiber Internal Tools
After she creates these projects, she then adds the groups she created to Team Foundation Server, SQL Server Reporting Services, and SharePoint Foundation 2010. In the procedures below, Jill adds the group "TFS_ProjectContributors"-which resolves to the friendly name Fabrikam Developers and Testers-at the appropriate permissions level for users who will contribute fully to the project. For more information about the various contribution levels, see
To add a group to the Contributors group in a team project
In Team Explorer, open the team project to which you want to add users, and then choose Settings.
The Settings menu appears.
In the Settings menu, in Team Project, choose Group Membership.
Team Web Access opens in the administration context for the team project, on the security tab.
On the groups tab, choose Contributors, and on the members tab, choose Add, and then choose Add user.
The ADD A WINDOWS USER OR GROUP window opens.
In Identities, specify the name of the group you want to add. In the example deployment, Jill created a group, called Fabrikam Developers and Testers, for the developers and testers who would work on all team projects in the collection. She types that name into the box and presses Enter.
 Tip
TipThe first time you add a user or group to Team Foundation Server, you cannot browse to it or check the name. After the identity has been added anywhere in Team Foundation Server, you will be able to use those functions to quickly find the name.
When you have finished adding the groups or users you want to add, choose Save Changes.
To add a group as Contributors to the team project site in SharePoint Foundation 2010
In Team Explorer, on the Team menu, choose Show Project Portal.
The portal for the team project opens in a separate window.
Choose Site Actions, and then choose Site Permissions.
The browser window changes to Permissions Tools.
Choose Grant Permissions.
The Grant Permissions window opens.
In Users/Groups, specify the name of the group that you want to add. In Grant Permissions, choose Grant users permission directly, select the Contribute check box, and then choose OK.

Unlike Team Foundation Server and SharePoint Foundation 2010, SQL Server Reporting Services does not distinguish between projects. Therefore, if you add a group to Reporting Services, that group will have the same permissions for reports across all the projects in the collection, regardless of their permissions in individual projects. Keep this in mind when choosing what groups to add.
To add a group to SQL Server Reporting Services
Open Internet Explorer or another browser compatible with Reporting Services administration.
Type the following into the address bar, where ReportServer represents the name of the server that is running SQL Server Reporting Services:
http://ReportServer/Reports/Pages/Folder.aspx
For example, Jill types: http://FabrikamPrime/Reports/Pages/Folder.aspx into the address bar.
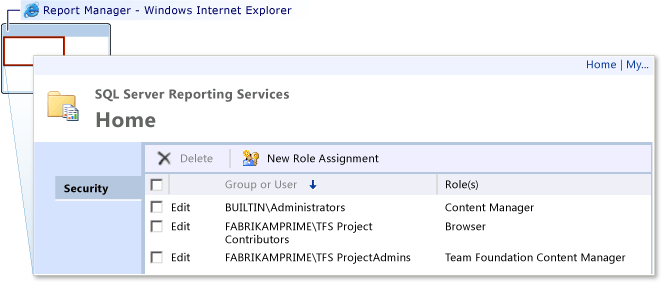
On the Home page, choose Folder Settings.
On the Security page, choose New Role Assignment.
On the New Role Assignment page, in Group or use name, specify the name of the group you want to add. Select the Browser check box, and then choose OK.
Restricting access to projects in the deployment
Sometimes you don't want all users in your deployment to have visibility into all projects in that deployment. By default, users who have permissions to access one project within a collection can view other projects within that collection, even if they don't have permissions to modify work items or perform other actions in that project. If you want to restrict a particular group to just one project in the collection, you must take extra steps.
In Team Foundation Server, permissions explicitly set to Deny generally take precedence over permissions set to Allow, whether through inherited allow or through explicitly setting the permission to allow. There are exceptions to this, but they generally don't apply to user groups (and you can read more about these exceptions in
To restrict a group from viewing a project
Open Team Web Access, change views to the administration context for the project, and choose the security tab.
On the groups tab, choose Create TFS Group.
The CREATE NEW TEAM FOUNDATION SERVER GROUP window opens.
In Group Name, specify a name for this group. In the example deployment, Jill names this group "Restricted". Optionally, type a description for this group, and then choose OK.
The group you just created appears in the list of TFS Groups. Make sure that it is highlighted in the list, and then choose the members tab.
Choose Add user.
The ADD A WINDOWS USER OR GROUP window opens.
In Identities, specify the name of the group you want to add. In the example deployment, Jill created a group for the contract employees who are only working on one project in the collection. She types that name into the box and presses Enter.
When you have finished adding the groups or users you want to add, choose Save Changes.
Choose the permissions tab. In the permissions list, toggle the value of View project-level permission to deny, and then choose Save Changes.
Configuring access to features in Team Web Access
Not all features of Team Web Access are available to your users by default. Access to Team Web Access features is controlled through the administration mode of Team Web Access. Default access level is set for the entire deployment, not for individual team project collections or groups. To configure access levels for specific users of collections, team projects, or teams, you must manually add those users or groups to one of the three access groups in Team Web Access. If you want your users to have access to all the features available, or if you want to restrict some users from accessing the default features available, you'll need to configure that access. You'll also want to make sure that you have the appropriate licensing in place to use those features. For more information, see the
To view or change the default feature access group of Team Foundation Server
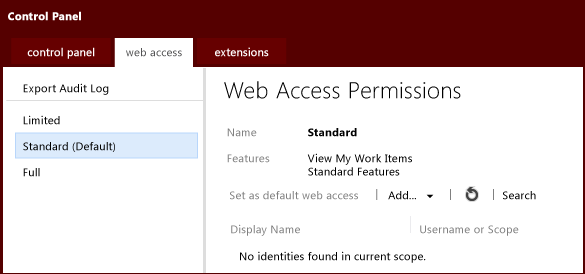
Open Team Web Access in administration mode, and choose Control Panel to navigate to the top-level administration context.
Choose the web access tab.
In Web Access Permissions, choose the name of the access group for which you want to view information. Review the following:
The list of features available for this group.
Whether the group is set as the default for the deployment. If it is, the group name will be followed by (Default). This is the group that all users of your deployment of Team Foundation Server will be assigned to by default.
Whether any users or groups are specifically assigned to this group. Unless you specifically configure users or groups to use this group, you will not see a list of identities assigned to this group.
To choose a different group to act as the default, choose that group in the explorer pane, and in Web Access Permissions for that group, choose Set as default web access.
If the group is already set as the default, this option will be unavailable.
For more information about what features are available for each access group, managing users in access groups, and auditing access, see Change access levels.
Home | Prepare for Installation | Install Prerequisites and Team Foundation Server | Configure Team Foundation Server to Support Your Development Teams | Create Back Up Schedule and Plan