Image Display
From NI IMAQ
Image Display
Many image acquisition applications require that one or more images be displayed. You have three options for displaying images in LabVIEW.
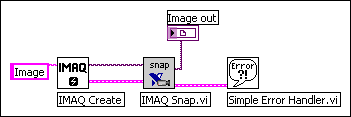
If you have LabVIEW 7.0 or later, you display an image directly on the front panel using the Image Display control, which is available on the Vision Controls palette. To display an image on the Image Display control, place the image control on the front panel of your VI. On the block diagram, wire the Image Out from an acquisition VI to the Image Display control terminal. The following diagram illustrates using an Image Display control to display an image. To view examples using the Image Display control in LabVIEW 7.0 and later, select Help»Find Examples.
If you have NI Vision 7 for LabVIEW, the image processing and analysis software for LabVIEW, you can display an image in an external window using the External Display VIs on the External Display palette. IMAQ WindDraw, located at Vision Utilities»Display, displays an image in a separate image window. The following figure illustrates using IMAQ WindDraw to display an image acquired using IMAQ Snap. You can display images in the same way using any acquisition type. Refer to the NI Vision Concepts Manual for more information about the display capabilities of NI Vision.

If you do not have either LabVIEW 7.0 or later or NI Vision, you can display an image with a LabVIEW picture control.
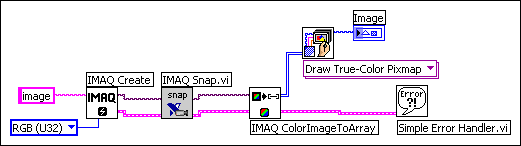
To display an image on a picture control, place the picture control on the front panel of the VI. Use either the IMAQ ImageToArray VI or the IMAQ ColorImageToArray VI to copy an image from an image buffer into a LabVIEW array. You can wire this array to the Draw True-Color Pixmap VI. Wire the new image output from Draw True-Color Pixmap to the picture control indicator. Refer to the LabVIEW VI, Function, & How To Help for more information about the picture control. The following figure illustrates using a picture control to display an RGB image acquired with IMAQ Snap.